• my photo

    Click photo for About Me

  • Enter your email address to subscribe to this blog and receive notifications of new posts by email.

    Join 1,198 other subscribers
  • Pinterest

    Follow Me on Pinterest
  • Amazing Deals

    Click image for Amazing Deals!

  • Share this blog

    Bookmark and Share
  • Archives

  • Categories

  • Recent Posts

  • Blog Stats

    • 417,600 hits
  • Meta

  • Disclaimer

    All content found at Stampin' by Genny is the sole responsibility of Genevieve Valdes, a Stampin’ Up! Independent Demonstrator. Stampin’ Up! does not endorse, edit, or otherwise contribute to this website.

Everybunny Easter Treat

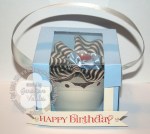
I’m so excited that spring is almost here!  In anticipation  I created this adorable pillow box and card  for Hand Stamped Sentiments challenge.  A perfect treat to put in an Easter basket or to give just as is.  The challenge this week is a color challenge.  Create any paper crafting project with the colors of Real Red, Soft Suede, Crumb Cake and Daffodil Delight.

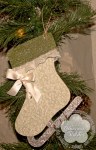
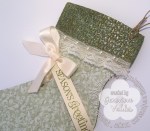
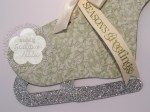
I used the new Easter stamp set, Everybunny, featured in the 2011-2012 Idea Book & Catalog.  This set has so many cute stamps perfect for Easter.  I made the box using the Pillow Box die.  I stamped the hot air balloon image on Crumb Cake with Soft Suede and Versamark then heat embossed it with clear embossing powder.  I used a blender pen to add color to the bunny and the balloon.  I then cut out the image and for a finishing touch I used Dazzling Details on the balloon.  I punched the flowers with the Itty Bitty Shapes Punch Pack then embellished with rhinestones.  I stamped the sentiment on Daffodil Delight and tied hemp twine around the box.  The 3″ x 3″ card was so easy to make.  I embossed the Daffodil Delight layer with the Perfect Polka Dots embossing folder.  The chick image I stamped then clear embossed and punched with the 1-3/8″ circle.  The flower layer is punched with the Fancy Flower punch.

Everybunny pillow box and card

click image to enlarge

I hope you’re inspired to join us over at Hand Stamped Sentiments.  We’d love to see your creation.

HSS color challenge - Real Red, Soft Suede, Crumb Cake, Daffodil Delight

click image to enlarge

All Stampin’ Up! supplies below may be ordered from my website or email me to place your order.

All products are Stampin’ Up! unless noted.

Everybunny Pillow Box and Card

Box Size:   3.75″ w x 2.25″ h

Card Size:  3″ x 3″

Stamp sets: Everybunny

Paper: Card Stock:  Crumb Cake, Soft Suede, Real Red, Daffodil Delight

Ink: Real Red, Soft Suede

Accessories: Pillow Box Die, Itty Bitty Shapes Punch Pack, 1-3/8 circle punch, Fancy Flower punch, Corner Rounder punch, Perfect Polka Dots embossing folder, Hemp Twine, Dazzling Details, Basic Rhinestones

Sea of Love Valentine Card

How these days in January make me long for the beach.  I guess I shouldn’t complain since the weather here has been sunny and in the 70’s but I just can’t help thinking of long summer days at the beach.  This week at Hand Stamped Sentiments we have a beach theme but I still have Valentine’s day on the brain.  So when I began to think of what to create for this challenge I thought of the sea…love…Eureka!!…The Sea of Love!  So here’s my interpretation of this week’s beach theme challenge.

Sea of Love Fish Punch Art Valentine Card

click image to enlarge

I used the Lots of Love Letterpress plate for the background.  I inked it up with Versamark then ran it through the Big Shot and to add sparkle I heat embossed with Iridescent Ice embossing powder.  The sentiment is stamped in Indigo Blue and also heat embossed with Iridescent Ice embossing powder.

Punch Art Fish Valentine Card

click image to enlarge

I hope you can see how the Sea of Love  shimmers with the Iridescent Ice.  The fish are made with various Stampin’ Up! heart punches.  I couldn’t resist the wiggle eyes.  The sand is Crumb Cake card stock sponged with Soft Suede ink.  This card would be perfect to give to your hubby or wife.  Either way love is in the air or rather the sea.

I hope you’re inspired to join us this week with your beach themed creation.  Hop on over to HSS for more inspiration from our very talented design team.

Sea of Love Valentine Card

Size:  4.25″ h x 5.50″ w

Stamp sets:  Short and Sweet

Paper: Card base:  Island Indigo, Card stock:  Pool Party, Riding Hood Red, Blushing Bride, Lucky Limeade, Crumb Cake

Ink: Island Indigo,  Soft Suede, Versamark

Accessories: Big Shot, Lots of Love Letterpress Plate, Full Heart Punch, Heart to Heart Punch, Scallop Edge Border Punch, Iridescent Ice Embossing Powder, non-Stampin’ Up! branch punch, non-Stampin’ Up! wiggle eyes

HSS Inspiration Challenge

This week on HSS we have an Inspiration Challenge.  Cupcakes!  I’ve been wanting to make this cupcake box and this was the perfect time to do it.  I have a couple of gifts to make so these were perfect.  I got the tutorial for the box from Becky Roberts.

The actual cupcake box is made with the retired Table Setting die.  The instructions for making the box can be found on Patty Bennett’s blog.  So much fun to make!

Hop on over to HSS and be inspired by our talented design team and join us!

All Stampin’ Up! supplies below may be ordered from my website or email me to place your order.

All products are Stampin’ Up! unless noted.

Cupcake box

Box Size:  3.00”  h x 3.25” w x 3.00″ d

Cupcake:  approx. 2.25″ h x 3.00″ diameter

Stamp sets: Curly Cute

Paper: Card Stock:  Very Vanilla, Bashful Blue

Ink: Real Red

Accessories:Big Shot, non- Stampin’ Up! Sizzix Texturz Starter kit Polka Daisies for lid of box, retired Perfect Setting die, retired Early Espresso Grosgrain striped ribbon, Very Vanilla Ribbon, Bashful Blue satin ribbon, Bright Button collection, 8 mm pearl, non- Stampin’ Up! cupcake insert.

Pretty Christmas tag

I love the Perfect Pennant die!  It’s so versatile!  You can make pennants, decorative tags or cards.  I made this tag for PPA’s Tag your it Challenge.  I die cut some shimmer silver paper and embossed it with the Snowburst embossing folder.  I had some retired music DSP from the Love Letter DSP pack and made a fan fold flower.  I cut a 1-1/2 strip of DSP then used the Scallop Trim Border punch on one side.  I scored every 1/4″  and using the Simply Scored Scoring Tool really makes it fast and easy.

To add some sparkle I used Dazzling Details on the fan fold flower.  The silver glimmer snowflake is die cut using the Northern Frost Sizzix strip and decorated with an 8mm pearl.  The pearls are a sneak peek from the upcoming mini occasions catalog.  To hang the pennant or tie to a gift I used Very Vanilla satin ribbon.  Easy to make and so elegant.

Stampin' Up! christmas tag and ornament

click to enlarge

All Stampin’ Up! supplies below may be ordered from my website or email me to place your order.

All products are Stampin’ Up! unless noted.

Snowflake tag

Size:  4.50”  h x 3.50” w

Stamp sets: Four the Holidays

Paper: Card Stock:  Very Vanilla, retired Love Letter DSP, Silver Glimmer paper, Silver Shimmer paper

Ink: Versamark

Accessories: Big Shot, Snow Burst Embossing Folder, Northern Frost Strip, Scallop Trim Border Punch, Simply Scored, Pewter embossing powder, 8mm pearls, Dazzling Details, non-Stampin’ Up! vanilla organza ribbon

Stampin’ Up! Vintage Skating Boot Gift Card Holder and Christmas ornament

This week at Hand Stamped Sentiments the challenge is Anything Goes Christmas Ornaments.  I love the Stampin’ Up! Holiday Stocking and Stocking Accents dies.  Inspired by the many stockings and boots I’ve seen created with these dies I made this vintage gift card holder.  I used the Snow burst textured folder for the top of the boot and heat embossed it with Iridescent embossing powder.  For the boot part I cut two Old Olive card stock stockings and two of the green print Paisley Petals DSP.  To show the green print on the back you need to flip the paper so the print you want to show both sides are showing when stacked.  I then adhered the DSP to the stockings then embossed with the Vintage Wallpaper embossing folder and Big Shot.

The blades are die cut from the Silver shimmery paper using the candy canes from the Stocking Accents die.   You need to cut four, two sets facing one side and the other facing opposite for the back side.  Therefore you need to cut two sets with the glimmer paper up and two sets with the glimmer paper down.  Before I adhered both sides of the boot I sandwiched the blades between the sides of the boot and used Tombow adhesive glue.

I then used some lace trim on the boot and adhered both cuffs to the top of the boot (it would look better if it was SU crochet trim but I ran out) .  For the lacing I made four 3/16″ holes with my Crop-a-dile then used Very Vanilla Satin Ribbon to lace up the boot.  The loop at the top is hemp twine through a  1/8″ hole.  I installed an eyelet for this hole.  I didn’t have any 3/16″ eyelets for the lace holes but it would look even better if I did.

An easy project with so many options for colors.

hand stamped sentiments christmas ornament challengeHop on over to HSS for more inspiration from our design team!

All Stampin’ Up! supplies below may be ordered from my website or email me to place your order.

All products are Stampin’ Up! unless noted.

Vintage Skater Boot Gift Card holder and Christmas ornament

Size:  7.25”  H x 5.50” W

Stamp sets: Curly Cute

Paper: Card Base:  Old Olive, Very Vanilla; DSP Paisley Petals, Silver glimmer paper

Ink: Old Olive, Versamark

Accessories: Big Shot, Snow Burst Embossing Folder, Vintage Wallpaper Embossing Folder, Holiday Stocking Die, Stocking Accents die, Very Vanilla Satin Ribbon, hemp twine, Basic Pearls, 1/8″ metal eyelet, Crop-a-dile, non-Stampin’ Up! lace trim

Christmas Stocking Greeting

This week at Hand Stamped Sentiments we have a color challenge – Cherry Cobbler, Real Red, Wasabi Green and Very Vanilla.  I immediately thought Christmas and I can use my new Stocking die!  I was so excited because I knew a stocking shaped card would be so cute.  The stocking is Cherry Cobbler and the snowflakes are Real Red.  I wasn’t sure how these two colors would look like together but I after I assembled my card the different reds look fabulous!  I textured the stocking with the Vintage Wallpaper folder.  Using the stocking die made this card fast and easy!

Click image to enlarge

I used more Real Red and Very Vanilla snowflakes on the inside and the sentiment is from Delightful Dozen.  I used the Pinking Hearts Corner punch on the corners of the sentiment layer.

Click image to enlarge

I hope your inspired to join us at HSS.  We’d love to see your projects.

All Stampin’ Up! supplies below may be ordered from my website or email me to place your order.

All products are Stampin’ Up! unless noted.

Stocking Shape Christmas Card

Size:  6.25”  H x 5.00” W

Stamp sets: Delightful Dozen, Tags til Christmas

Paper: Card Stock:  Cherry Cobbler, Real Red, Very Vanilla

Ink: Wild Wasabi, Real Red

Accessories: Big Shot, Vintage Wallpaper Embossing Folder, Holiday Stocking Bigz L Die, Ornament Punch, Northern Frost Sizzlits Strip, Basic Rhinestones (colored with red Sharpie), Real Red Glitter Brad, Pinking Hearts Corner Punch

Gratitude Paper Pumpkin

This week at Hand Stamped Sentiments we have an inspiration challenge.  I’ve been wanting to make these 3D paper strip pumpkins and today I did!  It was so easy!  These would make beautiful decorations for your Thanksgiving table.  Another option would be instead of the stamped sentiment you could do place cards.

I cut 14 strips  1 inch by 6 inch, of DSP then sponged the edges with Soft Suede.  I used my Crop-a-dile to make 1/8″ holes on each end of the strips.  If you use the Crop-a-dile you can make a hole all at one time.  What a time saver!  I then used two brads to make the pumpkin.  I die cut the leaves using the Leaves #2 die then I embossed them with the Vintage Wallpaper embossing folder.  I also used Gold Lame Smooch Pearlized Accent ink on the leaves and on the tendrils.  To add more dimension to the leaves I also sponged them with with Soft Suede.  The sentiment is from Day of Gratitude and I used the Decorative Label punch to die cut and frame it.

click image to enlarge

I hope you’re inspired!  We’d love to see your project.

All Stampin’ Up! supplies below may be ordered from my website or email me to place your order.

All products are Stampin’ Up! unless noted.

3D Pumpkin

Size:  3.00”  H x 5.00” W

Stamp sets: Day of Gratitude

Paper: Card Stock:  Early Espresso, DSP:  Paisley Petals

Ink: Soft Suede, Early Espress, Gold Lame Smooch Pearlized Accent ink

Accessories: Big Shot, Vintage Wallpaper Embossing Folder, Leaves #2 die, Decorative Label Punch, Old Olive Brights Designer Buttons, Hemp Twine

Want a FREE Big Shot?

The Big Shot is a big deal! And during October, if you join MY team you get a FREE Big Shot (or up to $100 in free Stampin’ Up! products) with your starter kit!!  Do you already have the Big Shot?  then choose $100 worth of catalog merchandise instead.  So you get $435+ worth of product for JUST $175.00, AMAZING!!!
I would LOVE for you to join MY Stampin’ Up! family.  I cherish being a Stampin’ Up! Demo.  I meet wonderful people, develop long lasting friendships, express my creative side, and I make money while doing it all!!!  Could you ask for more?!I have been a demo for a little over 2 years, and can’t imagine myself doing anything else!
Here are some other wonderful perks of being a Demonstrator: 
Product discount. Demonstrators get a 20% discount on all Stampin’ Up! products, including stamp sets, paper, and accessories. It’s a great way to support your love of stamping and paper crafting. 
Extra income. You’ll earn extra income based on your sales and recruiting–how much extra income is up to you. Maybe you just want enough income to pay the cable bill every month, or maybe your goal is bigger–the monthly payment for your new car–it’s your decision!
Flexible schedule. This is your business, so you can put in as much (or as little) time as you’d like.
Support from Stampin’ Up! We love our demonstrators and it shows through our demonstrator support materials, including a monthly magazine, workshop ideas, and audio and video trainings on all kinds of topics available on our Demonstrator Web Site.   I also offer training and monthly meetings for my downline to discuss business topics and of course stamp.
If you think becoming a Demo is for you, joining is EASY!  Simply CLICK HERE and fill out all your necessary paperwork ON-LINE, and get your kit even faster!  If you have any questions CLICK HERE to contact me.

If the Shoe Fits…Wear it for Halloween

This week’s challenge at Hand Stamped Sentiments is Halloween!  I love this holiday and this year Stampin’ Up! has some very fun and spooky stamp sets.  Check them out in the holiday mini.

Since I love shaped cards I made a template of a witch’s boot.  I based it on the boot in the Spooky Bingo Bits  stamp set.  See card recipe below for template. I cut the boot out then embossed it with the Spider Web Embossing Folder then Smooched it.  I laced it up with Lucky Limeade ribbon and embellished with a fan fold.  I then  stamped the head of the witch in the Howl-O-Ween Creeps set on watercolor paper, with a blender pen I colored it with Pumpkin Pie and Lucky Limeade classic ink then used the Dazzling Details to add some sparkle.  Finished off the boot with Black Satin ribbon, taffeta orange ribbon and Rich Razzleberry button.

click image to enlarge

Click image to enlarge - inside of card

Join us at Hand Stamped Sentiments and take the challenge.  We’d love to see your projects.

All Stampin’ Up! supplies below may be ordered from my website or email me to place your order.

All products are Stampin’ Up! unless noted.

Witch Boot Card

Template:  Click here for template.

Size:  4.25” H x 5.50” W

Stamp sets: Howl-O-Ween Creeps, Tiny Tags, Wicked Cool

Paper: Basic Black, Digital DSP Frightful Sight Spiders, Watercolor paper, Whisper White

Ink: Whisper White Craft Ink, Pumpkin Pie, Lucky Limeade, Rich Razzleberry

Accessories: Black Satin Ribbon, Pumpkin Pie Taffetta ribbon, Rick Razzleberry button, Jewelry Punch, Scallop edge punch, 1-3/8″ Circle Punch, 2-3/8″ Scallop Circle Punch, Scallop Trim Border Punch, Dazzling Details, Iridescent Ice Embossing Powder, Blender Pen, Dazzling Details, Silver Foil Smooch Crop-a-dile

A Charming Thank You

This week at Hand Stamped Sentiments we want to be impressed.  Create any project with dry or heat embossing.  For my project I was inspired by a gift from a dear friend.  She brought it over this evening and I am so fortunate to have such a wonderful friend.  I had a different card planned for this week’s challenge but I’ll show you that card for next week’s challenge.

This card I CASED from my upline Tara Bazata.  I basically used the same layout but changed up a few detail.  I used the Charming stamp set which hasn’t seen ink for a few months.  I stamped the medallion and  embossed the background and used torn edges and sponging to the layers to add more texture.

Charming Thank You card

click image to enlarge

Hop on over to Hand Stamped Sentiments and see all the wonderful inspiration from our design team.  We’re prepared to be impressed by your projects.

All Stampin’ Up! supplies below may be ordered from my website or email me to place your order.

All products are Stampin’ Up! unless noted.

A Charming Thank You

Size:  4.25” H x 5.50” W

Stamp sets: Charming, Tiny Tags

Paper: Card base:  Crumb Cake, Soft Suede, Daffodil Delight, Very Vanilla

Ink: Cajun Craze, Soft Suede; Flower and stems were inked with Cajun Craze, Daffodil Delight and Soft Suede markers

Accessories: Hemp Twine, Antique brads, Jewelry Tag punch, Sponge Daubers, Dimensionals, Big Shot, Square Lattice Embossing Folder