• my photo

    Click photo for About Me

  • Enter your email address to subscribe to this blog and receive notifications of new posts by email.

    Join 1,021 other subscribers
  • Pinterest

    Follow Me on Pinterest
  • Amazing Deals

    Click image for Amazing Deals!

  • Share this blog

    Bookmark and Share
  • Archives

  • Categories

  • Recent Posts

  • Blog Stats

    • 402,159 hits
  • Meta

  • Disclaimer

    All content found at Stampin' by Genny is the sole responsibility of Genevieve Valdes, a Stampin’ Up! Independent Demonstrator. Stampin’ Up! does not endorse, edit, or otherwise contribute to this website.

Last minute 30 Christmas cards with Letters to Santa DSP

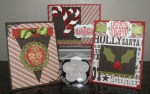
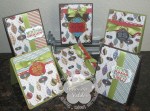
Oh my!  I need to send out my Christmas cards.  Here I’ve been helping everyone else complete theirs and I haven’t done mine.  I needed to make 30 Christmas cards fast!  I happened to have the Letters to Santa DSP and the Merry & Type stamp set so I set out to make 30 cards from half of the Letters to Santa DSP package.  We’ll here they are!  I primarily used the Merry & Type stamp set but I did also use the Tiny Tags and Tags Til Christmas sets.  I provide PDF instructions to show you how to cut the paper and card recipes for all 30 cards.  Below is a list of products used.

Merry & Bright Christmas Cards PDF Instructions - $5.95

All Stampin’ Up! supplies below may be ordered from my website or email me to place your order.

All products are Stampin’ Up! unless noted.

Merry and Type Christmas Cards

Size:  5.50”  H x 4.25” W

Stamp sets:  Merry and Type, Tags Til Christmas, Tiny Tags

Paper:  Card Stock:   Riding Hood Red, Whisper White, Early Espresso, Old Olive, Blushing Bride, Marina Mist; DSP:  Letter to Santa

Ink: Versamark, Riding Hood Red, Old Olive, Early Espresso, Marina Mist

Accessories:  Big Shot, Stocking Accents Die, Perfect Pennants Die, Stripes Embossing Folder, 1-1/4 square punch, Scallop Square punch, Ornament punch, Doily Triple Layer punch, Scallop Oval punch, Postage Stamp punch, Owl Builder punch, Ticket Corner punch, Corner Rounder punch, Jewelry Tag punch, Scallop Trim Corner punch, Scallop Trim Border punch, Scallop Edge Border punch, Eyelet border punch, Large Lace Ribbon Border punch, Dotted Scallop Ribbon Border punch, Antique brads, Champagne Glass Glitter, Dazzling Details, Iridescent Ice Stampin’ Emboss Powder, Gold Embossing Powder

If the Shoe Fits…Wear it for Halloween

This week’s challenge at Hand Stamped Sentiments is Halloween!  I love this holiday and this year Stampin’ Up! has some very fun and spooky stamp sets.  Check them out in the holiday mini.

Since I love shaped cards I made a template of a witch’s boot.  I based it on the boot in the Spooky Bingo Bits  stamp set.  See card recipe below for template. I cut the boot out then embossed it with the Spider Web Embossing Folder then Smooched it.  I laced it up with Lucky Limeade ribbon and embellished with a fan fold.  I then  stamped the head of the witch in the Howl-O-Ween Creeps set on watercolor paper, with a blender pen I colored it with Pumpkin Pie and Lucky Limeade classic ink then used the Dazzling Details to add some sparkle.  Finished off the boot with Black Satin ribbon, taffeta orange ribbon and Rich Razzleberry button.

click image to enlarge

Click image to enlarge - inside of card

Join us at Hand Stamped Sentiments and take the challenge.  We’d love to see your projects.

All Stampin’ Up! supplies below may be ordered from my website or email me to place your order.

All products are Stampin’ Up! unless noted.

Witch Boot Card

Template:  Click here for template.

Size:  4.25” H x 5.50” W

Stamp sets: Howl-O-Ween Creeps, Tiny Tags, Wicked Cool

Paper: Basic Black, Digital DSP Frightful Sight Spiders, Watercolor paper, Whisper White

Ink: Whisper White Craft Ink, Pumpkin Pie, Lucky Limeade, Rich Razzleberry

Accessories: Black Satin Ribbon, Pumpkin Pie Taffetta ribbon, Rick Razzleberry button, Jewelry Punch, Scallop edge punch, 1-3/8″ Circle Punch, 2-3/8″ Scallop Circle Punch, Scallop Trim Border Punch, Dazzling Details, Iridescent Ice Embossing Powder, Blender Pen, Dazzling Details, Silver Foil Smooch Crop-a-dile

A Charming Thank You

This week at Hand Stamped Sentiments we want to be impressed.  Create any project with dry or heat embossing.  For my project I was inspired by a gift from a dear friend.  She brought it over this evening and I am so fortunate to have such a wonderful friend.  I had a different card planned for this week’s challenge but I’ll show you that card for next week’s challenge.

This card I CASED from my upline Tara Bazata.  I basically used the same layout but changed up a few detail.  I used the Charming stamp set which hasn’t seen ink for a few months.  I stamped the medallion and  embossed the background and used torn edges and sponging to the layers to add more texture.

Charming Thank You card

click image to enlarge

Hop on over to Hand Stamped Sentiments and see all the wonderful inspiration from our design team.  We’re prepared to be impressed by your projects.

All Stampin’ Up! supplies below may be ordered from my website or email me to place your order.

All products are Stampin’ Up! unless noted.

A Charming Thank You

Size:  4.25” H x 5.50” W

Stamp sets: Charming, Tiny Tags

Paper: Card base:  Crumb Cake, Soft Suede, Daffodil Delight, Very Vanilla

Ink: Cajun Craze, Soft Suede; Flower and stems were inked with Cajun Craze, Daffodil Delight and Soft Suede markers

Accessories: Hemp Twine, Antique brads, Jewelry Tag punch, Sponge Daubers, Dimensionals, Big Shot, Square Lattice Embossing Folder

Blooming Blossom Birdhouse

With spring finally here Hand Stamped Sentiments has a Blooming Blossoms Challenge.  Make any project with flowers.  Now how can you pass this up!  There are so many possibilities and endless ideas for this challenge.  I moved my craft area to a room in my house where I have a window and I can see and hear birds chirping.  It’s such a wonderful sound.  Recently I had a cardinal right outside my window.  I happen to love these birds with their bright colored red feathers. You can’t miss them.  This week my project is celebrating flowers and Cardinals.

I wanted to use bright happy colors so I went with Stampin’ Up! In Colors – Pear Pizzazz, Peach Parfait, Blushing Bride and Poppy Parade.  Love, Love, Love these colors.  At first I wasn’t sure I liked them together but as I was creating my project it all came together.  My birdhouse card features a large Blushing Bride flower punched with the Blossoms Petal Punch.  I also used the retired Trio Punch for the small flowers.  I was sad to see this punch retire but a good substitute is the flower punch from the Itty Bitty Shapes Punch Pack.  I also used the Fancy Flower Punch to frame the opening of the birdhouse.  For the branch and the Cardinal I used the Two-Step Bird Punch.

I’ve seen the Cardinal on many blogs so I made mine with the Two-Step Bird Punch.  I punched two wings and used one for the crest and colored the face with a Black Stampin’ Write Marker, sponged the edges for depth and added a Basic Clear Rhinestone for the eye.

click image to enlarge

I hope you’re inspired to join us on Hand Stamped Sentiments.  We’d love to see your Blooming Blossom projects.

All Stampin’ Up! supplies below may be ordered from my website or email me to place your order.

All products are Stampin’ Up! unless noted.

Birdhouse Card

Birdhouse Template: Click here to obtain birdhouse pattern.  I did a scalloped roof instead of the roof offered with the pattern,.

Size: approx. size 4.25″ H x 5.50″ W

Stamps: Tiny Tags, With All My Heart

Paper: CS: Peach Parfait, Pear Pizzazz, Poppy Parade, Blushing Bride; DSP:  In Color Hostess Level 1 Paper Pack

Ink: Poppy Parade, Chocolate Chip

Accessories: Basic Rhinestones, Blossom Petal Punch, retired Trio Punch, Scallop Border Punch, Two-Step Bird Punch, Jewelry Tag Medium, Fancy Flower Punch, 1″ Circle Punch

Technique: Stamping and Punch Art

Shabby Chic Spring

My inspiration for this week’s sketch challenge at Hand Stamped Sentiments is my wish for spring to get here.   It’s a fun pocket sketch and the possibilities are endless.  Since I wanted my card to say spring I decided on a shabby chic card with the colors of the digital Spring Vintage DSP.  I also took inspiration from Tara Bilbao’s quilled roses.  She has a great instructional video on her blog on how to make them.  My third inspiration came fromAnn Schach’s Nature Walk card.  It’s a wonderfully distressed card and since I wanted my card to be shabby chic I started to think peeling wallpaper so I decided to incorporate her distressed look for my card.

I am also entering my card in PPA’s Vintage challenge.  Hop on over to get inspired.

I first printed the Spring Vintage DSP pattern with the kraft background and flowers.  The dotted DSP for the pocket is from the Jolly Holly DSP and the edges are distressed and sponged with Soft Suede.  I embossed a Melon Mambo layer with the Framed Tulips Embossing Folder then tore the layer and sponged with Soft Suede. I made the roses and embellished them with Dazzling Diamonds.  Some of the roses I also lightly sponged with Soft Suede before the Dazzling Diamonds.  I embellished the pocket with the Victoria Crochet trim and also the Scallop Trim border.  I also added pearls to the top of the pocket and on the Scallop Trim border.  My sentiment background is colored with SU markers, stamped off once for a lighter background.  The ‘friends’ is from the Tiny Tags stamp set and ‘friends’ is heat embossed in gold and attached with a Vintage brad.  Please join us for this week’s challenge.  We would love to see your take on this sketch.

All Stampin’ Up! supplies below may be ordered from my website or email me to place your order.

All products are Stampin’ Up! unless noted.

Shabby Chic Spring card

Card Size: 4.25″ w x 5.50″h

Stamp Sets: Tiny Tags

Paper: CS: Melon Mambo, Old Olive, Very Vanilla, Pretty in Pink, DSP:  Digital Download Spring Vintage, Jolly Holly

Ink: Classic Ink Soft Suede, Versamark, Rose Red and Old Olive markers

Card Accessories: Scallop Trim border punch, Medium Jewelry punch, Victoria Crochet Trim, Vintage brad, Dazzling Diamonds, Basic pearls, sponge dauber, Dimensionals

Technique: Stamping, Embossing


Hand Stamped Sentiments Inspiration Challenge #28

This week at Hand Stamped Sentiments it’s an inspiration challenge.  The challenge is to use the photo from Pottery Barn to inspire your project, which can be a card, scrapbook page, gift item, etc. Take the challenge.  Submissions are due by noon on Monday, August 16th. I can’t wait to see your projects.   Remember you can use any brand of products to create your projects.

I really love the sunburst quilt on the wall so I used it as my background paper for the Top Note shape.  I printed the full size photo of the quilt on matte photo paper.  Click here for full size photo.  I then cut out the quilt portion I wanted on my Top Note Die then ran it through the Big Shot.  To add dimension and texture I ran the Very Vanilla layer through my Big Shot with the Perfect Details Texture Plate.  I then made a scallop flower and secured it with a 3/4″ circle from the background paper and a silver brad from the Hodgepodge set.  Click here for the fan fold flower tutorial on Splitcoasters.  I adhered the Top Note to the Very Vanilla layer, added the ribbon then adhered the scallop flower with mini-glue dots.

click image to enlarge

click image to enlarge

All Stampin’ Up! supplies below may be ordered from my website or email me to place your order.
All products are Stampin’ Up! unless noted.

Project info:

Friends Sunburst card

Fan Fold Flower Tutorial: click here

Finished card size: 5.25″ x 4.25″

Stamp Sets: Tiny Tags

Paper: Card stock:  Cajun Craze, Very Vanilla, Chocolate Chip, non-SU matte photo paper

Ink: Cajun Craze

Accessories: Big Shot, Top Note die, Texture Plate Perfect Details, Scallop edge punch, Jewelry Tag punch,  Hodgepodge silver brad, Black Satin Ribbon, mini-glue dots

Techniques: Stamping

Good things come in small packages

I have been having fun making these cute gift boxes with stamp sets Tiny Tags, Vintage Vogue and Chocolate Bunny.  I also used the Build a Flower and  Pillow Box dies for the Big Shot.  These cute boxes are perfect for small gifts like candy treats or for jewelry like SU’s Simply Adorned bracelets, necklaces and charms.

gift boxes


bunny box side

click to enlarge

All Stampin’ Up! supplies below may be ordered from my website or email me to place your order.

Project info:

Bunny Box

Click here for bunny box template.  I printed the template on Very Vanilla CS then cut it out.  I decorated the front and the sides of the box with following.

Chocolate Bunny and flowers from Vintage Vogue – I stamped the Chocolate Bunny with Chocolate Chip on Very Vanilla CS then cut him out.  I stamped the Vintage Vogue flowers with So Saffron and Pretty Pink on Very Vanilla CS then cut them out.

The small flowers on the green branch were punched using the Trio Flower punch and the branch with leaves was stamped using the Two-Step Bird Punch.  The Pretty in Pink egg was punched using the Wide Oval punch then decorated with the flowers and the Whisper White grosgrain ribbon which was dyed with So Saffron ink.

The small flowers on the vine that are on the side of the box were stamped using Regal Rose and Old Olive markers.  The stamp is from Tiny Tags.

Half pearls from the Pretties kit were adhered to the center of the flowers.

The small tags were stamped with stamps from Tiny Tags on Very Vanilla CS then punched using the Medium Jewelry Tag punch.

Supplies list:

Stamps:  Tiny Tags, Chocolate Bunny, Vintage Vogue

Paper:  SU Cardstock:  Very Vanilla, Pretty in Pink, Old Olive, Bashful Blue

Ink:  SU Classic Ink; So Saffron, Old Olive, Pretty in Pink, SU markers Regal Rose and Old Olive

Accessories:  Leaves are from the Two-Step Bird punch, Wide Oval punch, Trio Flower punch, Medium Jewelry Tag punch, pearls from Pretties Kit, 1/4″ Whisper White ribbon dyed with So Saffron ink, 5/8″ Old Olive Satin ribbon

Technique:  Stamping

Hello Pillow Box

Stamps:  small flower background stamped with flower stamp from SU With All My Heart and Tiny Tags

Paper:  SU Cardstock – Regal Rose, Old Olive, Whisper White

Ink:  SU Regal Rose

Accessories:  Big Shot and Build a Flower Bigz Die and Pillow Box Die, 5/8″ Old Olive satin ribbon, SU rhinestone brad

Technique:  Die cutting, Stamping

Happy St. Patrick’s Day Pillow Box

Stamps: none  Sentiment was printed from My Digital Studio software

Paper:  SU Cardstock – Kraft Brown, Garden Green

Ink:  none

Accessories:  Big Shot and Pillow Box Die, Shamrock was made from Heart to Heart punch, SU silver brad, 5/8″ Whisper White Satin Organza ribbon

Technique:  Die cutting, Stamping, Digital Crafting

%d bloggers like this: