• my photo

    Click photo for About Me

  • Enter your email address to subscribe to this blog and receive notifications of new posts by email.

    Join 1,021 other subscribers
  • Pinterest

    Follow Me on Pinterest
  • Amazing Deals

    Click image for Amazing Deals!

  • Share this blog

    Bookmark and Share
  • Archives

  • Categories

  • Recent Posts

  • Blog Stats

    • 402,230 hits
  • Meta

  • Disclaimer

    All content found at Stampin' by Genny is the sole responsibility of Genevieve Valdes, a Stampin’ Up! Independent Demonstrator. Stampin’ Up! does not endorse, edit, or otherwise contribute to this website.

A Season to Sparkle starts with Halloween

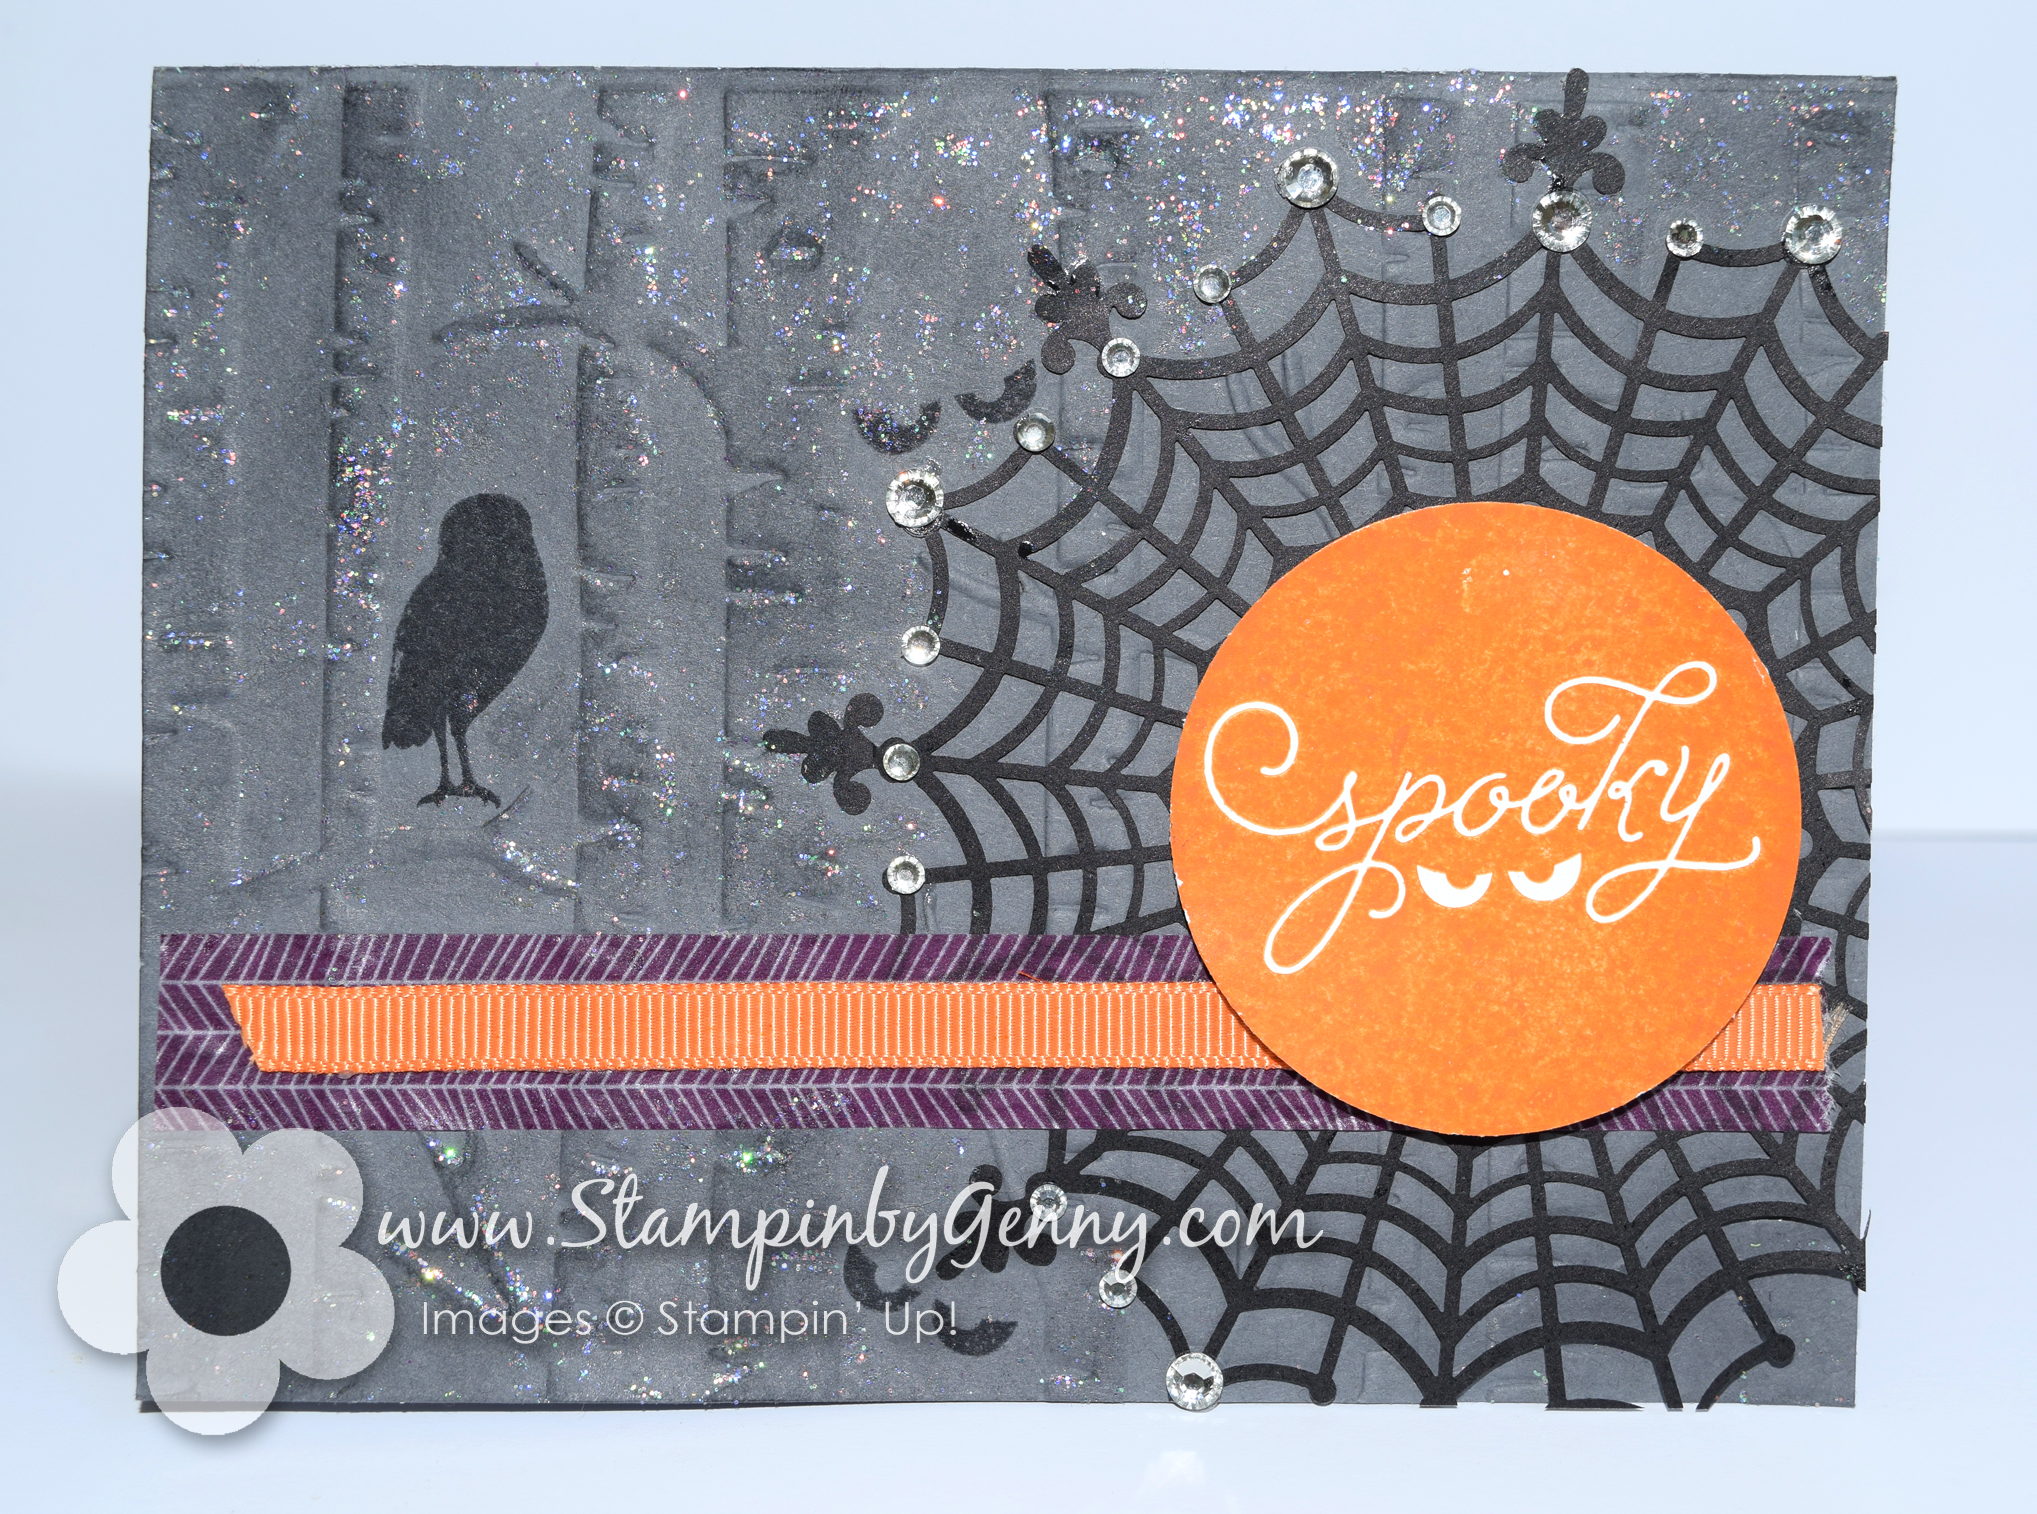
I just had to create another Halloween card inspired by the Hand Stamped Sentiment color challenge of Fresh Fig, Pumpkin Pie and Lemon Twist.  I used the chandelier and other elements from the Season to Sparkle stamp set to create my card.

I sponged Fresh Fig, Pumpkin Pie and Lemon Twist on glossy white card stock.  The chandelier is die cut from basic black.  The jeweled swag, bird and spider were stamped with Momento Black and die cut from whisper white.  The jewels were colored with an Aqua painter then colored with Clear Wink of Stella .  To make it all sparkle I added basic rhinestones and topped with a Lemon Twist bow.

Stampin Up Season to Sparkle Chandelier Halloween card

Go to Hand Stamped Sentiments and see more inspiration from the design team.

All Stampin’ Up! supplies below may be ordered fr om my website or email me to place your order.

All products are Stampin’ Up! unless noted.

A Season to Sparkle Halloween Card

Card Size:  5.50″ H x 4.25 W

Stamp Sets:  Season to Sparkle

Paper:  Card stock:  Whisper White, White Glossy cardstock, Fresh Fig, Pumpkin Pie

Ink: Momento Black, Fresh Fig, Pumpkin Pie, Lemon Twist

Accessories:  Chandelier Thinlet dies, Basic Rhinestones, Aqua painter, In Color Bitty Bows


Save

Save

Save

Save

Open if you Dare the Graveyard Gate

OOOH! OOOH! SPOOKY is what I was going for with the card I created with the Graveyard Gate bundle.  Inspiration for my card came from the Inspiration Challenge at Hand Stamped Sentiments.  I sponged Daffodil Delight, Pumpkin Pie and Rich Razzleberry for the sky then sponged Smoky Slate on the bottom to create the graveyard.  I then stamped the headstones and bats in Momento Black.  I used an adhesive sheet to die cut the gate so I could easily adhere the gate to the front of the card.

For the sentiment I die cut a circle with the 1-3/8″ punch and sponged it with Daffodil Delight and Pumpkin Pie then stamped the sentiment with Momento Black.  For extra sparkle I colored around the sentiment with Clear Wink of Stella.  The lock and key I die cut from silver foil.  Now… try to open the graveyard gate if you dare.


Stampin Up Graveyard Gate Halloween Card

For more inspiration go to Hand Stamped Sentiments and see more projects from the design team.

All Stampin’ Up! supplies below may be ordered from my website or email me to place your order.

All products are Stampin’ Up! unless noted.

Open if you Dare the Graveyard Gate Card

Card Size:  5.50″ H x 4.25 W

Stamp Sets:  Graveyard Gage

Paper:  Card stock:  Basic Black, Basic Gray, Whisper White, Silver Foil

Ink: Daffodil Delight, Pumpkin Pie, Rich Razzleberry, Smoky Slate, Momento Black

Accessories:  Graveyard Gate Framelits, 1-3/8″ circle Punch, 1-1/2″ circle punch, Adhesive Window Sheet, Black rhinestones, Sponge, Basic Rhinestone, Clear Wink of Stella


Save

Save

Save

Save

Save

Jar of Haunts Happy Halloween

I love Halloween!  Growing up my family every year we a had Halloween party to celebrate my father’s birthday.  My father passed away last year but I still make a card for him in his memory.  My card this week is based on the sketch at Hand Stamped Sentiments and the Great Pumpkin from Charlie Brown.

I  created my own background paper by stamping the eyes with Versamark then heat embossing with white and iridescent embossing powders.  The iridescent embossing powder is retired but I still have some and I use it when I want to add a little sparkle.

The cute jack-0-lantern is stamped with Tangerine Tango on Pumpkin Pie from the Jar of Haunts stamp set which can be ordered from the 2016 Holiday catalog.  The leaf and stalk I stamped with Early Espresso, fussy cut and outlined the leaf and veins with Early Espresso and colored with  Soft Suede and Pumpkin Pie.

The jar is stamped on White Shimmer with black ink then die cut using the jar framelit from the Everyday Jars Framelits set.  I adhered the Silver Satin Ribbon then adhered the jar.  The banners Silver and Black Glimmer paper die cut using the Banner Triple punch.  For an extra punch of bling I used basic rhinestones on the eyes and all over the black layer.

Stampin Up Jar of Haunts Halloween card

Be inspired and join the challenge at Hand Stamped Sentiments.  For more inspiration see what the designers have created.

All Stampin’ Up! supplies below may be ordered from my website or email me to place your order.

All products are Stampin’ Up! unless noted.

Jar of Haunts Happy Halloween card

Size:  4.25″ h x 5.50″ w

Stamp Sets:  Jar of Haunts

Paper:  Card stock:  Shimmer White, Basic Gray, Basic Black, Pumpkin Pie

Ink:  Momento Black, Tangerine Tango, Early Epresso, Versamark

Accessories: Basic Rhinestones, White embossing powder, Iridescent embossing powder, Triple Banner punch, Everyday Jars Framelits set, Silver Satin ribbon, Dimensionals and Glue dots

Save

Save

Save

Save

Save

Save

Save

Save

Save

Spooky Among The Branches

My card this week is inspired by the latest Hand Stamped Sentiments sketch challenge.  I created my card with Among the Branches Stamp Set and Woodland Textured Impressions Embossing Folder bundle.  My card was also inspired by the card on page 39 of the Holiday mini catalog.

Stampin Up Halloween card

I embossed Basic Gray card stock with the Woodland Textured Impressions Embossing Folder and stamped the bird and eye images.  I also used a Spider Web doily.  I stamped the greeting with Pumpkin Pie and adhered to the center of the doily web with dimensionals.  For added sparkle I spread Dazzking Details allover the background.  I also added basic rhinestones to the edges of the doily.

We’d love to see how this sketch inspires you.  Go to Hand Stamped Sentiments to see more inspiration!

All Stampin’ Up! supplies below may be ordered from my website or email me to place your order.

All products are Stampin’ Up! unless noted.

Spooky Among the Branches Card

Size:  5.50″ w x 4.25″ h

Stamp Sets:  Among the Branches

Paper:  Cardstock:  Basic Gray, Whisper White

Ink:  Momento Black, Pumpkin Pie

Accessories:  Woodland Textured Impressions Embossing Folder, Basic Rhinestones, Dazzling Details, Happy Haunting Designer Washi Tape, Spider Web Doilies, retired 1/4″ Pumpkin Pie grosgrain ribbon


BOO to you and a Howl-o-ween Treat

I received my pre-order stash from Stampin’ Up! and part of my order included the Howl-o-ween Treat Stamp Set + Boo to You Framelits Dies bundle.  Super cute images and the framelits makes it easy to die-cut them.  These cute images inspired me to make a side drawer card.  This type of card  CASE’d from Jackie Topa.  For instructions and a video click here.  I have previously made a couple of Halloween cards of this type and can be found here and here.

My side step drawer card features a skeleton and spider coming out of spooky drawers and an owl with a witch’s hat saying BOO!  I also used for embellishment the Spider Web Doilies.  I love them.  One side is black and the other is white.  I used the white side so it would contrast against the black.  I stamped the owl with silver ink.  I cut the drawers and the panel behind the owl from the new Black Glimmer paper.  I also used the Decorative Label punch on the to create the legs of the dresser.  I had so much fun creating this card!

All these products may be found in the new 2015 Holiday Catalog.

Stampin Up Halloween Howl-o-ween Treat Boo to You Framelits dies side step drawer cardAll Stampin’ Up! supplies below may be ordered from my website or email me to place your order.

All products are Stampin’ Up! unless noted.

BOO to you and a Howl-o-ween Treat card

Size:  4.25″ h x  5.00″ w

Stamp Sets:  Howl-o-ween Treat

Paper:  Cardstock:  Basic Black, Whisper White, Tangelo Twist, Black Glimmer paper

Ink:  Encore Silver ink, Momento Black

Accessories:  1/8″ silver brads, basic rhinestones, Spider Web Doilies, Boo to You Framelits dies, Decorative Label punch, Fine Tip Glue pen, dimensionals


Frightful Wreath Simply Created

Want an easy way to make a cute Halloween wreath?  Look no further than the Simply Created Frightful Wreath kit by Stampin’ Up!  This kit contains everything to create a cute Halloween wreath.  Here’s mine…

Stampin Up Frightful Halloween Wreath

2014-10-11_frightful_wreath2

So easy to create this wreath. You get everything in the kit to create this wreath.

Stampin Up Halloween Frightful Wreth

You get wire and beads to create his spider.

Stampin Up Frightful Wreath kit

Frightful Wreath Simply Creted kit 135866

All Stampin’ Up! supplies below may be ordered from my website or email me to place your order.

All products are Stampin’ Up! unless noted.

Frightful Wreath

Size:  17″ wreath


Happy Haunting Halloween Card

This week’s challenge at Hand Stamped Sentiments is a color challenge with the colors of Blackberry Bliss, Pear Pizzazz and Black.  These colors were perfect for a Halloween card.  I used the ghost from the Fall Fest stamp set and greeting from the Ghoulish Greetings stamp set.  For texture I used the Woodgrain Embossing folder and embellished with rhinestones.

I adhered the Blackberry Bliss and Pear Pizzaazz layers then punched the circles through both layers.  I stamped the ghosts with Versamark on the black layer and heat embossed with white embossing powder.  The sentiment is also stamped in Versamrk and heat embossed with black embossing powder.  Super easy card to make!

Stampin Up Fall Fest Happy Haunting card

Hop on over to Hand Stamped Sentiments to see more what our creative design team has whipped up using these colors.  I hope to see your creation at HSS.

All Stampin’ Up! supplies below may be ordered from my website or email me to place your order.

All products are Stampin’ Up! unless noted.

Happy Haunting Halloween Card

Size:  4.25″ h x 5.50″ w

Stamp Sets:   Fall Fest, Ghoulish Greetings

Paper:  Cardstock:  Black, Pear Pizzazz, Blackberry Bliss

Ink:  Versamark

Accessories:  Basic rhinestones, Dimensionals, 1-3/8″ and 1-1/4″ circle punches, Woodgrain Embossing Folder, White embossing poweder, Heat Tool

Happy Halloween My Digital Studio Card

For this week’s challenge I decided to play with My Digital Studio to create a Halloween card.  The colors were inspired by Hand Stamped Sentiments color challenge of Tangerine Tango, Elegant Eggplant, Garden Green and Basic Black.  Don’t these colors just scream HALLOWEEN!  It was so much fun using the coloring tool to add different colors to the digital stamp images.  If you haven’t tried digital crafting, download the free trial version of MDS here.  You can create cards, scrap book pages and books, journals and whatever your paper crafting mind can conjure.

Halloween card-001

Create a scary or funny Halloween card, scrap book page or 3D item using these colors and upload your card to Hand Stamped Sentiments.   If you need more inspiration go to HSS and see what our very talented design team has created.

All Stampin’ Up! supplies below may be ordered from my website or email me to place your order.

All products are Stampin’ Up! unless noted.

Happy Halloween My Digital Studio Card

Background
Designer Series Paper\_Designer Kits\Howlstooth & Scaringbone – designer series paper\Howlstooth & Scaringbone – 9

Embellishments
Scallop Dots Ribbon\Scallop Dots Ribbon – black
Basic Pearls and Rhinestones\Basic Pearls and Rhinestones – rhinestone large
3 Antique Brads\Antique Brads – brad 5

Stamps
Splatters\Ink Splatters\Ink Splatter 4
Splatters\Ink Splatters\Ink Splatter 5
Spooky Things\Spooky Things – happy halloween
_Designer Kits\Chevron\Chevron – 1 grunge
_Designer Kits\Chevron\Chevron – 8 grunge

Punches
Extras\Flag Punch,  Filled with: Card Stock\Textured Card Stock\Textured Card Stock – Elegant Eggplant
Extras\Flag Punch,  Filled with: Designer Series Paper\Small Polka Dot\Garden Green Small Polka Dot
Extras\Flag Punch,  Filled with: Designer Series Paper\_Designer Kits\Frightful Sight – designer series paper\Frightful Sight – 2
Labels & Tags\Lots of Tags – shape 4,  Filled with: Card Stock\Textured Card Stock\Textured Card Stock – Elegant Eggplant
Labels & Tags\Lots of Tags – shape 4,  Filled with: Card Stock\Textured Card Stock\Textured Card Stock – Tangerine Tango

Halloween tags

I created two hybrid Halloween tags using MDS2 .  I printed the tags on Very Vanilla cardstock, cut the tags with my paper trimmer then added the rhinestones and the ribbon.  The large bat I printed on Very Vanilla and cut it out with my sharp scissors.  I also added rhinestones then adhered it with dimensionals.

This slideshow requires JavaScript.

I hope your inspired to join us this week at Hand Stamped Sentiments and show us tag projects.

All Stampin’ Up! supplies below may be ordered from my website or email me to place your order.

All products are Stampin’ Up! unless noted.

Hybrid Halloween tags

Size:  5.00″ H x 2-7/8″ W

Digital Stamp sets:  Spooky Things spider, From the Crypt bat, Eat, Drink & Be Scary Halloween definition

Ink:  Black, Tangerine Tango, Lucky Limeade

Paper:  Very Vanilla

Embellishments:  Digital punches:  1.25 Square Punch, Digital DSP: Vintage Overlays texture 2, Night Owl pattern 7,  Non-digital Basic rhinestones, Lucky Limeade ribbon, 3/8 Ruffled ribbon, Linen Thread

Halloween paper pumpkins and tutorial

My inspiration for my project comes from Hand Stamped Sentiments pumpkin challenge.  I love making these paper strip pumpkins.  Instead of fall I created these Halloween pumpkins using the Howlstooth & Scaringbone DSP.  They are super easy to make and so much fun to decorate.  They would also be great to demo at a workshop.

This is a tutorial for making these cute paper strip pumpkins.  You can also make a fall pumpkin with the traditional colors of fall.  To download the tutorial click here.

Stampin' Up! Halloween paper strip pumpkins

click to enlarge

Stamp sets:  Wicked Cool, Ghoulish Googlies, Wonderfall

Ink:  Tangerine Tango, Basic Black, Basic Gray

Paper:  Tangerine Tango, Basic Black, Very Vanilla, Silver Glitter paper, Howlstooth & Scaringbone DSP

Embellishments:  Big Shot, Autumn Accents,  Antique brads, Silver brads, Googlies, Basic rhinestones, Black embossing powder, Heat Tool, Tag Punch, Sponge Daubers

Pumpkin tutorial

Paper Pumpkin strip tutorial

First cut 12 strips of paper 1″ x 6″.  The smaller pumpkin is made with ¾” x 4” strips.

At this point you can sponge the edges of your paper strips.  I chose not to for my pumpkins.  Stamp and sponge the tag. Cut your leaves.  Set these aside until you are ready to embellish your project.

Paper strip pumpkin tutorial

Paper strip pumpkin tutorial

Stack your paper strips then punch with the Crop-a-dile worked at both ends.  Insert your brads.  To help the pumpkin stand better I inserted the smaller brad with the prongs opposite the larger one.

Paper strip pumpkin tutorial

Spread apart the strips. Bend the stack of papers back and forth to break down the fibers to make them more pliable.

Halloween paper strip pumpkin

Now you are ready to decorate the top.  I added the curled strips of paper, glitter paper leaves and tag underneath the brad with a bit of adhesive.

Halloween paper strip pumpkin

For the smaller pumpkin I decorated it with a leaf and sentiment from Googly Ghouls.  I also added the googly eyes.

I hope you’re inspired by these pumpkins and you’ll join us at Hand Stamped Sentiments for this week’s challenge.

Stampin' Up! Pumpkins Challenge

%d bloggers like this: