• my photo

    Click photo for About Me

  • Enter your email address to subscribe to this blog and receive notifications of new posts by email.

    Join 1,021 other subscribers
  • Pinterest

    Follow Me on Pinterest
  • Amazing Deals

    Click image for Amazing Deals!

  • Share this blog

    Bookmark and Share
  • Archives

  • Categories

  • Recent Posts

  • Blog Stats

    • 402,229 hits
  • Meta

  • Disclaimer

    All content found at Stampin' by Genny is the sole responsibility of Genevieve Valdes, a Stampin’ Up! Independent Demonstrator. Stampin’ Up! does not endorse, edit, or otherwise contribute to this website.

Wonderful You Easel Card

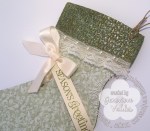
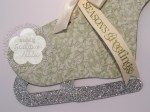
Wonderful you!  This easel card was created using the Label Framelits.  I also used the Paper Doily to create the delicate background  for the large butterfly.  To add some sparkle and texture I used vanilla smooch and embossed with the Vine street embossing folder.  This card would also make a great mother’s day card.

I used the sketch below from Hand Stamped Sentiments which is the next challenge.

Stampin up framelits label easel card

I hope you will be inspired to join us at Hand Stamped Sentiment!  We would love to see how you interpret the sketch below for your project.

All Stampin’ Up! supplies below may be ordered from my website or email me to place your order.

All products are Stampin’ Up! unless noted.

Wonderful You Easel Card

Stamp Sets:  Loving Thoughts, World Treasures

Paper:  Cardstock:  Whisper White, Soft Suede, Rich Razzleberry, Pool Party, Summer Starfruit; DSP Sycamore Street Designer Series Paper

Ink:  Summer Starfruit, Pool Party

Accessories:  Big Shot, Labels Framelits, Beautiful Butterflies Bigz die, Beautiful Wings Embosslits, Paper Doily Sizzlits, Basic pearls, Vanilla smooch, Vintage Wallpaper embossing folder, Vine Street embossing folder

Dare to Dream with Dazzling Diamond Dust

I’m so excited!  Convention is almost here!  I’ll be flying out on Wednesday and meeting up with my upline, downline and some of the HSS design team.  We’re going to have a blast!!  I’m hoping there’s WIFI so I can update you on all the great projects and activities.  This is my first convention and I’m so excited to finally be going.  I look forward to meeting you, my Stampin’ Friends.   So if you see me please say hi.

Now back to the project I want to share with you.  This week at Hand Stamped Sentiments we have a technique challenge.  I had never done the Dazzling Diamond Dust technique before and it was so fun and easy!  Here’s a link to a  tutorial on SCS.   Click to enlarge the photo so you can see how the flower image shimmers.

Stampin' Up! Dazzling Diamond Dust Bordering Romance stamp set

click image to enlarge

I used the flower image from Bordering on Romance stamp set.  I stamped it with black StayzOn on Very Vanilla card stock then used my blender pens and Primrose Petals and Gumball Green ink pads to color the image.  I then embossed it with the oval from the  Set Designer Frames Textured Impressions Embossing Folder Die.  I tore around the edges for a distressed look.    I then heat embossed the whole image layer with Iridescent Ice Stampin’ Emboss Powder.  The layers are cut from the Label Framelits.  I used the Vintage Wallpaper Embossing Folder for the background.  The butterflies are die cut using the Beautiful Wings Stampin’ Up! Embosslits Die.  I used the Loving Thoughts stamp set for my sentiment.  I embellished with 5/8 Inch Crochet Trim Victoria ribbon and Antique brad.  I also used Basic Pearls.

Join us this week at Hand Stamped Sentiments and see more projects from our very talented design team.

All Stampin’ Up! supplies below may be ordered from my website or email me to place your order.

All products are Stampin’ Up! unless noted.

Bordering on Romance Dazzling Diamond Dust Card

Size:  4.25″ W x 5.50″ H

Stamp sets:  Bordering on Romance, Loving Thoughts

Paper: Card Stock:  Very Vanilla, Primrose Petals

Ink:   Primrose Petals, Gumball Green, Black StayzOn

Accessories:  Iridescent Ice Stampin’ Emboss Powder, Label Framelits, Set Designer Frames Textured Impressions Embossing Folder Die, Vintage Wallpaper Textured Impressions Embossing Folder Die, Beautiful Wings Stampin’ Up! Embosslits Die, Blender Pens, 5/8 Inch Crochet Trim Victoria ribbon, Antique brad, Basic Pearls

Vintage Wedding Card

Something borrowed, something blue.  Springtime is the perfect time for a wedding.  For this week’s challenge at Hand Stamped Sentiments we have a wedding project challenge.  My card was inspired by the stamp set Established Elegance.  I selected for my blue shade – Pool Party.  Love, love, love this color!  I paired it with Certainly Celery for a fresh spring feel.  To add to the vintage style, after stamping the images I sprayed the scallop circle and Pool Party layers with water then crumpled them.  I also used my Color Spritzer to lightly spray the frame and sentiment layer with Early Espresso.

Established Elegance Vintage wedding card

click to enlarge

I have included a close up of the card below.  I used non-Stampin’ Up! white tulle around the bust form.  I added the pearls for an elegant touch.

Established Elegance Stampin' Up! vintage card

click image to enlarge

I hope you’re inspired to show us your wedding project.  Hop on over to Hand Stamped Sentiments to be inspired by our talented design team and to upload your creation.

hss wedding challenge #117

All Stampin’ Up! supplies below may be ordered from my website or email me to place your order.  If you have any questions about any card featured on my blog please email  me.

All products are Stampin’ Up! unless noted.

Established Elegance Vintage Wedding Card

Card Size:  5.00″ H x 5.00″ W

Stamp sets:  Established Elegance, Always

Paper: Whisper White, Pool Party

Ink: Pool Party, Certainly Celery, Soft Suede

Accessories: Big Shot, Scallop Circle die, Designer Frames Textured Impressions Embossing Folders, Vintage Wallpaper Textured Impressions Embossing Folder, Beautiful Wings Embosslits die, Large Oval Punch, Scallop Oval Punch, Bitty Shapes Punch Pack,  Certainly Celery marker, Pool Party marker, Basic Pearls, Antique Brad, Certainly Celery Satin ribbon, Dimensionals

Mother’s Day Label Framelits Easel Card

This week at Hand Stamped Sentiments we are introducing new design team members.  We’re thrilled to have Diane Vander Galien, Erika Clark, Elizabeth Price and Bobbie Trost join us.  Hop on over to HSS and see their wonderful projects as well as the rest of the design team’s projects.

For this week’s challenge it’s all about mom.  Create any paper craft project – card, 3d project, scrap book page.  For my project I created an easel card using the Label Framelits. Love, Love, Love this die set.  I also used the Doily Die, Beautiful Butterflies die and the Beautiful Wings Embosslit.  For some extra sparkle I smooched my card with Vanilla Shimmer Smooch.  So pretty!

Stampin' UP! Labels Framelit Easel Card

click image to enlarge

Here’s a close-up of the sentiment.

Close up of Stampin' Up! Mother's Day Easel cArd

click to enlarge

I hope you join us at HSS for this week’s challenge.

Hand Stamped Sentiments papercraft challenge

click image to enlarge

Mother’s Day Label Framelits Easel card

Card Size:  5.50″ W x 4.75″ H

Stamp sets:  Delightful Dozen, For All You Do

Paper: Very Vanilla, Soft Suede, Pool Party, Calypso Coral, retired Everyday Enchantment DSP

Ink: Calypso Coral, Soft Suede

Accessories:  Beautiful Butterflies die, Beautiful Wings Embosslits, Doily Die, Label Framelits, Pinking Hearts border punch, Vintage Wallpaper embossing folder, Finial Press embossing folder, Basic Pearls, 5/8″ Victoria Crochet trim, Antique Brad, Vanilla Shimmer Smooch

Stampin’ Up! Vintage Skating Boot Gift Card Holder and Christmas ornament

This week at Hand Stamped Sentiments the challenge is Anything Goes Christmas Ornaments.  I love the Stampin’ Up! Holiday Stocking and Stocking Accents dies.  Inspired by the many stockings and boots I’ve seen created with these dies I made this vintage gift card holder.  I used the Snow burst textured folder for the top of the boot and heat embossed it with Iridescent embossing powder.  For the boot part I cut two Old Olive card stock stockings and two of the green print Paisley Petals DSP.  To show the green print on the back you need to flip the paper so the print you want to show both sides are showing when stacked.  I then adhered the DSP to the stockings then embossed with the Vintage Wallpaper embossing folder and Big Shot.

The blades are die cut from the Silver shimmery paper using the candy canes from the Stocking Accents die.   You need to cut four, two sets facing one side and the other facing opposite for the back side.  Therefore you need to cut two sets with the glimmer paper up and two sets with the glimmer paper down.  Before I adhered both sides of the boot I sandwiched the blades between the sides of the boot and used Tombow adhesive glue.

I then used some lace trim on the boot and adhered both cuffs to the top of the boot (it would look better if it was SU crochet trim but I ran out) .  For the lacing I made four 3/16″ holes with my Crop-a-dile then used Very Vanilla Satin Ribbon to lace up the boot.  The loop at the top is hemp twine through a  1/8″ hole.  I installed an eyelet for this hole.  I didn’t have any 3/16″ eyelets for the lace holes but it would look even better if I did.

An easy project with so many options for colors.

hand stamped sentiments christmas ornament challengeHop on over to HSS for more inspiration from our design team!

All Stampin’ Up! supplies below may be ordered from my website or email me to place your order.

All products are Stampin’ Up! unless noted.

Vintage Skater Boot Gift Card holder and Christmas ornament

Size:  7.25”  H x 5.50” W

Stamp sets: Curly Cute

Paper: Card Base:  Old Olive, Very Vanilla; DSP Paisley Petals, Silver glimmer paper

Ink: Old Olive, Versamark

Accessories: Big Shot, Snow Burst Embossing Folder, Vintage Wallpaper Embossing Folder, Holiday Stocking Die, Stocking Accents die, Very Vanilla Satin Ribbon, hemp twine, Basic Pearls, 1/8″ metal eyelet, Crop-a-dile, non-Stampin’ Up! lace trim

Christmas Stocking Greeting

This week at Hand Stamped Sentiments we have a color challenge – Cherry Cobbler, Real Red, Wasabi Green and Very Vanilla.  I immediately thought Christmas and I can use my new Stocking die!  I was so excited because I knew a stocking shaped card would be so cute.  The stocking is Cherry Cobbler and the snowflakes are Real Red.  I wasn’t sure how these two colors would look like together but I after I assembled my card the different reds look fabulous!  I textured the stocking with the Vintage Wallpaper folder.  Using the stocking die made this card fast and easy!

Click image to enlarge

I used more Real Red and Very Vanilla snowflakes on the inside and the sentiment is from Delightful Dozen.  I used the Pinking Hearts Corner punch on the corners of the sentiment layer.

Click image to enlarge

I hope your inspired to join us at HSS.  We’d love to see your projects.

All Stampin’ Up! supplies below may be ordered from my website or email me to place your order.

All products are Stampin’ Up! unless noted.

Stocking Shape Christmas Card

Size:  6.25”  H x 5.00” W

Stamp sets: Delightful Dozen, Tags til Christmas

Paper: Card Stock:  Cherry Cobbler, Real Red, Very Vanilla

Ink: Wild Wasabi, Real Red

Accessories: Big Shot, Vintage Wallpaper Embossing Folder, Holiday Stocking Bigz L Die, Ornament Punch, Northern Frost Sizzlits Strip, Basic Rhinestones (colored with red Sharpie), Real Red Glitter Brad, Pinking Hearts Corner Punch

Flourish Fever

This week at Hand Stamped Sentiments we have Flourish Fever!  What is a flourish you ask?  Well for our challenge it is a decorative image with sweeping or fanciful curves or lines.  I immediately thought of the flourish in the Strength and Hope stamp set and the digital background papers.  I went for the shabby chic style and this is what I created.

Click image to enlarge

I stamped the solid heart in Pretty in Pink from the I (heart) Hearts stamp set then for that sparkle I covered it in Dazzling Diamonds and added the pearls.  I distressed the edges by sponging them with Soft Suede and also using the Cutter Kit to tatter the edges.  The flower layers were scrunched and the edges sponged to distress it.

Inside of card - Stamped with the flourish from Strength and Hope

I invite you to catch Flourish Fever with us and participate in the Hand Stamped Sentiments Flourish Fever challenge.

All Stampin’ Up! supplies below may be ordered from my website or email me to place your order.

All products are Stampin’ Up! unless noted.

Flourish Fever Card

Size: 5.00″ H x 5.00″

Rubber Stamps:  Strength and Hope, I (Heart) Hearts

Digital Background Paper:  Strength and Hope digital DSP

Ink:  Pretty in Pink, Soft Suede

Accessories: Basic Pearls, Vintage Wallpaper Embossing Folder, Scribbles, Swirls Sizzlits Die, Perfect Pennants Bigz Die, Fun Flowers Bigz L Die, Big Shot, Large Lace Ribbon Border Punch, Antique Brad, 5/8 Inch Crochet Trim Victoria, Dazzling Diamonds, Sponge Daubers

Technique: Digital Crafting with My Digital Studio, Stamping, Die Cutting

Simple Valentine Cards

I created these simple Valentine cards for a class.  These were very easy for my guests and they loved them.  These two-layer cards showcased the Big Shot for the embossed backgrounds.  I love the Vintage Wallpaper embossing folder and combines well with the Artistic Etchings stamp set.  I stamped the medallion in Riding Hood Red on Very Vanilla CS to make the background.  I then stamped the Eiffel Tower, glued the Red Glitter heart atop the tower and added a bit of Scallop Trim to the bottom and stamped ‘AMOUR’.  I also tore the edges of the Very Vanilla CS and sponged the edges in Riding Hood Red. For the finishing touch,  I adhered pearls and rhinestones to the corners.

For the “Just my Type” card   I used the Texture Plates Kit #4 which I had not used for awhile.  This set has a wonderful typed background which coordinates perfectly with the vintage typewriter image from Puns from the Past and the Newsprint DSP.  I punched the border of the Newsprint layer and sponged the edges in black.  I love the Tiny Tags stamp set and Medium Jewelry punch.  These little tags add so much to any card.  I adhered with the mini glue dots the tags underneath the knot of the ribbon.  I stamped the typewriter image on Very Vanilla CS then punched it out with the Decorative Label Punch.  I also punched another Decorative Label in black and framed the Typewriter image.  I added the Red glitter heart to the top of the typewriter image and the pearls to the corners.

One of my goals this year is to finish the inside of my cards as I did below.  It just looks so much neater and gives you another opportunity to use more images from a stamp set.

click image to enlarge


inside of cards - click image to enlarge


All Stampin’ Up! supplies below may be ordered from my website or email me to place your order.

All products are Stampin’ Up! unless noted.

Simple Valentine Cards

Card Size: 4.25″ w x 5.50″h

Stamp Sets: Artistic Etchings, Puns from the Past, Tiny Tags

Paper: CS: Very Vanilla, Riding Hood Red, Black; DSP: Newsprint; Red Glitter paper

Ink: Classic Ink Pad: Riding Hood Red, Basic Black

Card Accessories: Eyelet border punch, Scallop Trim border punch, Medium Jewelry punch, Ticket Corner punch, Decorative Label Punch,  Small Heart Punch, Vintage Wallpaper embossing folder, Texture Plates Kit #4 (Friend, Confidant print type), Black Satin ribbon, Basic pearls and clear rhinestones, sponge dauber, Dimensionals

Technique: Stamping, Embossing

Flirty Valentine Corset Card

For this week’s Hand Stamped Sentiments ribbon and lace challenge I created this corset template.  The template is sized to fit into a SU medium envelope (5-3/4″ x 4-3/8″).  I traced the corset on Very Vanilla CS then ran it through my Big Shot with the Vintage Wallpaper embossing folder and sponged it with Riding Hood Red ink.  I used the 5/8″ Victoria crochet trim as lace.  I put a strip of stick tape on the back of the crochet trim and pleated it as I adhered the trim.  I used my Crop-a-dile Big Bite to set the 1/8″ eyelets and used grosgrain ribbon to lace the corset.  The regular hand-held Crop-a-dile will not work because it doesn’t reach.  You can also use a regular eyelet setter kit.  It was a lot fun creating this card.  The possibilities are endless in creating this card.  You can use different embossing folders, different colored card stock, clear rhinestones and different ribbons.

I create these as invitations for hens night, bachelorette or bridal showers.  Got to my Etsy shop to order and request your custom color.

Click image to enlarge

Click image to enlarge

All Stampin’ Up! supplies below may be ordered from my website or email me to place your order.

All products are Stampin’ Up! unless noted.

Flirty Corset CArd

Card Size: Approx. 4.25″ w x 5.50″h

Stamp Sets: Teeny Tiny Wishes, I {Heart} Hearts

Paper: CS: Very Vanilla, Blushing Bride

Ink: Classic Ink Pad: Riding Hood Red

Card Accessories: 5/8″ Victoria Crochet Trim ribbon, Basic Pearls, Metallic eyelets, 1/4″ Very Vanilla grosgrain ribbon, sponge dauber, sticky tape

Technique: Stamping, Embossing

%d bloggers like this: