• my photo

    Click photo for About Me

  • Enter your email address to subscribe to this blog and receive notifications of new posts by email.

    Join 1,007 other subscribers
  • Pinterest

    Follow Me on Pinterest
  • Amazing Deals

    Click image for Amazing Deals!

  • Share this blog

    Bookmark and Share
  • Archives

  • Categories

  • Recent Posts

  • Blog Stats

    • 400,864 hits
  • Meta

  • Disclaimer

    All content found at Stampin' by Genny is the sole responsibility of Genevieve Valdes, a Stampin’ Up! Independent Demonstrator. Stampin’ Up! does not endorse, edit, or otherwise contribute to this website.

A Fitting Florets Christmas Card

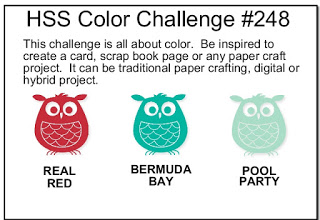
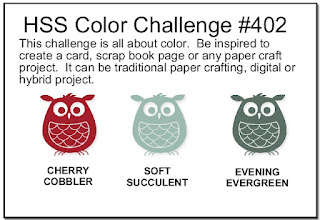
This week’s challenge at Hand Stamped Sentiments is a color challenge of Cherry Cobble, Soft Succulent and Evening Evergreen. These colors are perfect for Christmas cards so I decided to create a Christmas card with the Fitting Florets Collection.

There are two stamp sets, dies, paper and embellishments in Fitting Florets collection. I used the Soft Succulent as my card base then used a Cherry Cobbler layer followed by the DSP. I colored the berries on the DSP with Cherry Cobbler Stampin’ blends. For the frame and sprigs I die cut using the Bough Punch and Fitting Florests die from the frame out of the Distressed Gold paper. I love how the gold looks antiqued. The greeting I heat embossed with gold then colored the buds on the sprigs with Cherry Cobble blends. For embellishing I added a bow of retired 1/2″ Cherry Cobbler Seam Binding and retired Cherry Cobbler rhinestones from the Holiday Basic Jewels.

See more inspiration for this color challenge at Hand Stamped Sentiments.

All Stampin’ Up! supplies below may be ordered from my website or email me to place your order.

All products are Stampin’ Up! unless noted. To view or purchase products used to create this card. Click on the links below.

A Fitting Florets Chrismtas Card

Card Size:  5.50″ H x 4.25″ W

Stamp Sets/Bundle: Fitting Florets Collection

Paper:  Basic WhiteSoft Succulent, Cherry Cobbler, Fitting Florets DSP

InkVersamark, Cherry Cobbler Stampin’ Blends

AccessoriesBough Punch, retired 1/2″ Cherry Cobbler seam binding, retired Cherry Cobbler Holiday Rhinestones, Gold embossing poweder, heat tool

A Poinsettia Place Christmas

I have to finish up my Christmas cards and the mad dash is on to send them out this weekend.  One of the cards I created is inspired by the Hand Stamped Sentiments color challenge of Cherry Cobbler, Old Olive, and Misty Moonlight.

I created this card using the Poinsettia Petals Bundle.  Love this bundle.  The bundle includes dies that also emboss.  I die cut the poinsettias from Whisper White, embossed and sponged the petals with Cherry Cobbler.  The centers are beaded pearls which is part of the suite.  I also stamped the leaves an berries on Whisper White and  die cut using the bundle.  I used the Misty Moonlight ribbon behind the poinsettia.  The silver sprigs I die cut with the Sprig punch out silver foil.  The card base is Misty Moonlight and the Old Olive layer is DSP from the Poinsettia Place DSP, the White Vellum paper is the Plush Poinsettia Specialty Paper.  The paper is flocked and so pretty.  The sentiment from the Poinsettia Place stamp set I stamped with Versamark and heat embossed with white embossing powder.

See what other beautiful projects the design team created with this color challenge of Cherry Cobbler, Old Olive and Misty Moonlight.

All Stampin’ Up! supplies below may be ordered from my website or email me to place your order.

All products are Stampin’ Up! unless noted.

A Poinsettia Place Christmas Card

Card Size:  4.25″ H x 5.50″ W

Stamp Sets:  Poinsettia Petals

Paper:  Cardstock:  Misty Moonlight, Cherry Cobbler; DSP Poinsettia Place; Plush Poinsettia Specialty; Silver foil

Ink:  Cherry Cobbler, Old Olive

Accessories:  Poinsettia dies, Beaded Pearls, Misty Moonlight ribbon, sponge dauber, Sprig punch, glue dots, Tear and Tape adhesive, dimensionals

A Winter Woods Christmas Card

This week’s Hand Stamped Sentiments challenge is and inspiration challenge.  The Christmas images inspired me to use the Winter Woods stamp set which is in the  Stampin’ Up! Holiday Catalog.  The stamp set coordinates with the In the Woods Framelits dies which makes it easy to die cut the trees.  I wanted to create a simple card I could easily duplicate and came up with this snowy scene.

Stampin Up Winter Woods Christmas cardI die cut the trees from Sparkle Glimmer paper along with the snow drift.  The sentiment is from Timeless Tidings and die cut with the 1-3/4″ circle punch and the red frame was die cut using the 2″ circle punch.  The background is embossed with the Softly Falling Textured Embossing folder.  I finished the card with the 3/8″ Real Red Mixed Satin Ribbon and basic rhinestones.

To see more inspiration projects go to  Hand Stamped Sentiments Inspiration Challenge .

All Stampin’ Up! supplies below may be ordered from my website or email me to place your order.

All products are Stampin’ Up! unless noted.

A Winter Woods Card

Card Size:  4.25″ H x 5.50 W

Stamp Sets:  Winter Woods, Timeless Tidings

Paper:  Card Stock; Whisper White, Real Red; Glimmer Paper; Sparkle

Ink: Real Red

Accessories:  In the Woods Framelits Dies, 2″ Circle Punch, 1-3/4″ Circle Punch, Softly Falling Embossing Folder, Basic Rhinestones, dimensionals, 3/8″ Real Red Mixed Satin Ribbon, TomBow Glue

Christmas Pines are Pretty Pines

This week my card was inspired by Hand Stamped Sentiments color challenge of  Real Red, Bermuda Bay and Pool Party.  I used the new stamp set Christmas Pines and Pretty Pines Thinlits dies bundle along with the Pine Bough Textured Embossing Folder.  I love the pine bough thinlets.  There are three different sizes which create such pretty foliage.  I also used the bow dies to create the Real Red and Bermuda Bay bows.  The Pine Bough textured embossing folder created a beautiful background on the Natural Ivory card stock.  After stamping the sentiment I used the 2-1/2″ circle punch to die cut it.   I love this bundle.  There are so many possibilities!

This slideshow requires JavaScript.

Hop on over to HSS and be inspired by their design team!

Hand Stamped Sentiments

All Stampin’ Up! supplies below may be ordered from my website or email me to place your order.

All products are Stampin’ Up! unless noted.

Christmas Pines are Pretty Pines card

Size:  4.25″ h x 5.50″ w

Stamp Sets:  Christmas Pines

Paper:  Card stock:  Natural Ivory, Bermuda Bay, Pool Party, Real Red

Ink:  Real Red

Accessories: gold sequins, basic rhinestones, dimensionals, glue dots, Pine Boughs textured embossing folder, Pretty Pines thinlits dies, gold metallic thread

Save

Making Spirits Bright Among the Branches

This week’s inspiration challenge at Hand Stamped Sentiments inspired me to create this cute card using the Woodland Embossing folder and the greeting from Among the Branches stamp set.  I fussy cut the cute deer from the Home for Christmas DSP.

Stamping Up Woodland embossing folder and Among the Branches Christmas card

The card base is Very Vanilla, the next layer, 5.25″ h x 4.00″w is Whisper White and I embossed it with the Woodland Embossing folder.   The cute deer are fussy cut from the Home Christmas DSP.  The striped dsp, .25″ h x 4.00″ is also from the Home Christmas DSP pack.  I used a silver foil doily for the greeting and embellished with rhinestones.  Super cute and easy card to create.

Be inspired and share your project with Hand Stamped Sentiments.  Please also see what our design team has created.

All Stampin’ Up! supplies below may be ordered from my website or email me to place your order.


All products are Stampin’ Up! unless noted.

Making Spirits Bright Among the Branches Card

Size:  5.50″ h x 4.25″ w

Stamp Sets:  Among the Branches

Paper:  Cardstock:  Very Vanilla, Whisper White, Home for Christmas DSP

Ink:  Pool Party

Accessories:  Metallic Foil Doilies, Gold sequins, Woodland Embossing Folder, Basic Rhinestones, Silver 1/8″ Ribbon, Glue dots, TomBow Glue


My Digital Studio Christmas Card

Lately I’ve been creating on My Digital Studio and for this week’s challenge at Hand Stamped Sentiments I have created this Christmas Card.

Creating photo boxes and sizing them to your liking then filling with your choice of paper is how I created the glimmer strips and the strip of Season of Style DSP at the top of the card.  If you have MDS and haven’t used it in awhile, I invite you to create a card or scrap page using it.  If you don’t have MDS and would like to try before you buy click here for a FREE trial.

Stampin' Up My Digital Studio Christmas card

I would love to see what you create using the sketch below.  For more inspiration go to Hand Stamped Sentiments and see what our talented design team has created.

All Stampin’ Up! supplies below may be ordered from my website or email me to place your order.

All products are Stampin’ Up! unless noted.

My Digital Studio Christmas Card
Background
Designer Series Paper\_Designer Kits\Glimmer – designer series paper\Glimmer – silver

Embellishments
Designer Rosettes\Designer Rosettes – pointed old olive
Designer Rosettes\Designer Rosettes – scallop crumb cake
Other Ribbon\ribbon – alpine – knot
Antique Brads\Antique Brads – brad 2
Basic Pearls and Rhinestones\Basic Pearls and Rhinestones – rhinestone large

Punches
Extras\Holiday Celebration Punches\Holiday Celebration Punches – christmas, Fill Color = CHERRY COBBLER 165,30,44
Extras\Holiday Celebration Punches\Holiday Celebration Punches – christmas, Fill Color = OLD OLIVE 138,151,71

Photos
Designer Series Paper\_Designer Kits\Season Of Style – designer series paper\Season Of Style – 4
Designer Series Paper\_Designer Kits\Glimmer – designer series paper\Glimmer – silver
Designer Series Paper\_Designer Kits\Glimmer – designer series paper\Glimmer – red
C:\Documents and Settings\Gen\My Documents\Watermark_PNG\Stampin by Genny watermark2_wht

Monochromatic Rocking Gingerbread Christmas Card

This week we have a monochromatic challenge at Hand Stamped Sentiments.  My card was also inspired by the cute gingerbread in the Scentsational Season Bundle.  He’s so cute!  My card is also a rocking card which is so much fun to decorate.  Click here for a tutorial on how to make this card.

I cut a Soft Suede 5″ circle and a 4-1/2″ Very Vanilla  circle with my retired Stampin’ Up! Circle Scissor Plus.  I embossed the Very Vanilla circle with the Perfect Polka Dot folder then folded them in half and glued them together.

click on images to enlarge

Join us this week at Hand Stamped Sentiments and show us how this photo inspires you.

Monochromatic challenge

All Stampin’ Up! supplies below may be ordered from my website or email me to place your order.

All products are Stampin’ Up! unless noted.

Monochromatic Rocking Gingerbread Card

Size:  500″ H x 5.00″ W

Stamp Sets:  Scentsational Season

Paper:  Very Vanilla, Soft Suede, Champagne Glitter paper

Ink:  Soft Suede, Versamark

Embellishments:  Basic rhinestones, Label Framelits, Holiday Collection Framelits, perfect Polka Dot Embossing folder, Snow Flurry Bigz Die, Early Espresso Embossing powder

Rocking Christmas Card

This week at Hand Stamped Sentiments we have a fun challenge – Fancy Fold Cards.   With only few more days left till Christmas I decided to make another Christmas card but with a rocking twist.  I had seen this type of card out in internet land and decided to make a rocking Christmas card.  You can view a tutorial for making this card here.  They’re so easy to create!  I cut an Early Espresso 5″ circle and a 4-1/2″ Soft Suede circle with my Circle Scissor Plus then folded them in half and glued them together.

Stampin Up Rocking Christmas Card front

click image to enlarge - front

Stampin Up Rocking Christmas Card back

click to enlarge - back

The Scallop Circle Cherry Cobbler layer is embossed with the Snow Burst embossing folder and heat embossed with Iridescent Ice embossing powder.  I used the Scallop Circle and Scallop Circle #2 dies to cut the Cherry Cobbler Scallop Circle and the Lucky Limeade Scallop Circle.  The Gift image is stamped on watercolor paper with brown StayzOn and colored with ink pads and a blender pen.  I used the Circle Scissor Plus to cut out this layer at 2-3/4″ .  To add some more sparkle I framed it with Champagne Glass glitter.  I added an Old Olive button and stamped ‘Merry Christmas’ in Early Espresso on Very Vanilla.

For the back of the card I stamped the bird and ornament image on water color paper then punched with the ornament punch.  I also used ink pads and a blender pen to color.  I stamped snowflakes and heat embossed them in gold along with the sentiment.

Hop on over to HSS for more inspiration from out very talented Design Team.

All Stampin’ Up! supplies below may be ordered from my website or email me to place your order.

All products are Stampin’ Up! unless noted.

Rocking Christmas Card

Size:  5.00”  w x 5.00” H

Stamp sets: Forest Festivities, Short and Sweet

Paper: Card Stock:  Early Espresso, Soft Suede, Cherry Cobbler, Lucky Limeade, Very Vanilla, Watercolor paper

Ink: Versamark, Early Espresso, Soft Suede, Cherry Cobbler, Lucky Limeade, Brown StayzOn

Accessories: Big Shot, Snow Burst Embossing Folder, Scallop Circle die, Scallop Circles die #2, Ornament punch, Modern Label Punch, Word Punch, Bright Designer Button Old Olive, Twine, Retired silver tinsel, Dazzling Details, Champagne Glass Glitter

Merry and Type Christmas Card

This week at Hand Stamped Sentiments we have a color challenge.  Create any project with the colors of  Blushing Bride, Pool Party, Pear Pizzazz and Real Red.  Since I’ve been  in the groove making Christmas cards with the Merry and Type stamp set and coordinating DSP I created a Christmas card with these non-traditional colors.

Merry and Type Christmas Card

click to enlarge

Do you recognize the Whisper White square shape?  It’s the Top Note Die.  I die cut the shape as you would normally then I turned the cut Top Note 90 degrees and centered it then ran it through the Big Shot again.  Very easy!

The ornament image is  stamped with Versamark and Real Red then heat embossed with Iridescent Embossing powder.  To color the ornaments I used a blender pen and ink pads.

To add some additional sparkle I embellished with light pink rhinestones.  I used a light colored pink  Sharpie to color them.

The sentiment is stamped with Pool Party and Versamark.  I then heat embossed it with Iridescent Embossing Powder to add some sparkle.  I used the the Decorative Label to punch it out then layered it over Real Red satin ribbon.

I hope you’re inspired to create a project with these colors.  Hop on over to HSS to be inspired by our talented design team.

Hand Stamped Sentiments Color challenge 96 - Blushing Bride, Pool Party, Pear Pizzazz, Real REd

All Stampin’ Up! supplies below may be ordered from my website or email me to place your order.

All products are Stampin’ Up! unless noted.

Merry and Type Christmas Card

Size:  5.50”  H x 4.25” W

Stamp sets: Merry and Type

Paper: Card Base:  Whisper White; Card Stock:  Pool Party, Blushing Bride; DSP retired Pear Pizzazz from Sale-a-bration 2010

Ink: Versamark, Pear Pizzazz, Pool Party, Real Red, Blushing Bride

Accessories: Big Shot, Top Note die, Decorative Label punch, Basic Rhinestones, Real Red Satin Ribbon, Iridescent Embossing Powder, Blender Pens

Over the Top Pewter Gilded Frame Christmas Card

This week’s challenge at Hand Stamped Sentiments is to create an over the top Christmas card.  Inspired by a project I saw in the November Stampin’ SUCCESS magazine I created this over the top pewter gilded frame Christmas Card.

Gilded Frame Over the Top Christmas Card

Click image to enlarge

The embossed snowflake background is heat embossed with Iridescent Embossing Powder.

The frame is die cut using Sizzix Frame die.  I used the Vintage Wallpaper embossing folder and inked up the inside of the embossing folder with Versamark then ran it through the Big Shot.  I then heat embossed it with Pewter Stampin’ Emboss Powder.  I love how the frame looks antiqued!

I used the Blossom Petals Builder punch to make the white poinsettia.  I used the three narrow petals to create the layers then used the Simply Scored to score the petals then adhered them to a 1″ circle with glue dots.  For some extra sparkle I applied Versamark and heat embossed with Iridescent Embossing Powder. For more shine I used  basic rhinestones for the center of the poinsettia.  The Blossom Petals Builder punch made it so easy!  The sentiment is stamped and heat embossed with Iridescent Embossing Powder on a 3/4″ strip of Whisper White card stock.

More basic rhinestones were added to the frame and background to send this card over the top with sparkle.

HSS Over the Top Christmas Card Challenge

I hope you’re inspired to join us this week.  For more over the top inspiration go to Hand Stamped Sentiments and see what our design team has created for this week.

All Stampin’ Up! supplies below may be ordered from my website or email me to place your order.

All products are Stampin’ Up! unless noted.

Over the Top Pewter Gilded Frame Christmas Card

Size:  5.00”  H x 5.00” W

Stamp sets: Four the Holidays

Paper: Card Stock:  Whisper White

Ink: Baja Breeze

Accessories: Big Shot, Vintage Wallpaper Textured Embossing Folder, Snow Burst Textured Embossing Folder, Frame Sizzix Die, Blossom Petals Builder Punch, 1-1/4″ square punch, Basic Rhinestones, Versamrk, Pewter Stampin’ Embossing Powder

%d bloggers like this: