• my photo

    Click photo for About Me

  • Enter your email address to subscribe to this blog and receive notifications of new posts by email.

    Join 1,189 other subscribers
  • Pinterest

    Follow Me on Pinterest
  • Amazing Deals

    Click image for Amazing Deals!

  • Share this blog

    Bookmark and Share
  • Archives

  • Categories

  • Recent Posts

  • Blog Stats

    • 438,460 hits
  • Meta

  • Disclaimer

    All content found at Stampin' by Genny is the sole responsibility of Genevieve Valdes, a Stampin’ Up! Independent Demonstrator. Stampin’ Up! does not endorse, edit, or otherwise contribute to this website.

Quilt inspired Thank You card

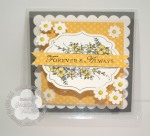
Summer is here and what better way to cool off than with a pinwheel.  My card this week is inspired by Hand Stamped Sentiments Quilt Inspired Challenge.  When I saw this challenge I immediately thought pinwheels.  The Patio Party cupcake dsp was perfect for my project.  I cut a scallop circle from the dsp and pieced it together then made a 2.5″ x 2.5″ pinwheel for the center and used an Antique brad for the center.   I also die cut a doily for the layer behind the scallop circle.  The Midnight Muse layer is embossed with the Perfect Polka Dots folder.  This was any easy card to make.

Stampin Up doily pinwheel thank you card

click image to enlarge

I hope you’re inspired to join us this week at Hand Stamped Sentiments.  Also take a look at the amazing projects from our talented design team.

stampin up quilt inspired challenge

All Stampin’ Up! supplies below may be ordered from my website or email me to place your order.

All products are Stampin’ Up! unless noted.

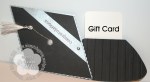
Quilt Inspired Thank You Card

Size:  5.00″ W x 5.00″ H

Stamp sets:  Itty Bitty Banners

Paper: Patio Party DSP; Card Stock:  Primrose Petals, Whisper White, Midnight Muse, Baja Breeze

Ink:  Midnight Muse

Accessories:  Sizzlit Doily die, Scallop Circle #2 die, Bitty Banners framelits, Perfect Polka Dots embossing folder, Antique Brad,

Another Happy Birthday Card

Here it is another week and another Hand Stamped Sentiments challenge.  Wow!  Where does the week go!?  For this week the challenge is paper pleating.  There are so many great ways to fold paper and use it to embellish any project.  For inspiration I CASED a card from the new Stampin’ Up! Idea Book and Catalog.  I used Summer Starfruit cardstock with Pool Party.  I love this combo!  Summer Starfruit is fast becoming one of my favs.  I stamped my cake image on watercolor paper and used a blender pen and pads to color the banners on the cake.  I embellished the cake with butterflies die cut from the Embosslit Beautiful Wings.  To add sparkle to them I added Dazzling Details to the wings.  The DSP is from Patio Party and the sentiment is from Itty Bitty Banners.  The banner is die cut with the coordinating Bitty Banners Framelits.  For a soft layer in the color Pool Party I die cut a doily using the Paper Doily Sizzlit.  Instead of ribbon I cut a strip of Summer Starfruit and used the Simply Scored Scoring Tool to score my paper to make it easier to pleat.  If you haven’t used the Simply Scored Scoring Tool you need to!  It’s so easy to use and in my opinion the best scoring tool on the market.

This slideshow requires JavaScript.

I hope you’re inspired to join our challenge.  Hop on over to Hand Stamped Sentiments and see all the wonderful projects created by our talented design team.

All Stampin’ Up! supplies below may be ordered from my website or email me to place your order.

All products are Stampin’ Up! unless noted.

Happy Birthday Card

Size:  5.00″ W x 5.00″ H

Stamp sets:  Make a Cake, Bitty Banners

Paper: Patio Party DSP; Pool Party CS; Summer Starfruit CS; Watercolor paper

Ink:  Soft Suede, Pool Party, Summer Starfruit

Accessories:  Paper Doily, 1/2″ circle punch, 1/16″ circle punch, Paper Doily Sizzlits, Beautiful Wings Embosslits, Bitty Banners Framelits, Hemp Twine, Basic Rhinestones, Simply Scored Scoring Tool, Blender Pen, Dazzling Details

Happy Birthday Patio Party Bird Card

Hello!  This week at Hand Stamped Sentiments we have a challenge to create a project with a bird/peacock.  Great challenge!  My mind just soared with so many ideas!  I’m so excited to share this card because it contains many of the new products found in the new Stampin’ Up! catalog.  So many beautiful stamp sets and products!  I’m going broke if I order everything on my wish list.  The beautiful DSP paper, Patio Party,  features the new In-Colors and I also used card stock from this same collection.  My card also features a new sentiment from the Bitty Banners set that I die cut using the new Bitty Banners Framelits.  No more trying to cut my own banners by hand.  LOVE IT!!  Another new product is the 1/4″ stitched grosgrain ribbon.  This ribbon comes in many colors and the stitching adds so much.

The flower stamped images are from the set Mixed Bunch and die cut with the Blossom punch.  The bird is die cut using the Bird Builder punch.  This punch is a must have because it die cuts a wing, bird and stem with leaves.  So versatile!  The Patio Party DSP layer is the Top Note shape cut narrow.  Cool shape!

This slideshow requires JavaScript.

I hope you’re inspired to join our challenge.  Hop on over to Hand Stamped Sentiments and see all the wonderful projects created by our talented design team.

stampin up challenge blog

All Stampin’ Up! supplies below may be ordered from my website or email me to place your order.

All products are Stampin’ Up! unless noted.

Happy Birthday Patio Party Bird Card

Size:  5.50″ W x 4.25 H

Stamp sets:  Mixed Bunch, Bitty Banners

Paper: Textured Soft Suede CS; Patio Party DSP; Raspberry Ripple CS; Summer Starfruit CS; Whisper White CS

Ink:  Raspberry Ripple, Baja Breeze

Accessories:  Top Note Die, Bitty Banners Framelits, Blossom punch, 1″ circle punch, Bird Builder punch, Square Scallop punch, 1/4 Stitched Grosgrain ribbon, Baja Breeze Seam Binding, Basic Rhinestones

Forever & Always Window Sheet Wedding Card

On June 1st the NEW Stampin’ Up! catalog was launched!!  So many beautiful stamps, colors, accessories and ideas!  My card for today was inspired by one of the beautiful cards found in the catalog.  Since this week at Hand Stamped Sentiments we have a color challenge -Daffodil Delight, Basic Gray, Basic Black and Neutral I was inspired by a card made with clear window sheets.  Using window sheets adds so much punch to cards.  Any element on the window sheet looks like it’s floating.

I cut the window sheet 5″ x 10″ then scored in the middle.  I also used the square scallop die to die cut the scallop layer.  I used one of the images from Apothecary Art and colored the image with Stampin’ Up! marker, Daffodil Delight and die cut using the Framelits die.  The sentiment from Loving Thoughts was stamped in Basic Gray on the Daffodil Delight polka dot DSP printed from My Digital Studio.  The cute flowers were punched out with the Itty Bitty Shapes Punch Pack and Boho Punch.  The centers for the flower are the 3/16″ Daffodil Delight brads.  To neatly adhere the layers and flowers to the window sheet I used mini glue dots.

This slideshow requires JavaScript.

Click images to enlarge

I hope you’re inspired to join our challenge.  Hop on over to Hand Stamped Sentiments and see all the wonderful projects created by our talented design team.

All Stampin’ Up! supplies below may be ordered from my website or email me to place your order.

All products are Stampin’ Up! unless noted.

Forever & Always Window Sheet card

Size:  5.00″ W x 5.00″ H

Stamp sets:  Apothecary Art, Loving Thoughts

Paper: Basic Gray, Whisper White, My Digital Studio printed Daffodil Delight  DSP, Window Sheet

Ink:  Basic Gray, Daffodil Delight marker

Accessories:  3/16″ Daffodil Delight brads, Itty Bitty Shapes Punch Pack, Boho Punch, Big Shot,  Labels Collection Framelits Dies,

Butterfly headband

This week at Hand Stamped Sentiments we have a fun challenge – Anything but a card Challenge.  My project this week inspired by spring, is a headband with felt butterflies.  I wrapped a headband in white grosgrain ribbon then die cut butterflies with the Beautiful Butterflies die.  I embellished with rhinestones and there you have it, a headband to please any little princess.

Butterfly headband

click image to enlarge

Hop on over to HSS and be inspired by our talented team.  I hope you join us this week and play along!

Hand Stamped Sentiments

All Stampin’ Up! supplies below may be ordered from my website or email me to place your order.

All products are Stampin’ Up! unless noted.

Butterfly headband

Material: non-Stampin’ Up! Felt

Accessories:  White Grograin Ribbon, Basic Rhinestones, Beautiful Butterflies die, non-Stampin’ Up! plastic headband

Graduation Owl Card

It’s that time of year and I’ve been inspired to create graduation projects.  I used the Perfect Pennants die to create the focal point of my card.  I have tons of silver card stock from an invitation project.  I used it as my card base and die cut a pennant from Basic Black cardstock.  I embossed the pennant with the Stripes embossing folder and added a silver glitter top.  I cut both medallions from the Perfect Pennants die and used my Owl builder punch for my graduation owl.  Doesn’t he look smart?  He’s such a cutie too!

I printed the black and white Houndstooth check from the digital Night and Day Designer Series Papers for his little vest.  You get ten beautiful black and white background papers for $4.95.   I love creating hybrid projects with My Digital Studio.

I used the graduation cap from the digital stamp set Go Graduate Plus stamp brush set.  I printed it out and used it as a template.  The wings are 1/4 of the 1-3/4 Scallop Circle.

This card can be given to any graduate and they would love it.  Especially if there’s a gift card or check inside.  This card can be created with any high school colors.  I think I’ll send this card to my nephew.  His school colors are cardinal, black and white.

Stampin' Up! Graduation Owl card

click image to enlarge

All Stampin’ Up! supplies below may be ordered from my website or email me to place your order.

All products are Stampin’ Up! unless noted.

Graduation Owl Card

Size:  4.25″ W x 5.50″ H

Stamp sets:  Delightful Dozen, Go Graduate Plus stamp brush set

Paper: Basic Black, Whisper White, Silver glitter paper, non Stampin’ Up! silver card stock, digitally printed First Edition and Night & Day DSP

Ink:  Cherry Cobbler

Accessories:  Antique brad, Perfect Pennants die, Big Shot, Owl builder punch, Modern Label punch, Scallop Trim Border punch, Embossing Folders; Stripes and Houndstooth, retired Basic Black satin ribbon, basic rhinestones

Clever Graduation Cap Gift Card Holder

One of the benefits of being a Stampin’ Up! demonstrator is the Success magazine which is sent to us monthly full of ideas, business tips and techniques.  This month there was a very clever graduation cap gift holder.  Here’s the template for the top and the bottom.

Here are the instructions found in the magazine and edited to coordinate with the project I made.

Instructions
  1. Trace and cut the following from Basic Black Card Stock: one top piece and two bottom pieces.
  2. Emboss one bottom piece using the Big Shot and the Stripes Textured Impressions Embossing Folder. Adhere the left, bottom, and right sides of the embossed card stock to the matching Basic Black piece to create a pocket for the gift card.
  3. Cut four 4-inch x 1-inch strips of Silver Card Stock.  Punch the edges of the Silver Card Stock using the Dotted Scallop Ribbon Punch. Adhere a 2-1/8″ portion of the punched piece to the bottom of the Very Vanilla greeting and secure both pieces to the top of the bottom piece.
  4. Cut a 5-1/2″ x 1/2″ strip of Silver Card Stock. Stamp “Congratulations” on the card stock in Cherry Cobbler ink.  (optional – I heat embossed with Iridescent Ice).  Adhere the strip to the cap as shown on the card and trim the excess card stock.
  5. Make a tassel and wrap  around the prongs of a Glitter Brad. Attach the brad to the center of the cap.
  6. Attach the top of the hat to the bottom of the hat using a Silver Brad.

This slideshow requires JavaScript.

All Stampin’ Up! supplies below may be ordered from my website or email me to place your order.

All products are Stampin’ Up! unless noted.

Graduation Cap Gift card holder

Size:  6.00″ W x .50″ H

Stamp sets:  Delightful Dozen

Paper: Basic Black, non Stampin’ Up! silver card stock

Inkjet:  Cherry Cobbler

Accessories:  silver brad, glitter brad, Dotted Scallop Ribbon punch, Stripes Textured Embossing Folder, silver ribbon to make tassel

Masculine Bookmark

This week’s challenge at Hand Stamped Sentiments we have a masculine inspiration challenge.  Masculine projects are a challenge for me but my husband gave me a great idea!  He suggested I make bookmark for him.  I immediately thought My Digital Studio.  I haven’t played on it in awhile and this was the perfect opportunity.  I started with the First Edition digital DSP.  The edges look sponged because I used background #1 of the Vintage Overlays digital DSP.  There’s a great tutorial for this technique on www.mydigitalstudio.net.  The images are from digital stamp The Open Seas.  I used Cherry Cobbler and Not Quite Navy. I used two pieces of chipboard and covered each side with the  digital background.  Before I glued them together I put the Antique brads through.  EASY PROJECT!

Open Seas bookmark

click image to enlarge

I hope you join us this week for our masculine inspiration challenge.  For more inspiration visit HHS to see all the wonderful projects from our talented design team.

HHS masculine stampin up inspiration photo

All Stampin’ Up! supplies below may be ordered from my website or email me to place your order.

All products are Stampin’ Up! unless noted.

Masculine bookmark

Card Size:  1.50″ W x 5.50″ H

Digital Stamp sets:  The Open Seas, font:  French Script for initials

Paper: digital DSP First Edition, non Stampin’ Up! Matte photo paper

Inkjet:  Cherry Cobbler, Not Quite Navy

Accessories:  Antique Brads, retired Early Espresso 1-1/4 striped ribbon

Emboss Resist Mixed Bunch Card

This week at Hand Stamped Sentiments we have a technique challenge for you – emboss resist.  This technique is lots of fun!  If you haven’t done it before, there’s a great tutorial and video on SCS.  For my card this week I used the Mixed Bunch stamp set and coordinating Blossom punch.  I stamped the flower images then heat embossed with clear embossing powder.  I added color with sponge daubers and embellished with basic rhinestones colored with Sharpies.  The sentiment is stamped with Versamark and Melon Mambo then heat embossed with clear.  I made a triple loop bow using the 1/2″ Daffodil Delight seam binding.

Mixed bunch stampin up emboss resist card

click image to enlarge

This was  a very easy card that came together in no time.  Hop on over to HSS and see all the beautiful projects from our design team.  They’re sure to inspire!

Hand Stamped Sentiments emboss resist

All Stampin’ Up! supplies below may be ordered from my website or email me to place your order.

All products are Stampin’ Up! unless noted.

Emboss Resist Mixed Bunch card

Card Size:  5.00 H x 5.00″ W

Stamp sets:  Mixed Bunch, Loving Thoughts

Paper: Whisper White

Ink: Melon Mambo, Daffodil Delight, Pool Party

Accessories:  Heat tool, clear embossing powder, Blossom punch, basic rhinestones, 1/2″ Daffodil Delight seam binding,  Sharpie permanent markers, dimensionals, mini glue dots, sponge daubers

Another Blossom Petals Punch Flower Card

I love that the Blossom Petal Builder card makes so many types of flower.  Lately I’ve been stuck on making flowers with the larger and smaller petals.  I punched 16 of the larger petals and 8 of the smaller ones.  I then punched a 1-3/8″ circle and 1-1/4″ circle from an adhesive sheet to make two stickers.  Punch another 1″ circle from the adhesive sheet.

Use 8 of the larger on the 1-3/8″ circle, space them evenly.  Adhere the other large 8 petals on the 1-1/4″ circle, space them evenly.  Adhere the smaller 8 petals on the 1″ circle.  Use dimensionals to adhere the petal layers.  The larger petal circle is the base, then the 1-1/4″ petal circle followed by the 1″ small petal circle for the center.  I then punched 3 of the larger flowers from the Boho Punch and adhered the 3 flowers with mini glue dots then embellished with pearls.  The sentiment is cut using the Framelit dies and coordinating stamp set, Apothecary Art.

Blossom Petals Punch flower card

click image to enlarge

My color inspiration comes from Pals Paper Arts color challenge of – Calypso Coral, Baja Breeze and So Saffron.

All Stampin’ Up! supplies below may be ordered from my website or email me to place your order.

All products are Stampin’ Up! unless noted.

Blossom Petals Punch Flower card

Card Size:  5.00 H x 5.00″ W

Stamp sets:  Apothecary Art

Paper: Whisper White, Baja Breeze, Calypso Coral, So Saffron

Ink: Calypso Coral

Accessories:  Big Shot, Perfect Polka Dots Embossing Folder, Blossom Petals punch, Boho punch, Scallop Trim Corner Punch, Framelits Dies, 5/8″ Organza ribbon, Basic Pearls dimensionals