• my photo

    Click photo for About Me

  • Enter your email address to subscribe to this blog and receive notifications of new posts by email.

    Join 1,007 other subscribers
  • Pinterest

    Follow Me on Pinterest
  • Amazing Deals

    Click image for Amazing Deals!

  • Share this blog

    Bookmark and Share
  • Archives

  • Categories

  • Recent Posts

  • Blog Stats

    • 400,866 hits
  • Meta

  • Disclaimer

    All content found at Stampin' by Genny is the sole responsibility of Genevieve Valdes, a Stampin’ Up! Independent Demonstrator. Stampin’ Up! does not endorse, edit, or otherwise contribute to this website.

Clever Graduation Cap Gift Card Holder

One of the benefits of being a Stampin’ Up! demonstrator is the Success magazine which is sent to us monthly full of ideas, business tips and techniques.  This month there was a very clever graduation cap gift holder.  Here’s the template for the top and the bottom.

Here are the instructions found in the magazine and edited to coordinate with the project I made.

Instructions
  1. Trace and cut the following from Basic Black Card Stock: one top piece and two bottom pieces.
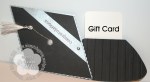
  2. Emboss one bottom piece using the Big Shot and the Stripes Textured Impressions Embossing Folder. Adhere the left, bottom, and right sides of the embossed card stock to the matching Basic Black piece to create a pocket for the gift card.
  3. Cut four 4-inch x 1-inch strips of Silver Card Stock.  Punch the edges of the Silver Card Stock using the Dotted Scallop Ribbon Punch. Adhere a 2-1/8″ portion of the punched piece to the bottom of the Very Vanilla greeting and secure both pieces to the top of the bottom piece.
  4. Cut a 5-1/2″ x 1/2″ strip of Silver Card Stock. Stamp “Congratulations” on the card stock in Cherry Cobbler ink.  (optional – I heat embossed with Iridescent Ice).  Adhere the strip to the cap as shown on the card and trim the excess card stock.
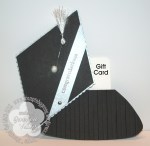
  5. Make a tassel and wrap  around the prongs of a Glitter Brad. Attach the brad to the center of the cap.
  6. Attach the top of the hat to the bottom of the hat using a Silver Brad.

This slideshow requires JavaScript.

All Stampin’ Up! supplies below may be ordered from my website or email me to place your order.

All products are Stampin’ Up! unless noted.

Graduation Cap Gift card holder

Size:  6.00″ W x .50″ H

Stamp sets:  Delightful Dozen

Paper: Basic Black, non Stampin’ Up! silver card stock

Inkjet:  Cherry Cobbler

Accessories:  silver brad, glitter brad, Dotted Scallop Ribbon punch, Stripes Textured Embossing Folder, silver ribbon to make tassel

Graduation Explosion Box

For our grandson’s graduation gift I made this explosion box.  I obtained the instructions for the box from the Glitter Adventure blog.  For the top I cut the sides so it would look more like graduation cap.  I had a great time making this box making sure not to over embellish since it was for our grandson.  The box was also suppose to hold what every graduate going to college is hoping for…a check.  I made a button from Cherry Cobbler card stock and covered it with Crystal Effect and let it dry overnight.  I then took wire to make the holder for the envelope.  I used a Sharpie marker to wrap the wire around it to make the loops.  All the sentiments were printed from My Digital Studio.  I downloaded pictures from his FB page to include in the pockets of the second layer.  The outer layer has pockets for other momentos or photos.  I decorated each layer before assembling.  Once all the layers were decorated I adhered the box.  I photographed each layer below.

Click on the photos to enlarge.

OLYMPUS DIGITAL CAMERA         OLYMPUS DIGITAL CAMERA         OLYMPUS DIGITAL CAMERA
OLYMPUS DIGITAL CAMERA

OLYMPUS DIGITAL CAMERA

OLYMPUS DIGITAL CAMERA

All Stampin’ Up! supplies below may be ordered from my website or email me to place your order.

All products are Stampin’ Up! unless noted.

Graduation Explosion Box

Stamps:  Digital Stamps:  Go Graduate Plus, Great Grads Stamp, Word Play

Paper: Card Stock:  Silver, Cherry Cobbler, Very Vanilla

Ink:  inkjet printer to print Cherry Cobbler sentiments

Accessories:  Crystal Effects, Glitter brads, Corner rounder punch, Decorative Label punch, Wide Oval Punch, 1-3/8 circle punch, Stars #2 Originals Die, Buttons #5 Sizzlits, silver brad, non-SU 1/4” satin ribbon, non-SU silver wire, mini-glue dot

Technique: Digital and paper crafting, die cutting

For the Graduate

This week at Hand Stamped Sentiments we’re celebrating graduates.  Create any project – card, gift set, card holder, money holder, scrapbook page, or any 3D item with a graduation theme.  For my project I wanted to make a gift set using my Top Not die.  I used Basic Black, Silver and Whisper White card stock.  After die cutting the Basic Black Top Notes I textured them with the Texture Plates Kit #4 Distressed plate.  I die cut two more Top Notes in Silver to outline the black ones.  Cut along he perforated line on the Basic Black Top Note then adhere the silver Top Note behind the Basic Black one. The graduation cap silhouette is one I created.  See below for template.  I rolled some Whisper White paper for the diploma and tied with Basic Black Satin ribbon.  I then stamped the sentiment (Curly Cute) and created the banner.

I created the card to hold a gift card.  I used the Two-step owl punch and created the cap from silver card stock.  The diploma is a strip of Whisper White then wrapped with retired silver cording.  I then adhered the owl to circle layers with dimensionals.

I hope you’re inspired to make your own graduation gift sets.  Hop over to Hand Stamped Sentiments, be inspired, create and upload your project.

Here’s my project.  Click the images to enlarge.

OLYMPUS DIGITAL CAMERA         OLYMPUS DIGITAL CAMERA
Top Note box and gift card holder Top Note box
OLYMPUS DIGITAL CAMERA         OLYMPUS DIGITAL CAMERA
Top Note box side view Gift card holder inside Top Note box
OLYMPUS DIGITAL CAMERA         OLYMPUS DIGITAL CAMERA
Outside of gift card holder Gift card holder inside

All Stampin’ Up! supplies below may be ordered from my website or email me to place your order.

All products are Stampin’ Up! unless noted.

Top Note Box

Templates: click here for box template; click here for grad cap template

Size: 3-1/2” L x 2-1/2″ W x 1” D

Stamps: Curly Cute

Paper: Basic Black , Silver, Whisper White

Ink: Basic Black

Accessories: Very Black Satin Ribbon, Big Shot, Texture Plates Kit #4 Distressed plate

Technique: Stamping, Die Cutting, Embossing

Congrats Gift Card holder

Size: 3-1/2” W x 2-5/8”H

Stamps: Silhouette Sentiments

Paper: Basic Black , Silver, Whisper White, Digital DSP Night and Day houndstooth pattern

Ink: Basic Black

Accessories: 1-3/4” circle punch, 1-3/8” circle punch, Two-Step Owl punch, retired Slit punch, Very Black Satin Ribbon, retired silver cording, dimensionals, MIni-glue dots

Technique: Stamping, Die Cutting, Embossing

Another Graduation Gift Set

My niece in Oregon graduated last week and I needed to send a gift or card so I decided to make this adorable gift tote and matchbox dresser ensemble I saw on Laura Lin’s blog.  The instructions from Laura and my instructions for the matchbox dresser are here.  As Laura says they are addicting and I’m going to make more.  Since I am transitioning to the new Stampin’ Up! DSP, and I’m waiting for my order, I had to use non SU paper that I had in stock.  Sorry SU DSP and card stock fans.

I used the tags cut from the matchbox die to make little notes and I put one  in each of the drawers.  I decorated the notes with butterflies and rhinestones.  I used one tag for the top of the dresser and tied with the ribbon.

To give the card that extra touch I lined the outside flap of the envelope.

Graduation gift tote set

click image to enlarge

matchbox dresser

click image to enlarge

All Stampin’ Up! supplies below may be ordered from my website or email me to place your order.
All products are Stampin’ Up! unless noted.

Project Info:

Gift tote ensemble

Finished tote size:  6″ x 6″ and about 7″ around the top

Stamp Sets: Tiny Tags, Picture This, Go Graduate digital stamp set

Paper: 12″ x 12″ non-SU pink textured CS, 12″ x 12″ non-SU teal textured CS, 12″ x 12″ Penny Lane-Graceful Circles by My Mind’s Eye paper

Ink: Bermuda Bay Classic Ink (115655 retiring June 30, 2010), Melon Mambo printed from my inkjet printer for ‘Happy Graduation’ sentiment and Melon Mambo Classic Ink (115656)

Accessories: Big Shot, Top Not die, Matchbox die, Beautiful Wings Embosslits die, Scallop Edge Punch, Pretty in Pink Satin Ribbon, Medium Naturals white envelope, 1/16″ circle punch, non-SU celadon satin ribbon, Spare Parts fabric designer brads for dresser pulls, non-SU color rhinestones, non-SU white grommets

Techniques: stamping, die cutting

New Digital Downloads

Just in time for all your graduation projects the latest group of digital downloads for My Digital Studio includes Go Graduate plus stamp brush set, Jumbo Outline and Contempo Alphabet stamp brush sets.  How cool is that!  Remember that you do not have to own the My Digital Studio software to use the images in your digital crafting.  You can use them with any software that imports or inserts images in your document.  To purchase these or any other downloads go to my website and instantly the downloads are available.  I love it – instant gratification!

Item Description Price
121069 Go Graduate Plus stamp brush set $5.95
122143 Jumbo Outline Alphabet stamp brush set $9.95
122145 Contempo Alphabet stamp brush set $9.95

Go Graduate Plus Stamp Brush Set

Jumbo Outline Alphabet Stamp Brush Set

Contempo Alphabet Stamp Brush Set

Hand Stamped Sentiments – Color Splash Challenge

It’s a color splash challenge.  Basic Black, Real Red and So Saffron are the bold colors we’re playing with this week at Hand Stamped Sentiments.  I decided for my project this week I would use the Stars #2 Original Die , glitter and My Digital Studio to create a graduation card.  I created the Basic Black grid background and the Real Red grid background with ‘CONGRATS’ on My Digital Studio.  I used the Big Shot and the star die to cut the stars then glittered the Basic Black stars and layered them with the Real Red and So Saffron stars.  A quick and easy card with some bling!  I invite you to post your creation.

Congrats card

click image to enlarge

All Stampin’ Up! supplies below may be ordered from my website or email me to place your order.

Project info:  All supplies are Stampin’ Up! except were otherwise noted.

Congrats card

Stamps:  none

Paper:  Real Red cs, Basic Black, So Saffron cs  My Digital Studio was used to create the Basic Black and Real Red grid background as well as the sentiment.

Ink:  none

Accessories:  Big Shot, Stars #2 Original Die, Martha Stewart Onyx glitter, medium envelope flap lined with Basic Black grid paper

Hand Stamped Sentiments Color Splash Challenge

This past Sunday the Olympics ended and to celebrate the athletes and the games over at Hand Stamped Sentiments we’re doing a color challenge with the graphic colors of these winter games – Bashful Blue, Not Quite Navy, Glorious Green, Green Galore, Brilliant Blue.

Hand Stamped Sentiments Color Splash Challenge

I’m really liking My Digital Studio software.  I was also inspired by the Olympic rings so I created the circles for this card with the software then punched them out with SU 1-3/8″ circle punch then embellished them.  The card I created for this challenge would be perfect for a birthday or graduation.

Celebrate card for Challenge #5

click to enlarge image

All Stampin’ Up! supplies below may be ordered from my website or email me to place your order.

Project info:

Stamps:  none; Circles were printed from My Digital Studio

Paper:  SU Card stock:  Bashful Blue, Whisper White

Ink:  none; Circles and stamp images were printed from My Digital Studio

Accessories:  SU Pretties Kit Star Brad, SU Silver Brad, SU Rhinestone Brad, Big Shot, Buttons #5 die, Stars #2 die, Trio Flower punch, Small heart punch, Two-Step Bird Punch, SU corner punch,  SU 1-3/8 circle punch, SU Perfect Polka Dots Texture Folder, SU Silver Cord, SU dimensionals

%d bloggers like this: