• my photo

    Click photo for About Me

  • Enter your email address to subscribe to this blog and receive notifications of new posts by email.

    Join 1,203 other subscribers
  • Pinterest

    Follow Me on Pinterest
  • Amazing Deals

    Click image for Amazing Deals!

  • Share this blog

    Bookmark and Share
  • Archives

  • Categories

  • Recent Posts

  • Blog Stats

    • 411,353 hits
  • Meta

  • Disclaimer

    All content found at Stampin' by Genny is the sole responsibility of Genevieve Valdes, a Stampin’ Up! Independent Demonstrator. Stampin’ Up! does not endorse, edit, or otherwise contribute to this website.

Happy Valentine’s day tag card

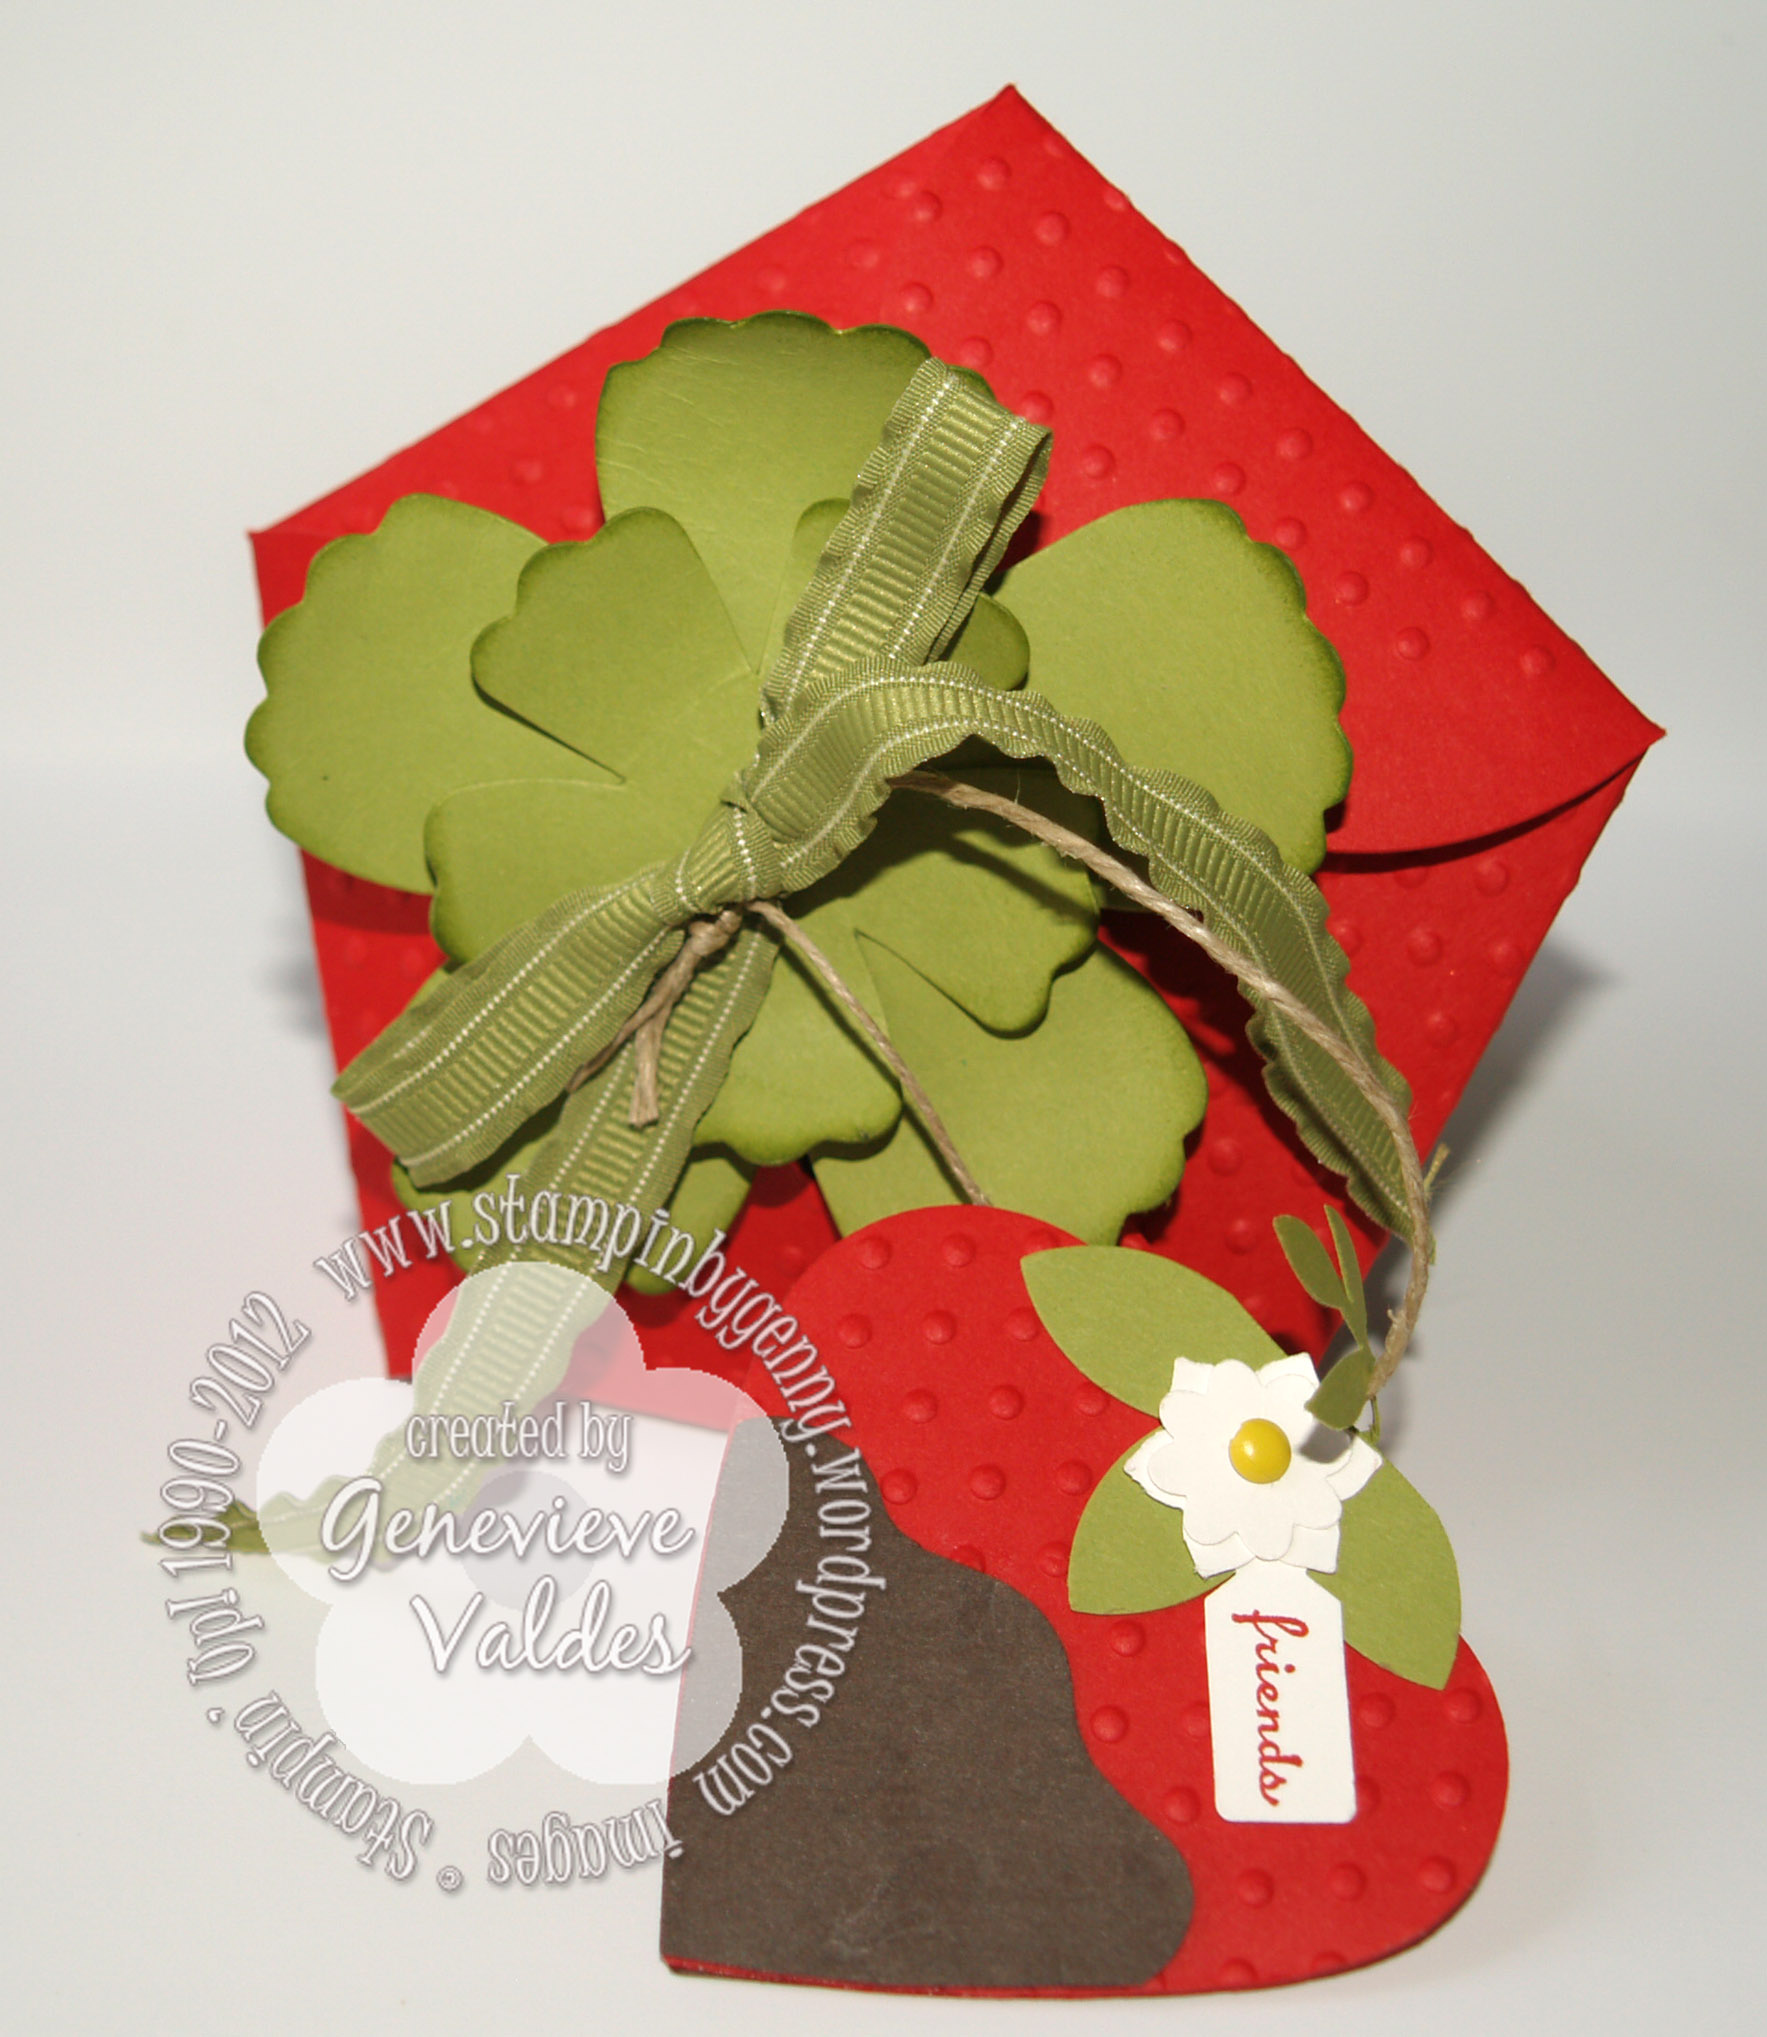
This week at Hand Stamped Stamped Sentiments we have a color challenge for you.  The colors of Cherry Cobbler, Pretty in Pink, Melon Mamboare perfect for Valentine’s day so I created this Valentine card with tag.  The kraft pocket is a holiday retired Stampin’ Up! product that I embossed with the Chevron embossing folder. The tag is created from Vanilla card  stock and embellished with the Cherry Cobbler Dotted Scallop ribbon.  It’s perfect for a Valentine message.  I would show it to you but it’s a surprise for someone special.

Stampin' Up! tag valentine's day card

click to enlarge

Happy Valentine’s Day Tag card

Stamp Sets:  Tiny Tags, Distressed Dots

Paper:  Very Vanilla, Whisper White, Melon Mambo, Pretty in Pink, Cherry Cobbler

Ink:  Early Espresso, Pretty in Pink, Cherry Cobbler, Melon Mambo

Acessories:  Big Shot, Hearts a Flutter Framelits and Stamp set, Tea Lace paper doilies, Cherry Cobbler and whisper White twines, Vintage Faceted Designer buttons, Bitty buttons, Basic rhinestones, Cherry Cobbler Scalloped dotted ribbon, Chevron embossing folder, small heart punch

Be My Valentine Heart Pouch

This week’s challenge at Hand Stamped Sentiments is an inspirational challenge.  See what project is inspired by the photo below.  All sorts of heart projects popped in my head.  Here’s what I created.

This slideshow requires JavaScript.

I used the largest hearts framelit and cut two in Whisper White.  I stamped one of them with the distressed polka dot background.  For the front side of the pouch I wrapped Cherry Cobbler  twine.  The inner box is  triangular.  Click here for directions on how to make triangular box.  I hope this photo inspires you to join us at HSS.

All Stampin’ Up! supplies below may be ordered from my website or email me to place your order.

All products are Stampin’ Up! unless noted.

Heart Framelits Pouch

Stamp Sets:  Delightful Dozen. Distressed Dots Background stamp

Paper:  Whisper White, Cherry Cobbler, Red Glimmer paper

Ink:  Whisper White

Acessories:  Big Shot, Heart Framelits, Owl Punch, Small heart punch, Fashionable Heart Embosslits, Iridescent Powder for sentiment, Cherry Cobbler twine, retired Pinking Hearts border trim punch, 1/2″ Cherry Cobbler Seam Binding Ribbon, Adorning Accents Textured Impressions Embossing Folders

Halloween tags

I created two hybrid Halloween tags using MDS2 .  I printed the tags on Very Vanilla cardstock, cut the tags with my paper trimmer then added the rhinestones and the ribbon.  The large bat I printed on Very Vanilla and cut it out with my sharp scissors.  I also added rhinestones then adhered it with dimensionals.

This slideshow requires JavaScript.

I hope your inspired to join us this week at Hand Stamped Sentiments and show us tag projects.

All Stampin’ Up! supplies below may be ordered from my website or email me to place your order.

All products are Stampin’ Up! unless noted.

Hybrid Halloween tags

Size:  5.00″ H x 2-7/8″ W

Digital Stamp sets:  Spooky Things spider, From the Crypt bat, Eat, Drink & Be Scary Halloween definition

Ink:  Black, Tangerine Tango, Lucky Limeade

Paper:  Very Vanilla

Embellishments:  Digital punches:  1.25 Square Punch, Digital DSP: Vintage Overlays texture 2, Night Owl pattern 7,  Non-digital Basic rhinestones, Lucky Limeade ribbon, 3/8 Ruffled ribbon, Linen Thread

Halloween paper pumpkins and tutorial

My inspiration for my project comes from Hand Stamped Sentiments pumpkin challenge.  I love making these paper strip pumpkins.  Instead of fall I created these Halloween pumpkins using the Howlstooth & Scaringbone DSP.  They are super easy to make and so much fun to decorate.  They would also be great to demo at a workshop.

This is a tutorial for making these cute paper strip pumpkins.  You can also make a fall pumpkin with the traditional colors of fall.  To download the tutorial click here.

Stampin' Up! Halloween paper strip pumpkins

click to enlarge

Stamp sets:  Wicked Cool, Ghoulish Googlies, Wonderfall

Ink:  Tangerine Tango, Basic Black, Basic Gray

Paper:  Tangerine Tango, Basic Black, Very Vanilla, Silver Glitter paper, Howlstooth & Scaringbone DSP

Embellishments:  Big Shot, Autumn Accents,  Antique brads, Silver brads, Googlies, Basic rhinestones, Black embossing powder, Heat Tool, Tag Punch, Sponge Daubers

Pumpkin tutorial

Paper Pumpkin strip tutorial

First cut 12 strips of paper 1″ x 6″.  The smaller pumpkin is made with ¾” x 4” strips.

At this point you can sponge the edges of your paper strips.  I chose not to for my pumpkins.  Stamp and sponge the tag. Cut your leaves.  Set these aside until you are ready to embellish your project.

Paper strip pumpkin tutorial

Paper strip pumpkin tutorial

Stack your paper strips then punch with the Crop-a-dile worked at both ends.  Insert your brads.  To help the pumpkin stand better I inserted the smaller brad with the prongs opposite the larger one.

Paper strip pumpkin tutorial

Spread apart the strips. Bend the stack of papers back and forth to break down the fibers to make them more pliable.

Halloween paper strip pumpkin

Now you are ready to decorate the top.  I added the curled strips of paper, glitter paper leaves and tag underneath the brad with a bit of adhesive.

Halloween paper strip pumpkin

For the smaller pumpkin I decorated it with a leaf and sentiment from Googly Ghouls.  I also added the googly eyes.

I hope you’re inspired by these pumpkins and you’ll join us at Hand Stamped Sentiments for this week’s challenge.

Stampin' Up! Pumpkins Challenge

Stampin’ Up! Snowflake tag inspired by blue glass

Wouldn’t this tag look great as an ornament or around a bottle of champagne?  This week I was inspired to create this snowflake tag.  Hand Stamped Sentiments has an inspiration challenge and the photo inspired me to use the Snow Flurry die and Apothecary Accents .  I die cut the shape then embossed it with the Northern Flurry Textured embossing folder.  I used Frost White Shimmer paint to sponge the embossed snowflakes and used the snowflakes from the Snow Swirled stamp set to stamp some of the snowflakes with the Frost White shimmer paint.  I embellished the snowflake with basic rhinestones and finished the center with a Designer Vintage Faceted button and white twine.  The sentiment is from the Greetings of the Season stamp set.

This slideshow requires JavaScript.

Hop on over to HSS and see all the wonderful projects by our talented design team.  Be inspired and join us!

HSS challenge 137

All Stampin’ Up! supplies below may be ordered from my website or email me to place your order.

All products are Stampin’ Up! unless noted.

Snowflake Christmas Tag

Size:  3.00″ W x 5.00″ H

Stamp sets:  Greetings of the Season, Snow Swirled

Ink:  Frost White Shimmer Paint, Midnight Muse

Paper:  Baja Breeze, Whisper White

Embellishments:  Big Shot, Apothecary Accents, Snow Flurry Bigz Die, Northern Flurry Textured Embossing folder, 1-3/8 square punch (for banner ends), Designer Vintage Faceted button, Basic rhinestones, White Baker’s Twine, Whisper White Organza ribbon, Whisper White Stitched Grosgrain ribbon, Glue dots

Not too early for Halloween

For this week’s challenge at Hand Stamped Sentiments we have a vintage theme challenge.  Vintage is not difficult to accomplish.  Distressing and sponging paper are two ways to age your project.  I created this Halloween tag to put around a bottle of wine.  Perfect for a hostess gift.

Halloween Stampin' Up! toxic treat tag

click image to enlarge

Try adding some vintage techniques to your project.  Hop on over to Hand Stamped Sentiments to see all the wonderful projects from our design team.  I know you’ll be inspired.

All Stampin’ Up! supplies below may be ordered from my website or email me to place your order.

All products are Stampin’ Up! unless noted.

Halloween Toxic Treat Tag

Approx. Size:  2-5/8″ W x 5.25″ H

Stamp sets:  Toxic Treats, Memorable Moments

Paper: Card Stock:    Basic Black, Pumpkin Pie, Very Vanilla

Ink:   Basic Black,  Pumpkin Pie

Accessories:  Glimmer Brads, Vintage Faceted buttons, Scallop Dots Black ribbon, Taffeta Pumpkin Pie ribbon, sponge dauber

Mixed bunch party favor box

Due to some technical difficulties I was not able to post last week when I got home from convention.  But her I am.  It’s been a busy week trying to get caught up.  This week at Hand Stamped Sentiments we have a challenge for party favor boxes.  I had not used the Fancy Favor box in awhile so with summer in full swing here’s a favor for any summer party.

The box is die cut from Cherry Cobbler, the flower image is from the Mixed Bunch set and is stamped on Whisper White with Daffodil Yellow ink then die cut with the Blossom punch.  The center image is also from the Mixed Bunch set and is stamped in Cherry Cobbler ink.  For added sparkle I used Cherry Cobbler Dazzling Details for the center.  The handle was die cut with the Oval Punch then tied with Daffodil Seam binding ribbon.  So simple but this favor would look great on a white plate filled with chocolates.

party favor box

click image to enlarge

I hope you’re inspired to join us at HSS and wow us with your favorite party favor.  Also take a look at the other projects from our talented design team.

All Stampin’ Up! supplies below may be ordered from my website or email me to place your order.

All products are Stampin’ Up! unless noted.

Fancy Box Party Favor

Approx. Size:  3.00″ W x 3.50″ H

Stamp sets:  Mixed Bunch

Paper: Card Stock:  Cherry Cobbler, Whisper White

Ink:   Daffodil Yellow, Cherry Cobbler

Accessories:  Fancy Favor Box die, Big Shot, Blossom Punch, 1″ circle punch, Cobbler Dazzling Details, Daffodil Yellow Seam Binding ribbon, Dimensionals

Stampin’ Up! Petal Cone Strawberry box and tag

Juicy red strawberries were my inspiration for this week’s fruit challenge at Hand Stamped Sentiments.  I love shopping the produce section.  Vibrant colors and fruit displayed to show it’s freshness.  Strawberries are in abundance at my grocery store.  The clear boxes filled with juicy strawberries got me to thinking I could make a strawberry out of the Petal Cone die and to make it more decadent I thought chocolate dipped!  Here’s my creation complete with tag.  See below to download the tutorial for how to make this gift set.

This slideshow requires JavaScript.

Click here to download the tutorial complete with photos.

Please join us this week at Hand Stamped Sentiments.  Also take a look at the amazing projects from our talented design team.

All Stampin’ Up! supplies below may be ordered from my website or email me to place your order.

All products are Stampin’ Up! unless noted.

Strawberry box and tag gift set

Box Size:  2.50″ W x 5.00″ H

Tag Size:  2.50″ W x 2.50″ H

Stamp sets:  Tiny Tags

Paper: Real Red, Early Espresso, Lucky Limeade, Whisper White

Ink:  Real Red, Old Olive

Accessories:  Heart Framelits, Big Shot, Fun Flowers Bigz L Die, Petal Cone Bigz L Die, Perfect Polka Dots Embossing Folder, 27″ of Lucky Limeade 3/8″ Ruffled Ribbon, 1/8″ hole punch, Big Bite Crop-a-dile, Sticky Strip, sponge dauber, Hemp Twine, Heart Framelits, Retired 5-Petal Flower Punch (you can substitute with scallop circle punch), Boho Blossoms Punch, Jewelry Tag Punch, Bird Builder Punch (for leaves at top of strawberry), 1/8″ hole punch, 3/16” Daffodil Delight brad

Inspired again by Stampin’ Up’s Idea Book & Catalog – A Frames Framelit Pouch

This week’s challenge at Hand Stamped Sentiments is a color challenge of – Calypso Coral, Daffodil Delight and Baja Breeze.  Gorgeous summer colors!  As I was looking through Stampin’ Up’s new Idea Book & Catalog I saw a treat pouch created with the Label Framelits.

I first cut two framelits using the second to largest framelit.  I then stamped the flourish flower from Mixed Bunch with Versamark and heat embossed it in clear.  Score where shown.

Cut 2 framelits using the second to largest.  Click image to enlarge

Punch both sides of a 1-1/4″ x 3-3/4″ Calypso Coral strip of cardstock with the Scallop Trim Border punch.  Trim the strips and adhere them to the bottom of the pouch.

click image to enlarge

Punch 4 flowers using the Boho Blossom punch and adhere the layers with mini glue dots

click image to enlarge

Adhere the bottoms of the pouch with sticky tape.

Stamp the flower with Daffodil Delight and punch using the Blossoms punch.  Stamp the center on Baja Breeze card stock with Versamark then clear heat emboss.  Use dimensionals to adhere the Baja Breeze center to the flower.

Stamp the sentiment then die cut using the Bitty Banners Framelits.  Adhere the banner behind the center with a mini glue dot.

Embellish Scallop Border Trim edge with pearls.

Punch a hole through both sides of the pouch with a regular hole punch.  Use an 8″ piece of Daffodil Delight seam binding to tie together both sides.

click image to enlarge – Frames Framelit Pouch

I hope you’re inspired to join us this week at Hand Stamped Sentiments.  Also take a look at the amazing projects from our talented design team.

All Stampin’ Up! supplies below may be ordered from my website or email me to place your order.

All products are Stampin’ Up! unless noted.

Inspire Treat Pouch

Size:  3.00″ W x 4.00″ H

Stamp sets:  Bitty Banners, Mixed Bunch, Loving Thoughts

Paper: Calypso Coral, Baja Breeze, Whisper White

Ink:  Daffodil Delight, Calypso Coral, Versamark

Accessories:  Frames Framelits, Bitty Banners framelits, Blossoms punch, Scallop Trim border punch, 1″ circle punch, Daffodil Delight seam binding ribbon, Basic Pearls, Clear embossing powder, Heat Tool, non-Stampin’ Up hole punch

Clever Graduation Cap Gift Card Holder

One of the benefits of being a Stampin’ Up! demonstrator is the Success magazine which is sent to us monthly full of ideas, business tips and techniques.  This month there was a very clever graduation cap gift holder.  Here’s the template for the top and the bottom.

Here are the instructions found in the magazine and edited to coordinate with the project I made.

Instructions
  1. Trace and cut the following from Basic Black Card Stock: one top piece and two bottom pieces.
  2. Emboss one bottom piece using the Big Shot and the Stripes Textured Impressions Embossing Folder. Adhere the left, bottom, and right sides of the embossed card stock to the matching Basic Black piece to create a pocket for the gift card.
  3. Cut four 4-inch x 1-inch strips of Silver Card Stock.  Punch the edges of the Silver Card Stock using the Dotted Scallop Ribbon Punch. Adhere a 2-1/8″ portion of the punched piece to the bottom of the Very Vanilla greeting and secure both pieces to the top of the bottom piece.
  4. Cut a 5-1/2″ x 1/2″ strip of Silver Card Stock. Stamp “Congratulations” on the card stock in Cherry Cobbler ink.  (optional – I heat embossed with Iridescent Ice).  Adhere the strip to the cap as shown on the card and trim the excess card stock.
  5. Make a tassel and wrap  around the prongs of a Glitter Brad. Attach the brad to the center of the cap.
  6. Attach the top of the hat to the bottom of the hat using a Silver Brad.

This slideshow requires JavaScript.

All Stampin’ Up! supplies below may be ordered from my website or email me to place your order.

All products are Stampin’ Up! unless noted.

Graduation Cap Gift card holder

Size:  6.00″ W x .50″ H

Stamp sets:  Delightful Dozen

Paper: Basic Black, non Stampin’ Up! silver card stock

Inkjet:  Cherry Cobbler

Accessories:  silver brad, glitter brad, Dotted Scallop Ribbon punch, Stripes Textured Embossing Folder, silver ribbon to make tassel