• my photo

    Click photo for About Me

  • Enter your email address to subscribe to this blog and receive notifications of new posts by email.

    Join 1,021 other subscribers
  • Pinterest

    Follow Me on Pinterest
  • Amazing Deals

    Click image for Amazing Deals!

  • Share this blog

    Bookmark and Share
  • Archives

  • Categories

  • Recent Posts

  • Blog Stats

    • 402,197 hits
  • Meta

  • Disclaimer

    All content found at Stampin' by Genny is the sole responsibility of Genevieve Valdes, a Stampin’ Up! Independent Demonstrator. Stampin’ Up! does not endorse, edit, or otherwise contribute to this website.

Wonderfall Leaves

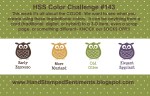
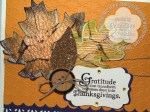
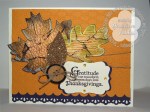
This week I created a card for Hands Stamped Sentiments color challenge of More Mustard, Old Olive, Early Espresso and Elegant Eggplant.  I used the same technique for the leaves as in my fall easel card.  This card was easy and fast.  The Wonderfall leaves stamp set and die make it super easy to create leaves.  I used the Fancy Fan Textured Impressions folder for the background.  I love the pattern it’s so vintage!  I used the Scallop border punch for the More Mustard layer and I used one of the Finishing Touches Edgelits Dies for the Elegant Eggplant cut-out border.  For some sparkle, I die cut one of the leaves from the Champagne Glitter paper.  I love this paper.  Just a little goes a long way.  The sentiment is from the Day of Gratitude stamp set and embossed with clear embossing powder.

This slideshow requires JavaScript.

Join us this week at Hand Stamped Sentiments and show us your color splash.  We’d love to see it!

All Stampin’ Up! supplies below may be ordered from my website or email me to place your order.

All products are Stampin’ Up! unless noted.

Wonderfall Leaves Card

Size:  4.25″ H x 5.50″ W

Stamp sets:  Day of Gratitude, Wonderfall

Ink:  Elegant Eggplant, More Mustard, Early Espresso, Old Olive

Paper:  Very Vanilla, More Mustard, Elegant Eggplant, Champagne Glitter Paper

Embellishments:  Decorative Label Punch, Scallop Border Punch, Big Shot, Autumn Accents Bigz Die, Finishing Touches Edgelits Dies, Fancy Fan Textured Impressions folder, Basic Rhinestones, Linen Thread, Naturals Designer buttons

Wonderfall Leaves Easel Card

I created this easel card with the fabulous Wonderfall stamp set and Autumn Accents die.  The card base was die cut with the Floral Framelits.  The technique I used to color the leaves I learned at convention.  The large leaf was stamped in More Mustard.  I then sponged the edges with Cajun Craze and distressed the leaf by folding it in my hand.  I opened up the leaf then took my Raspberry Ripple ink pad and stamped the leaf with the ink pad.  The folds picked up the ink fabulously!  I used the same technique for the smaller leaf.

I embossed the Very Vanilla background layer for the card with the Fancy Fan Textured Impressions Embossing Folder.  For the Very Vanilla bottom layer I stamped the image with the Daydream Medallions then die cut it with the Floral Framelits.  I used the rock’n roll technique for the sentiment.  I always forget about this technique and need to use it more.

This slideshow requires JavaScript.

I hope your inspired to join us this week at Hand Stamped Sentiments and show us your fall inspiration.

All Stampin’ Up! supplies below may be ordered from my website or email me to place your order.

All products are Stampin’ Up! unless noted.

Wonderfall Leaves Easel Card

Size:  5.25″ H x 5.25″ W

Stamp sets:  Wonderfall, Mixed Medley (hostess set), Daydream Medallions

Ink:  More Mustard, Cajun Craze, Raspberry Ripple, Early Espresso, Crumb Cake, Soft Suede

Paper:  Early Espresso, Very Vanilla, Champagne Glimmer Paper

Embellishments:  Big Shot, Fancy Fan Textured Impressions Embossing Folder, Texturz plates,
Autumn Accents Bigz Die, 1-1/4″ Scallop Circle Punch, Floral Framelits, Naturals Designer Buttons, Linen Thread, Sponge Daubers

Halloween paper pumpkins and tutorial

My inspiration for my project comes from Hand Stamped Sentiments pumpkin challenge.  I love making these paper strip pumpkins.  Instead of fall I created these Halloween pumpkins using the Howlstooth & Scaringbone DSP.  They are super easy to make and so much fun to decorate.  They would also be great to demo at a workshop.

This is a tutorial for making these cute paper strip pumpkins.  You can also make a fall pumpkin with the traditional colors of fall.  To download the tutorial click here.

Stampin' Up! Halloween paper strip pumpkins

click to enlarge

Stamp sets:  Wicked Cool, Ghoulish Googlies, Wonderfall

Ink:  Tangerine Tango, Basic Black, Basic Gray

Paper:  Tangerine Tango, Basic Black, Very Vanilla, Silver Glitter paper, Howlstooth & Scaringbone DSP

Embellishments:  Big Shot, Autumn Accents,  Antique brads, Silver brads, Googlies, Basic rhinestones, Black embossing powder, Heat Tool, Tag Punch, Sponge Daubers

Pumpkin tutorial

Paper Pumpkin strip tutorial

First cut 12 strips of paper 1″ x 6″.  The smaller pumpkin is made with ¾” x 4” strips.

At this point you can sponge the edges of your paper strips.  I chose not to for my pumpkins.  Stamp and sponge the tag. Cut your leaves.  Set these aside until you are ready to embellish your project.

Paper strip pumpkin tutorial

Paper strip pumpkin tutorial

Stack your paper strips then punch with the Crop-a-dile worked at both ends.  Insert your brads.  To help the pumpkin stand better I inserted the smaller brad with the prongs opposite the larger one.

Paper strip pumpkin tutorial

Spread apart the strips. Bend the stack of papers back and forth to break down the fibers to make them more pliable.

Halloween paper strip pumpkin

Now you are ready to decorate the top.  I added the curled strips of paper, glitter paper leaves and tag underneath the brad with a bit of adhesive.

Halloween paper strip pumpkin

For the smaller pumpkin I decorated it with a leaf and sentiment from Googly Ghouls.  I also added the googly eyes.

I hope you’re inspired by these pumpkins and you’ll join us at Hand Stamped Sentiments for this week’s challenge.

Stampin' Up! Pumpkins Challenge

%d bloggers like this: