• my photo

    Click photo for About Me

  • Enter your email address to subscribe to this blog and receive notifications of new posts by email.

    Join 1,203 other subscribers
  • Pinterest

    Follow Me on Pinterest
  • Amazing Deals

    Click image for Amazing Deals!

  • Share this blog

    Bookmark and Share
  • Archives

  • Categories

  • Recent Posts

  • Blog Stats

    • 411,353 hits
  • Meta

  • Disclaimer

    All content found at Stampin' by Genny is the sole responsibility of Genevieve Valdes, a Stampin’ Up! Independent Demonstrator. Stampin’ Up! does not endorse, edit, or otherwise contribute to this website.

Vintage Christmas Card

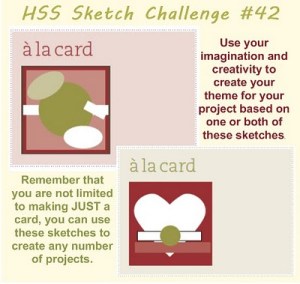
This week at Hand Stamped Sentiments we have a sketch challenge.   The sketches come from the Stampin’ Success magazine.  There are two sketches.  You choose the one that inspires you the most.  I chose to do the first sketch because I’ve been so inspired by Deck the Halls DSP and the vintage look.  I know I promised to post more of the cards that my guests did at the Christmas Stamp-a-Stack this past Saturday and I will.  Look for them on Wednesday.  But for now here’s my newest creation.


click image to enlarge

All Stampin’ Up! supplies below may be ordered from my website or email me to place your order.

All products are Stampin’ Up! unless noted.

Vintage Christmas Card

Finished size: 5″ x 5″

Stamp Sets: Belles & Boughs

Paper: Card stock:  Early Espresso, Always Artichoke, Deck the Halls DSP, Cherry Cobbler; watercolor paper

Ink: Early Espresso, Always Artichoke, Cherry Cobbler, More Mustard, Soft Suede, Versamark (heat embossed in gold the bells and holly images then water colored)

Accessories: Big Shot, Scallop Circle #2 die, Circle Scissor Plus, Decorative Label Punch, Blender pens, Gold Champagne Glass Glitter, 5/8″ Very Vanilla Satin ribbon, Stampin’ Sponges, dimensionals

Techniques: Heat embossing, watercoloring, die cutting

Fall is in the air…

Well it looks like fall is definitely here!  Today when I went out this morning to walk my dog there was a slight chill and it felt so nice because the sun was just beginning to peek out.  All this inspired me to create this week’s Hand Stamped Sentiment’s Baby Wipe Technique Challenge card with the Autumn Splendor and Day of Gratitude stamp sets.  This technique is perfect for capturing the different leaf colors.  I used Pumpkin Pie, Chocolate Chip and Old Olive re-inkers on my baby wipe.  I then used the baby wipe ink pad to stamp the Autumn Splendor leaf images and Punch Potpourri bird image on Very Vanilla card stock.

I used the Scallop Trim corner and border punches on the Very Vanilla layers.  I ran the smaller Very Vanilla layer through my Big Shot with the Square Lattice embossing folder.   Both Very Vanilla layers were sponged with Pumpkin Pie.

The Chocolate Chip layer is distressed with scissors.

I implemented the tone on tone technique and stamped the medallion image from the Day of Gratitude stamp set with Old Olive ink on the Old Olive layer.  I stamped the sentiment with Versamark and Chocolate Chip ink then heat embossed with clear embossing powder.  As a final touch I added a half pearl for the eye of the bird and to the corner of the Old Olive layer.

I enjoyed this technique and encourage you to try it.  It’s very easy and results are beautiful.  You can go here to SCS to see a written and video tutorial for this technique.  Once you’ve created your baby wipe technique project please post it to the Hand Stamped Sentiments site.

Baby Wipe Technique Leaf card

click image to enlarge

All Stampin’ Up! supplies below may be ordered from my website or email me to place your order.
All products are Stampin’ Up! unless noted.

Baby wipe Leaf technique card


Finished size: 5.50″ H x 5.50″ W

Stamp Sets: Day of Gratitude, Autumn Splendor

Paper: Card stock:  Old Olive card base (5.50″ x 5.50″), Very Vanilla (started with following sizes then punched 5.25″ x 5.25″, 4.25″ x 4.25″),  Chocolate Chip (4.50″ x 4.50″), Old Olive (3.25″ x 3.25″)


Ink: Chocolate Chip, Pumpkin, Pie, Old Olive, Versamark

Accessories: Big Shot, Square Lattice embossing folder, half pearls, Two-step bird punch, Scallop Trim corner and border punches, Clear embossing powder, Heat tool

Techniques: Stamping, Embossing

A Haunted Spooky Dresser

I’ve become addicted to creating spooky dressers.  In my previous post I created a witch in the dresser.  Today I created a haunted dresser.  I love the Wicked Cool stamp set and Two-step Owl punch.  The punch is so versatile.  You can create penguins, witch owls, tulips bats and ghosts.  For this card I created the bat and ghosts from the owl punch.  The bat tutorial comes from Bonnie Mountford’s blog. I got the idea for the ghosts from Diane Carr.     See my previous post to link to Jackie Topa’s dresser tutorial and for Patti Lee’s blog link.

I have also submitted my card for the PPA60 Halloween Inspiration challenge.  Stop by and take a look at all the fabulous Halloween cards.

Haunted dresses card

click image to enlarge

All Stampin’ Up! supplies below may be ordered from my website or email me to place your order.
All products are Stampin’ Up! unless noted.

Project info:

Haunted Dresser Card


Finished size: 4.25″ H x 5.50″ W

Stamp Sets: Wicked Cool

Paper: Cardstock:  Basic Black, Whisper White, Pumpkin Pie, Cherry Cobbler


Ink: Whisper White Craft ink, Versamark

Accessories: Curly Label Punch, Two-Step Owl Punch, Scallop Trim edge Punch, 1″ circle Punch, 1-3/8″ circle punch for bat wings, Regular hole punch for scalloping the bottom of bat wings, Clear embossing powder for spider webs, Silver embossing powder for sentiment, Silver Glimmer brads, dimensionals, Sponge daubers, Heat tool

Techniques: Paper crafting, Punch crafting

I’ve become addicted to creating spooky dressers.  In my previous post I created a witch in the dresser.  Today I created a haunted dresser.  I love the Wicked Cool stamp set and Two-step Owl punch.  The punch is so versatile.  You can create penguins, witch owls, tulips bats and ghosts.  For this card I created the bat and ghosts from the owl punch.  The bat tutorial comes from Bonnie Mountford’s blog. I got the idea for the ghosts from Diane Carr.     See my previous post a link to Jackie Topa’s dresser tutorial and for Patti Lee’s blog link.

Witch in a Dresser and did I mention Fort Worth Regional

When I saw this card on Patti Lee’s blog I had to CASE it.  The template for this side step dresser card comes from Jackie Topa.  Click here for Jackie’s tutorial video for how to create this type of card.  I used the same colors and Wicked Cool stamp set Patti used.  Since I do not own the Curly Label punch I used the Tab punch instead and black Glimmer Brads I received at the Fort Worth regional.

Which leads me to mention I attended Stampin’ Up’s! Fort Worth Regional this past  Saturday.  It was a lot fun, informative and Shelli Gardner provided  inspiration.  We all need from time to time a reminder of what we need to be doing to achieve our goals.  There were some very talented demonstrators and SU home office staff present awesome projects and techniques.  This was my first SU event and loved it.  I was hoping to trade some of my Witch Halloween cards before the session started but due to a freeway closing did not arrive to the convention center early enough.  However I was able to trade throughout the session.  I will post  the cards I received in the next few days.  All I can say is the Fort Worth regional left me wanting more which is why I have made it a goal to go to convention.  If you’re a demonstrator and have not attended an SU event consider doing so.  You’ll be glad you did.  Now onto my card.

By the way I have also submitted my card to PPA60 Halloween Inspiration Challenge.  They have some great cards posted by the design team.

Wicked Cool Dresses

Click image to enlarge

All Stampin’ Up! supplies below may be ordered from my website or email me to place your order.
All products are Stampin’ Up! unless noted.

Project info:

Witch in a Dresser card


Finished size: 4.25″ H x 5.50″ W

Stamp Sets: Wicked Cool

Paper: Cardstock:  Rich Razzleberry, Old Olive, Whisper White


Ink: Rich Razzleberry Classic ink and marker, Basic Black ink, Pumpkin Pie marker, Old Olive marker

Accessories: Tab Punch, Black Glimmer Brads

Techniques: Paper crafting

Wicked Halloween

I just received  the Halloween stamp set Wicked Cool and I had to use it for the shaving cream technique challenge at Hand Stamped Sentiments.  The tutorial for this technique can be found on SplitcoastStampers.   I had never tried this technique before because I thought it would be complicated but it’s not.  It was easy peasy and so much fun!  This is now one of my favorite techniques.  I used Rich Razzleberry, Old Olive and Pumpkin Pie ink to create the swirls in the shaving cream.  Each corner was stamped with the spider web and heat embossed with black embossing powder.

I stamped the hat and sentiment on Pumpkin Pie and embossed with clear embossing powder.  The shoes were stamped with Basic Black ink on Whisper White and sponged with Rich Razzleberry.  The bats were stamped on the cape with Versamark and heat embossed with clear embossing powder.  The template for the cape is below with card recipe.   I used taffeta Pumpkin Pie ribbon and black rhinestones on the cape.

I’ve also submitted this card to PPA60 Halloween Inspiration challenge.  Stop by and take the challenge.

Shaving Cream Halloween card

click image to enlarge

All Stampin’ Up! supplies below may be ordered from my website or email me to place your order.
All products are Stampin’ Up! unless noted.

Project info:

Wicked Halloween Card

Cape Template: Click here for cape template.

Finished size: 4.25″ H x 5.50″ W

Stamp Sets: Wicked Cool

Paper: Cardstock:  Whisper White, Pumpkin Pie, Basic Black

Ink: Re-inkers:  Pumpkin Pie, Old Olive, Rich Razzleberry;  Classic ink pad Basic Black

Accessories: Heat tool, Clear Embossing Powder, Black Embossing Powder, Black self-adhesive rhinestones, 1/8″ Pumpkin Pie Tafetta ribbon, Dimensionals

Techniques: Shaving Cream

Hand Stamped Sentiments Sketch Challenge #25

This week at Hand Stamped Sentiments – a sketch challenge.  Come play and post your interpretation of this sketch featured in the July issue of Success Magazine.  This magazine is put out every month exclusively for SU demonstrators to help us be better demos and to feature fabulous projects.  This is just one of the benefits of being a SU demo.

Sketch ChallengeI’ve been having a lot of fun with my Artistic Etchings, Chic Boutique and All a Flutter stamps.  Lately I have also been using vellum.  This paper is great because it adds a touch of elegance to any project.  I stamped with craft white and embossed in clear the butterflies on vellum and I also took a strip and ran it through the Big Shot with my Polka Dots folder.  I love that looks like lace.  The sentiment from Artistic Etchings and scroll frame are stamped in Versamark and heat embossed with black.  The black card base is smooched with silver.  Click to enlarge the photo so you can see the shimmery silver on black.

All a Flutter Amour card

Click image to enlarge

All Stampin’ Up! supplies below may be ordered from my website or email me to place your order.
All products are Stampin’ Up! unless noted.

Project info:

All a Flutter Amour card

Finished card size: 4.25″ x 5.50″

Stamp Sets: All a Flutter, Chic Boutique, Artistic Etchings

Paper: Card stock:  So Saffron, Whisper White, Basic Black, Vellum

Ink: Basic Black, Craft White

Accessories: Basic Pearls Jewel Accents, Two-Step Bird Punch, retired Flower Trio punch, Black and Clear Stampin’ Embossing Powder, Big Shot, Perfect Polka Dots Textured Impressions,  Silver Smooch, mini glue dots

Techniques: Stamping, Heat Embossing, Dry Embossing

Hand Stamped Sentiments Challenge 23 – Color Splash

This week over at Hand Stamped Sentiments we have a color splash challenge – Whisper White, Rose Red, Old Olive, Chocolate Chip and Crumb Cake.  Some of the designers this week must have had Paris in mind because we reached for the Artistic Etchings and Chic Boutique stamp sets.  I used the Chic Boutique stamp set because I recently purchased it and I had not had a chance to use yet and Paris is a place I’d love to visit.  I had a lot of fun creating this card.

BlOG CANDY WINNER:  The winner for last week’s challenge selected by RANDOM.ORG is #6 Christiana of Christy Gets Crafty who wrote “How lovely and inventive! You did a great job with this card! I’ve never seen anything like it.”  Congratulations to Christiana and thank you all for your comments.  I also hope to see you participate in this week’s color challenge.

Chic Boutique Eiffle tower card

click to enlarge

All Stampin’ Up! supplies below may be ordered from my website or email me to place your order.
All products are Stampin’ Up! unless noted.

Project info:

Chic boutique Eiffel Tower Card

To add more dimension to the background texture I also sponged it with Chocolate Chip.  I stamped the scroll frame with Gold Encore ink and heat embossed it with clear embossing powder.  The Eiffel Tower is stamped with Versamark and Chocolate Chip and heat embossed with clear embossing powder.

Stamp Sets: Chic Boutique, Tiny Tags

Paper: Card stock:  Whisper White, Chocolate Chip, Rose Red, Old Olive

Ink: Classic Ink:  Chocolate Chip, Marker:  Rose Red, Gold Encore, Versamark

Accessories: Big Shot, Perfect Details Texturz Plate, Scallop Trim Border punch, Jewelry Tag Medium punch, Gold brad, Gold Cording, Stampin’ Dimensionals, Non-SU gold flower brads

Techniques: Stamping, Sponging, Heat Embossing

Hand Stamped Sentiments Technique Challenge #22 and Giveaway!

This week’s challenge at Hand Stamped Sentiments is a technique challenge –  fancy fold or shape card.  I’ve been wanting to create a watering can card and this was my opportunity.  The template is from Waltzingmouse Stamps.  I have included the template link below.  Also this week I am giving away the stamp set Of the Earth.  Leave me a comment and your name will be entered in the drawing.  To see what else you can win go to Hand Stamped Sentiments.

Now on to the project deets. To add dimension to the watering can I cut out an additional spout and sponged the edges of the can and sentiment oval with Soft Suede ink.  I stamped all the flower images on Very Vanilla card stock.  I used glue dots and SNAIL to adhere the flowers and the leaves.  I used the rock and roll method with Garden Green and Olive Green ink to add dimension to the leaves.  I had a lot of fun creating this card.

Watering Can card

click image to enlarge

Leave me a comment to enter you name in a drawing to win this stamp set.

All Stampin’ Up! supplies below may be ordered from my website or email me to place your order.
All products are Stampin’ Up! unless noted.

Project info:

Watering Can card

Template: click here

Stamp Sets: Petal Pizzazz, Chic Boutique

Paper: Card stock:  Soft Suede, Very Vanilla, Regal Rose

Ink: Classic Ink:  Regal Rose, Pumpkin Pie, Daffodil Delight, Garden Green, Old Olive Soft Suede

Accessories: Big Shot, Beautiful Wings Embosslits die, Vintage brads

Techniques: Stamping

Memorial day card

PPA is having a Memorial Day theme challenge and I created a card for my father.  He was in the army reserves and was always very proud of his unit and his military service.  I restored this photo for him and therefore the photo will be a gift within this card I created for him.   I too am very proud of my father.  He’s been retired for quite some time now but he loves to reminisce about his days in the military.  This Memorial Day we remember all branches of the military and thank them for their sacrifice and service.

I used My Digital Studio and the Big Shot to create this card.

Memorial day card front

click to enlarge image

Memorial day card - inside

click to enlarge image

All Stampin’ Up! supplies below may be ordered from my website or email me to place your order.
All products are Stampin’ Up! unless noted.

Project info:

The Army logos are downloaded clip art.

Finished size: 4-3/8″ w x 6″ h

Stamp Sets: none

Paper: Card stock:  Kraft Brown, Real Red, Night of Navy, Whisper White, vellum

Ink: Sentiments created on My Digital Studio in Real Red

Accessories: Big Shot, Stars #2 die, star brads from silver Hodgepodge kit, Whisper White organza ribbon, mini glue dots, dimensionals

Techniques: Digital and paper crafting

Hand Stamped Sentiments Anything but a Card challenge 13

This week at Hand Stamped Sentiments the challenge is Anything but a Card.  With Mother’s Day around the corner I decided to decorate a candle.  I used the stamp set With All My Heart.  This stamp set is available until the end of April.  Please email me if you would like to order or simply click on the ‘Shop Now’ icon on the right to place your order online.  To add some bling I inserted the rhinestone brads while the wax was still warm.  Easy Peasy!  Click here for a tutorial from Splitcoaststampers on how to stamp on candles.

Hop on over to HSS and post your creation for this challenge.

Anything but a card image

With All my Heart candle

click image to enlarge

All Stampin’ Up! supplies below may be ordered from my website or email me to place your order.

All products are Stampin’ Up! unless noted.

Project info:

With All My Heart candle

Stamp Sets: With All My Heart stamp set from the spring occasion mini page 12
Paper: tissue
Ink: Pretty in Pink classic ink, Rich Razzleberry classic ink
Accessories: rhinestone brads, Pretty in Pink satin ribbon, heat tool
Techniques: stamping