• my photo

    Click photo for About Me

  • Enter your email address to subscribe to this blog and receive notifications of new posts by email.

    Join 1,203 other subscribers
  • Pinterest

    Follow Me on Pinterest
  • Amazing Deals

    Click image for Amazing Deals!

  • Share this blog

    Bookmark and Share
  • Archives

  • Categories

  • Recent Posts

  • Blog Stats

    • 411,353 hits
  • Meta

  • Disclaimer

    All content found at Stampin' by Genny is the sole responsibility of Genevieve Valdes, a Stampin’ Up! Independent Demonstrator. Stampin’ Up! does not endorse, edit, or otherwise contribute to this website.

Valentine Easel Shaker Card

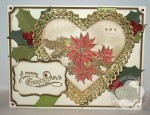
This week’s challenge at Hand Stamped Sentiments is a technique challenge – Shaker Cards!  I’ve never made this type of card but since I have the Stampin’ Up! Heart Framelits it was easy to make using two different sizes of heart dies to make the red heart frame for the window.  For the easel base I used the large scallop heart framelit.  The cute stamped image is from the Take it to Heart stamp set featured in the new occasions mini.  Can you guess how I created the background?  I used the Lots of Love Letterpress plate.  The letter press embosses and can also ink at the same time.  For a more subtle background you don’t have to ink it up.  The shaker heart is filled with the scrap small hearts after using the Pinking Hearts border punch.  A bit of mica flakes is also mixed with the small hearts to add  some additional sparkle.

Valentine Easel Shaker Card

click image to enlarge

Shaker cards are fun to make but also fun for the recipient.   I hope you’re inspired to join us.  For more inspiration go to HSS and see more shaker cards created by our talented design team.

All Stampin’ Up! supplies below may be ordered from my website or email me to place your order.

All products are Stampin’ Up! unless noted.

Valentine Easel Shaker Card

Size:  5.00″ h x 5.00″ w

Stamp sets: Take it to Heart, With All My Heart

Paper: Card Stock:  Riding Hood Red, Whisper White

Ink: Riding Hood Red,  Versamark

Accessories: Big Shot, Heart Framelits, Perfect Polka Dots embossing folder, Lots of Love Letterpress, Oval punch, Pinking Hearts Border punch, Window Sheets, Iridescent Embossing Powder, Gold Embossing Powder, Whisper White Satin Ribbon, Mica Flakes

Take it to Heart Forever & Always Valentine Card

This week at Hand Stamped Sentiments the challenge is Pleats and Ruffles.  I’ve used lots of items from the new mini catalog to create this card.

Stampin Up Valentine Take it to heart card

click image to enlarge

I love the bird image from the Take it to Heart stamp set.  I used ink pads and blender pens to color the image.  To give the image a bit more sparkle I used the tiniest bit of Cherry Cobbler Dazzling Details to the flowers.  I also heat embossed the textured background with touches of gold embossing powder.  Since the challenge calls for pleats or ruffles, I ruffled a piece of Victoria Crochet ribbon on a hat pin.  The top of the pin also features small punched flowers.  This is my first Valentine card of the season.  Let me know what you think and also what your favorite items are from the new mini.

Hand Stamped Sentiment ruffles and pleats challenge 100

All Stampin’ Up! supplies below may be ordered from my website or email me to place your order.

All products are Stampin’ Up! unless noted.

Take it to Heart Valentine Card

Size:  5.00″ h x 5.00″ w

Stamp sets: Take it to Heart, Loving Thoughts

Paper: Card Stock:  Riding Hood Red, Very Vanilla, Watercolor paper

Ink: StayzOn Brown, Riding Hood Red, Old Olive, Soft Suede, Baja Breeze, Versamark

Accessories: Big Shot, Finial Press, Paper Doily Sizzlit, Heart Collection Framelits Dies, Hat Pin, Itty Bitty Shapes Punch Pack, Gold Embossing Powder, Cherry Cobbler Dazzling Details, Blender Pen

An Old Fashioned Vintage Christmas Card

This week at Hand Stamped Stamped Sentiments we have a theme challenge.  Create any paper craft project with an old fashion Christmas theme.  Looking through my stash I found some gold heart doilies and since recently I received the Hearts Collection Framelits Dies I was inspired!  Perfect combo!

I used one of my favorite Christmas vintage stamp sets, Bells and Boughs.  I stamped the poinsettia image on Very Vanilla with Versamark and heat embossed it in gold.  I then die cut it using the heart die.  It was so easy!  The image is colored with a blender pen and ink pads and sponged with Soft Suede.  I cut holly leaves in Always Artichoke and Old Olive using the Large Oval punch and 3/4″ circle punch to cut the sides.  I used a stylus to score the leaf veins.

The berries are cut from Red Glimmer paper with the 1/2″ circle punch.  So sparkly!  I love this paper.  I definitely need to get some more for Valentine’s.   The small circles at the corners and on the sentiments were cut with the Owl Builder punch.

I hope you’re inspired to join us this week at Hand Stamped Sentiments.

HSS Old Fashion Theme Challenge

All Stampin’ Up! supplies below may be ordered from my website or email me to place your order.

All products are Stampin’ Up! unless noted.

Vintage Christmas Card

Size:  5.50”  w x 4.25” H

Stamp sets: Bells and Boughs, Comfort and Joy

Paper: Card Base:  Very Vanilla; Card Stock:  Always Artichoke, Old Olive, Soft Suede, Red Glimmer paper

Ink: Versamark, Cherry Cobbler, Old Olive, Soft Suede

Accessories: Big Shot, Hearts Collection Framelits die, Decorative Label Punch, Large Oval Punch, 1/2″ circle punch, Owl Builder Punch, Ticket Corner Punch, Pinking Hearts Border punch, Olive Olive Satin Ribbon, Basic Pearls, non- Stampin’ Up! gold doily

Button it up!

This week at Hand Stamped Sentiments it’s all about buttons.  Since I didn’t have a button I liked I decided to make a heart paper button. There is an easy to follow tutorial for making paper buttons on SCS.  The dressmaker form can be found here.  This card came together very quickly and was fun to make.  Join us this week for our Button Challenge.

click image to enlarge

All Stampin’ Up! supplies below may be ordered from my website or email me to place your order.

All products are Stampin’ Up! unless noted.

Dress maker form card

Size: 4.25″ H x 5.50″ W

Stamps:  Bliss, Artistic Etchings

Paper: Card Stock:  Very Vanilla, Basic Black, Blushing Bride, Soft Suede, Crumb Cake; DSP:  First Edition

Ink:  Soft Suede, Blushing Bride

Accessories:  Antique brad, 5/8 Inch Crochet Trim Victoria ribbon, Black Satin ribbon, Basic pearls, Eyelet border punch, Heart to Heart punch, Ticket corner punch, 1 inch circle punch, 3/4 inch circle punch, Crop-a-dile

Technique: Die cutting, stamping

Simple Valentine Cards

I created these simple Valentine cards for a class.  These were very easy for my guests and they loved them.  These two-layer cards showcased the Big Shot for the embossed backgrounds.  I love the Vintage Wallpaper embossing folder and combines well with the Artistic Etchings stamp set.  I stamped the medallion in Riding Hood Red on Very Vanilla CS to make the background.  I then stamped the Eiffel Tower, glued the Red Glitter heart atop the tower and added a bit of Scallop Trim to the bottom and stamped ‘AMOUR’.  I also tore the edges of the Very Vanilla CS and sponged the edges in Riding Hood Red. For the finishing touch,  I adhered pearls and rhinestones to the corners.

For the “Just my Type” card   I used the Texture Plates Kit #4 which I had not used for awhile.  This set has a wonderful typed background which coordinates perfectly with the vintage typewriter image from Puns from the Past and the Newsprint DSP.  I punched the border of the Newsprint layer and sponged the edges in black.  I love the Tiny Tags stamp set and Medium Jewelry punch.  These little tags add so much to any card.  I adhered with the mini glue dots the tags underneath the knot of the ribbon.  I stamped the typewriter image on Very Vanilla CS then punched it out with the Decorative Label Punch.  I also punched another Decorative Label in black and framed the Typewriter image.  I added the Red glitter heart to the top of the typewriter image and the pearls to the corners.

One of my goals this year is to finish the inside of my cards as I did below.  It just looks so much neater and gives you another opportunity to use more images from a stamp set.

click image to enlarge


inside of cards - click image to enlarge


All Stampin’ Up! supplies below may be ordered from my website or email me to place your order.

All products are Stampin’ Up! unless noted.

Simple Valentine Cards

Card Size: 4.25″ w x 5.50″h

Stamp Sets: Artistic Etchings, Puns from the Past, Tiny Tags

Paper: CS: Very Vanilla, Riding Hood Red, Black; DSP: Newsprint; Red Glitter paper

Ink: Classic Ink Pad: Riding Hood Red, Basic Black

Card Accessories: Eyelet border punch, Scallop Trim border punch, Medium Jewelry punch, Ticket Corner punch, Decorative Label Punch,  Small Heart Punch, Vintage Wallpaper embossing folder, Texture Plates Kit #4 (Friend, Confidant print type), Black Satin ribbon, Basic pearls and clear rhinestones, sponge dauber, Dimensionals

Technique: Stamping, Embossing

Flirty Valentine Corset Card

For this week’s Hand Stamped Sentiments ribbon and lace challenge I created this corset template.  The template is sized to fit into a SU medium envelope (5-3/4″ x 4-3/8″).  I traced the corset on Very Vanilla CS then ran it through my Big Shot with the Vintage Wallpaper embossing folder and sponged it with Riding Hood Red ink.  I used the 5/8″ Victoria crochet trim as lace.  I put a strip of stick tape on the back of the crochet trim and pleated it as I adhered the trim.  I used my Crop-a-dile Big Bite to set the 1/8″ eyelets and used grosgrain ribbon to lace the corset.  The regular hand-held Crop-a-dile will not work because it doesn’t reach.  You can also use a regular eyelet setter kit.  It was a lot fun creating this card.  The possibilities are endless in creating this card.  You can use different embossing folders, different colored card stock, clear rhinestones and different ribbons.

I create these as invitations for hens night, bachelorette or bridal showers.  Got to my Etsy shop to order and request your custom color.

Click image to enlarge

Click image to enlarge

All Stampin’ Up! supplies below may be ordered from my website or email me to place your order.

All products are Stampin’ Up! unless noted.

Flirty Corset CArd

Card Size: Approx. 4.25″ w x 5.50″h

Stamp Sets: Teeny Tiny Wishes, I {Heart} Hearts

Paper: CS: Very Vanilla, Blushing Bride

Ink: Classic Ink Pad: Riding Hood Red

Card Accessories: 5/8″ Victoria Crochet Trim ribbon, Basic Pearls, Metallic eyelets, 1/4″ Very Vanilla grosgrain ribbon, sponge dauber, sticky tape

Technique: Stamping, Embossing

Spring Vintage Hearts

This week at Hand Stamped Sentiments we have a hearts theme challenge.  Hearts are a wonderful shape because they’re not just for Valentine’s day.  They fit right it for birthdays, anniversaries,  thinking of you, weddings and thank you projects.  I knew I wanted to create a project with spring colors and with a shabby chic look.  I’ve recently downloaded the Spring Vintage DSP for My Digital Studio and I thought perfect! Next I selected the perfect coordinating stamp sets, Baby Blossoms and With all my Heart.  The box shape I selected is the Petal Cone.  The shape is perfect for my vintage shabby chic look I had in mind.  The Petal Cone die, Spring Vintage DSP and Baby Blossoms stamp set can be found in the new Occasion Mini.

To add to my spring shabby chic look I embellished with pearls, crochet trim and of course hearts.  The base of the card is Crumb Cake CS, the next layer is Rose Red CS.  The DSP is the Spring Vintage download printed on matte photo paper.  I created the sentiment layer on my card by stamping the frame from the Baby Blossoms stamp set then used paper snips to cut the frame.  I used the SU wide oval punch and then used a tag from the Matchbox die and stamped ‘friend’ from With all my Heart stamp set.  I also used the Eyelet border punch under the crochet ribbon and embellished with pearls.  I created the heart trim at the bottom of the card using the Small heart punch.  I aligned the side of the punch with the previous heart and aligned the bottom of the heart with the line I drew in pencil.  Draw it light so it can be erased once you finish.

The Petal Cone box is Very Vanilla CS and I then printed Spring Vintage DSP on matte paper then put the paper through my Big Shot with Petal Cone die so I could then cut two sides of the triangle.  I cut these out then adhered them to the sides of the Petal Cone.  The Scallop flower is made with the 2-3/8″ scallop circle punch and clear rhinestone brad.

This is my quick and fast method for making the scallop flower.  Punch 6 scallop circles, stack them all together, then pierce the center and use a brad to fasten.  Crunch and fold each layer.  Voilá you have a flower.  There are other methods where you fold each layer and spritz with water before fastening all the layers but I don’t have much patience and my quick method works for me.

I enjoyed making this gift set and I hope it inspires you to take the challenge and create your heart project.


Spring Vintage gift set

click image to enlarge

Spring Vintage Friend card

click image to enlarge

Spring Vintage petal cone box

click image to enlarge

All Stampin’ Up! supplies below may be ordered from my website or email me to place your order.

All products are Stampin’ Up! unless noted.

Spring Vintage gift set

Card Size: Approx. 5.00″ w x 5.00″h

Stamp Sets: Baby Blossoms, With All My Heart

Paper: CS: Very Vanilla, Rose Red, Crumb Cake, Spring Vintage DSP download papers printed on matte photo paper

Ink: Classic Ink Pad:  Always Artichoke, SU Markers:  Rose Red, Always Artichoke

Card Accessories: Small heart punch, Wide Oval punch, Heart to Heart punch, Eyelet border punch,Big Shot, Matchbox die, Petal Cone die, 5/8″ Victoria Crochet Trim ribbon, Basic Pearls

Petal Cone Accessories: Small heart punch, Heart to Heart punch, 2-3/8″ Scallop punch, Big Shot, Petal Cone die, 5/8″ Victoria Crochet Trim ribbon, Basic Pearls, clear rhinestone brad for scallop flower.

Technique: Stamping, Die cutting

With all my Heart

This week at Hand Stamped Sentiments we have sketch challenge.  I knew I wanted to create a Valentine card because I’ve been itching to use the red glitter paper in the new occasions mini. I also used one of my favorite stamp sets Notably Ornate and my two DSP favs – Love Letter and Newsprint.  Hop on over to HHS and take the challenge.  We’d love to see your projects.

HHS sketch challenge #51

HHS Sketch Challenge 51

With all my heart Valentine card

click image to enlarge

I have also entered my card over at Pals Paper Arts.  Their Design Team is so talented.

I knew I wanted to to create a Valentine card because I wanted to use the Red Glitter paper and the Notably Ornate stamp set because I love the frame.  I stamped it and the bird in Basic Black and heat embossed it with clear embossing powder.  I cut them both out with my paper snips.  The dotted heart is from the I {Heart} Hearts set and stamped in Cherry Cobbler and also trimmed with paper snips and heat embossed with clear embossing powder.  I framed the heart with the Pinking Heart border.  Kasey has a wonderful tutorial on how to frame with punched borders.

I created the large scallop border with 1″ circles.  I punched the circles from the Love Letter DSP.  I adhered the circles starting from the center so the border would end up even on both sides. The polka dot paper is from the Love Letter DSP and I also used a Newsprint layer.  For that Valentine feel I used the Red Glitter paper.  Love it!!  The sentiment banner ends are punched using the 1-1/4 square punch.  The sentiment is from the With all my Heart stamp set.

All Stampin’ Up! supplies below may be ordered from my website or email me to place your order.

All products are Stampin’ Up! unless noted.

Amour card

Card Size: Approx. 5.50″ w x 4.25″h

Stamp Sets: Notably Ornate, With All My Heart, I {Heart} Hearts

Paper: CS:  Basic Black, Very Vanilla; DSP:  Love Letter, Newsprint, Red Glitter paper

Ink: Cherry Cobbler, Basic Black

Accessories: 1″ circle punch, Small heart punch, Pinking Hearts Border Punch, 1-1/4 Square Punch, Basic Pearls, Heat tool, Versamark, Clear embossing powder

Technique: Stamping, Heat embossing

Owl Love

This week at Hand Stamped Sentiments we have a Punch Theme Challenge.  I was so excited about this challenge because one of my favorite punches is the Two-Step Owl punch.   So I decided to create my project around this punch.

I’ve been wanting to make an owl box to store 3″x3″ cards and I’ve succeeded.  The 3″ x 3″ cards and envelopes fit nicely into this box.  I’m finishing up the tutorial along with the dress tutorial.  I promise to post them by the end of the week.

click image to enlarge

All Stampin’ Up! supplies below may be ordered from my website or email me to place your order.

All products are Stampin’ Up! unless noted.

Owl Box and 3″ x 3″ cards

Finished Box Size: Approx. 5.50″ w x 7.00″h

Cards, Finished Size: 3″ x 3″

Stamp Sets: Tiny Tags

Paper: Digital paper Play Date, CS:  Chocolate Chip, So Saffron, Tempting Teal, Real Red, Crumb Cake

Ink: Chocolate Chip

Accessories: Decorative Label Punch, Two-Step Owl Punch, Two-Step Bird Punch, Scallop Trim Punch, Jewelry Tag Punch, Basic pearls, 5/8″ Real Red grosgrain ribbon,

Techniques: Stamping, Paper Punching


Simple Valentine’s card – Make & Take

I love the I {Heart} Hearts stamp set!  I know I keep saying this but there are so many cute hearts in this set and if you purchase it now Stampin’ Up! will donate $2 from every set sold to the Haitian Relief Fund.  So not only will you get this great stamp set but you’ll be doing your part to make a difference.  Now on to the card…

This is a simple Valentine card I CASED from Kay Kalhoff’s blog.  I love the simplicity of this card.  I didn’t layer as much as she did and I did not have the new Scalloped Heart of Hearts Embosslits Die  so I used what I had and I think it turned out very cute.  I also stamped the envelope for that extra touch.  I am going to have my group make this card at my next event this weekend.  Thank you for the idea Kay!

click image to enlarge

Project info:  All SU products to create this card may be purchased from my SU website.

Simple Valentine Card

Stamp Sets:  I {Heart} Hearts stamp set (117101 wood, 118571 clear), sentiment from Whimical Words found in the Sale-a-bration brochure

Paper: SU Cardstock: Whisper White (100730), Real Red (102482), Specialty DSP Sending Love (117153)

Ink:  Real Red Classic ink pad (103133)

Accessories:  SU Whispler White organza ribbon (114319), SU Big Shot (113439) with SU small polka dot Texturz Plate from the Backgrounds 1 set (114512), SU full heart punch 113693), SU dimensional to adhere heart (104430) and SU mini glue dots to adhere ribbon to heart (103683), SU SNAIL adhesive (104332)

Techniques: stamping, paper punching