• my photo

    Click photo for About Me

  • Enter your email address to subscribe to this blog and receive notifications of new posts by email.

    Join 1,192 other subscribers
  • Pinterest

    Follow Me on Pinterest
  • Amazing Deals

    Click image for Amazing Deals!

  • Share this blog

    Bookmark and Share
  • Archives

  • Categories

  • Recent Posts

  • Blog Stats

    • 438,315 hits
  • Meta

  • Disclaimer

    All content found at Stampin' by Genny is the sole responsibility of Genevieve Valdes, a Stampin’ Up! Independent Demonstrator. Stampin’ Up! does not endorse, edit, or otherwise contribute to this website.

Say it with a Fruit Basket

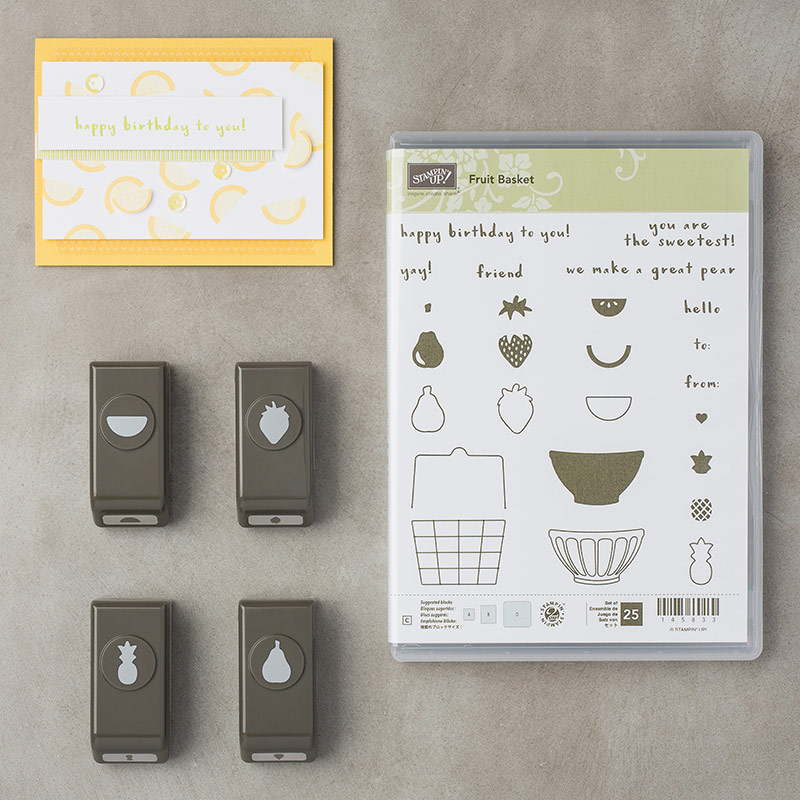
Say ‘You are the sweetest’ with a fruit basket.  That’s what I say.  My card this week is inspired by Hand Stamped Sentiments sketch challenge.  I had not stamped with the Fruit Basket stamp set from the Occasions Catalog.  This stamp set may be purchased as a bundle with the Itty Bitty Fruit Punch Pack to receive .  There are 4 punch shapes that coordinate with this stamp set.  I used the strawberry shape to die cut the strawberries.  For the bowl I stamped it in Momento Black first on the die cut circle.  I then stamped another bowl and fussy cut it and adhered it over the stamped image.
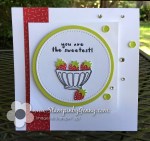
Here is the bundle I used to create my card.

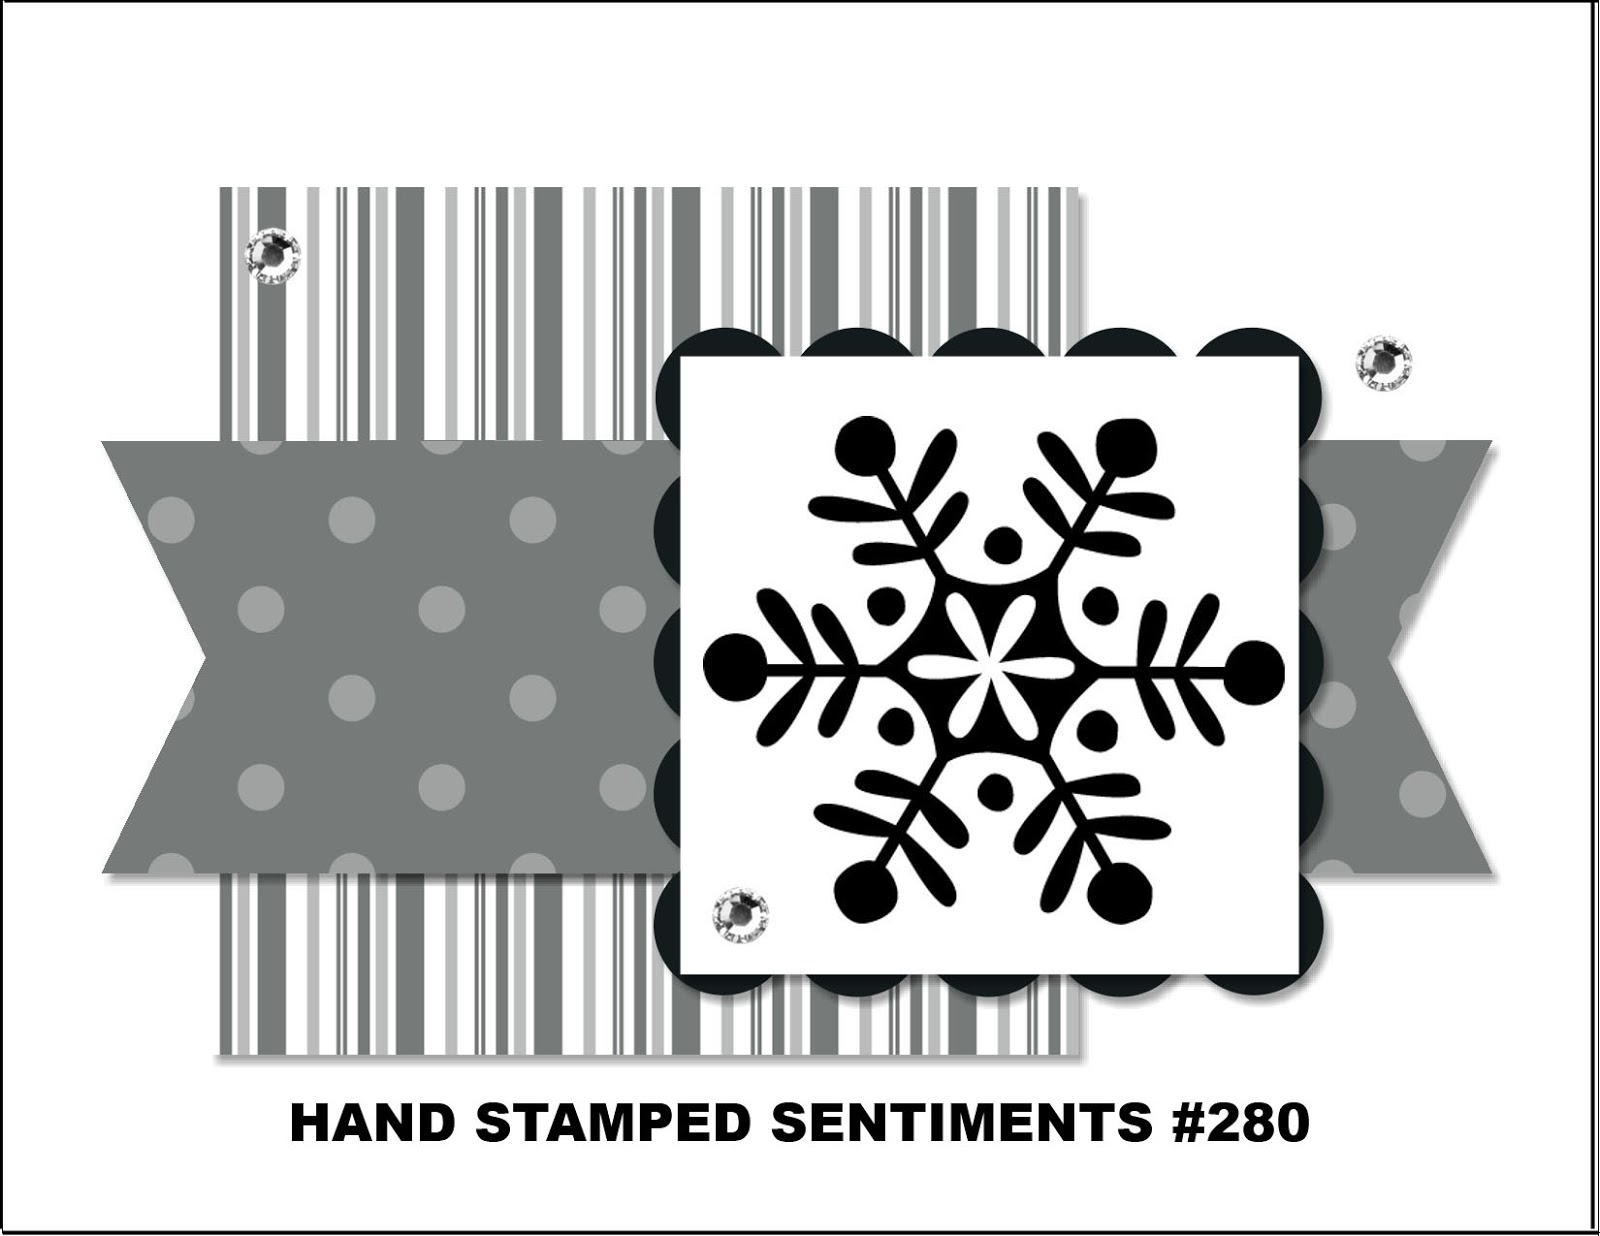
Create a project using this sketch and go to Hand Stamped Sentiments for more inspiration from their design team.

All Stampin’ Up! supplies below may be ordered from my website or email me to place your order.

All products are Stampin’ Up! unless noted.

Say it with a Fruit Basket Card

Card Size:  5.00″ H x 5.00″ W

Stamp Sets: Fruit Basket

Paper:  Card stock:  Whisper White, 6″ x 6″ Tutti Fruitti dsp, Lemon Lime Twist

Ink: Momento Black

Accessories:  Tutti-Fruitti adhesive backed sequins, basic rhinestones, Stitched Shapes Framelits Dies, retired Circle Framelits, Itty Bitty Punch Pack

Beautiful Day Birthday

I was inspired for this week’s challenge to create with the new Beautiful Day stamp set found in the Occasions catalog.  There are two large images of a flower and butterfly perfect to color with markers, watercolors or the new Brusho Crystal Color powders.  This week’s challenge at Hand Stamped Sentiments is a color challenge of Real Red, Perfect Plum and Cherry Cobbler.

I stamped the butterfly with Versamark onto Vellum cardstock then heat embossed with black embossing powder.  I then used the stained glass technique to color the butterfly with Stampin’ Write markers then fussy cut.  I again stamped the butterfly with Versamark onto the Whisper White layer then repeated the same marker colors.  I then used mini glue dots to adhere the Vellum butterfly to the center of the butterfly embossed on the Whisper White.  To embelish I used basic rhinestones to and die cut 1/2″ circles in Perfect Plum cardstock.  I also sponged Dazzling Diamonds with Perfect Plum ink and die cut circles with the retired Itty Bitty Shapes Punch Pack and layered over the Perfect Plum circles.

Stampin Up Beautiful Day Birthday card

Go to Hand Stamped Sentiments and see more inspiration for this color challenge.

All Stampin’ Up! supplies below may be ordered from my website or email me to place your order.

All products are Stampin’ Up! unless noted.

Beautiful Day Birthday Card

Card Size:  4.25″ H x 5.50″ W

Stamp Sets: Beautiful Day, Teeny Tiny Wishes

Paper:  Card stock:  Real Red, Perfect Plum, Whisper White, Vellum, Tutti Frutti DSP, Dazzling Diamonds glimmer paper

Ink: Real Red, Stampin’ Write Markers, Versamark

Accessories:  Black embossing powder, Stampin’ Write Markers, Basic Rhinestones, retired, Cherry Cobbler Seam Binding ribbon, retired Word Punch, retired Modern Label punch, 1/2″ circle punch, retired Itty Bitty Shapes Punch pack


Sliding Barn Door Valentine

January means a new year and a fresh start.  Many of us are heading back to the gym in full force, organizing and tackling DIY projects.  One of the projects my husband and I are working on is purchasing a sliding barn door for our bedroom.  These doors are one of the hottest home design trends.  So I was so excited to  see the Barn Door Bundle (Barn Door Stamp Set and Sliding Door Framelits Dies) in the new Stampin’ Up! Occasions Catalog!

Watch Stampin’ Up!’s Brandy Barnard in this video demonstration of how to use the Barn Door Bundle.  Purchase the bundle which includes the Barn Door Stamp Set and Sliding Door Framelits Dies and save 10% .

Barn Door Bundle

Sliding Barn Door Valentine Card

Stampin Up Barn Door Valentine cardThe cool detail is how the door slides left and right within the die cut grooves.  I created this barn door card front for this Valentine card.

I used #6 washers with Mini Stampin’ Dimensionals to slide the door.  However,  I’ve seen tutorials using dimes or pennies.

Stampin Up Barn Door Valentine cardI was also inspired by Hand Stamped Sentiments Inspiration challenge.  For more inspiration visit HSS.

All Stampin’ Up! supplies below may be ordered from my website or email me to place your order.

All products are Stampin’ Up! unless noted.

Sliding Barn Door Valentine Card

Card Size:  4.25″ H x 5.50″ W

Stamp Sets:  Barn Door, Sealed with Love

Paper:  Card stock:  Real Red, Whisper White, Basic Black

Ink: Real Red, Black Momento, Early Espresso

Accessories:  Sliding Door framelits, heart on frame from Owl Builder Punch, retired Heart to Heart Punch, Whisper White baker’s twine, mini Dimensionals, mini glue dots, #6 washers

Happy New Year and Dragonfly Dreams!

Happy New Year and all the best for 2018!  I look forward to a fresh new start.  The new year and Hand Stamped Sentiments sketch challenge both inspired me to create my card.  I chose the colors of Emerald Envy, Lemon Lime Twist and Pool Party which to me remind me of spring.

Stampin up Dragonfly Dreams card

The background on the larger layer I created using the smoosh ink technique with Emerald Envy, Lemon Lime Twist and Pool Party.  The background on the smaller layer I created with the dot stamp from the Dragonfly Dreams set.  The dragonfly I die cut from Dazzling Diamonds glimmer paper then embellished with basic rhinestones.

For more inspiration visit Hand Stamped Sentiments.

All Stampin’ Up! supplies below may be ordered from my website or email me to place your order.

All products are Stampin’ Up! unless noted.

Happy New Year and Dragonfly Dreams Card

Card Size:  4.25″ H x 5.50″ W

Stamp Sets:  Dragonfly Dreams

Paper:  Card stock:  Whisper White, Pool Party, Lemon Lime Twist, Emerald Envy, Silver and Dazzling Diamonds glimmer paper

Ink: Pool Party, Emerald Envy, Lemon Lime Twist, Momento Black

Accessories:  Basic Rhinestones, Triple banner punch, Detailed Dragonfly Thinlits


‘Tis the Season

‘Tis the season for snowflakes and Christmas.  On Thursday something rare happened…it snowed in San Antonio.  We got about 2 inches of snow and for about a day we had a glimpse of a white Christmas.  It was lovely. The snowfall inspired me to create Christmas card based on the color challenge of Bermuda Bay, Calypso Coral, Daffodil Delight and Lemon Twist.

I used these the snowflake dies from the Seasonal Layers Thinlits to die cut the snowflakes from Silver Glimmer paper then sponged them with Calypso Coral, Daffodil Delight and Lemon Twist.  The background layer I embossed with the Softly Falling Embossing folder.  I embellished with basic rhinestones, gold satin ribbon and gold sequin trip.  The sentiment is from the Christmas Pines stamp set which I stamped with Black and embossed with Iridescent Ice embossing powder for sparkle.

See more inspiration at Hand Stamped Sentiments from their design team.

All Stampin’ Up! supplies below may be ordered from my website or email me to place your order.

All products are Stampin’ Up! unless noted.

‘Tis the Season Snowflake Card

Card Size:  4.00″ H x 4.00″ W

Stamp Sets:  Christmas Pines

Paper:  Card stock:  Whisper White, Bermuda Bay, Silver Glimmer paper

Ink: Calypso Coral, Daffodil Delight, Lemon Twist, Momento Black

Accessories:  Basic Rhinestones, retired Gold Sequin ribbon, retired 5/8″ Gold Satin Ribbon, Sponges, Softly Falling Textured Embossing Folder


Jingle all the way on a sleigh ride

Inspired by Hand Stamped Sentiments and Hallmark Christmas movies I created this card with the Sleigh Ride Edgelits and Jingle all the Way stamp set.  The Pool Party  layer I embossed with the Gently Falling embossing folder.  I used strips of Whisper White and Vellum to die cut the town, trees and sleigh.

I used Dazzling Diamonds Glitter to accent the hills and roofs.   For the sentiment I used heat stick powder and embellished with Dazzling Diamonds Glitter.  I also die cut a star from Dazzling Diamonds Glimmer Paper. To wrap it all up I used 1/8″ silver ribbon and basic rhinestones.

stampin up sleigh ride edgelits and jinlgle all the way bundle card

See more inspiration at Hand Stamped Sentiments for this Christmas inspiration challenge.

All Stampin’ Up! supplies below may be ordered from my website or email me to place your order.

All products are Stampin’ Up! unless noted.

Jingle all the way on a Sleigh Ride Card

Card Size:  4.25″ H x 5.50″ W

Stamp Sets:  Jingle All the Way

Paper:  Card stock:  Whisper White, Pool Party, Vellum, Dazzling Diamonds Glimmer Paper

Ink: Heat and stick powder

Accessories:  Sleigh Ride edgelits, 1/8″ silver ribbon, Dazzling Diamonds Glitter, Tombow glue, Fine Tip Glue, Basic Rhinestones, Itty Bitty Accents Star punch

‘Tis the Season to Sparkle with Seasonal Layers

My card this week has been inspired by Hand Stamped Sentiments  sketch challenge and all the Christmas movies I’ve been watching on the Hallmark channel.  Every year as part of preparing for the holidays I watch Christmas movies on the Hallmark channel.  All the movies seem to start with a beautiful snowy setting which made me think snowflakes which made me think the snowflakes from the Seasonal  Layers Thinlits Dies.  This die set is so versatile because it has images for every season.  It contains three different snowflakes which I die cut from Whisper White, Silver Foil paper and Dazzling Diamonds Glimmer paper.  I used Smoky Slate for the background layer and embossed the Whisper White layer with the Softly Falling Embossing Folder then added the 1/8″ silver ribbon in a swirl pattern using glue dots.  I then adhered the snowflakes to create my snowy scene.  The sentiment ‘Tis the Season to Sparkle’ is from the Season to Sparkle stamp set which I die cut from retired Scallop Oval Punch.

For more sparkle I added rhinestones and silver sequins.Stampin Up Seasonal Layers Snowflake Christmas cardGo to Hand Stamped Sentiments to see more inspiration from the design team.

All Stampin’ Up! supplies below may be ordered from my website or email me to place your order.

All products are Stampin’ Up! unless noted.

‘Tis The Season to Sparkle Card

Card Size:  4.25″ H x 5.50″ W

Stamp Sets:  Season to Sparkle

Paper:  Card stock:  Whisper White, Smoky Slate, Silver Foil and Dazzling Diamonds Glimmer paper

Ink: Versamrk

Accessories:  Seasonal Layers Thinlits dies, Softly Falling Embossing Folder, 1/8″ Silver ribbon, retired Scallop Oval punch, Silver Sequins, Basic Rhinestones


Save

Save

Save

Save

Save

Save

Save

Save

Save

A Season to Sparkle starts with Halloween

I just had to create another Halloween card inspired by the Hand Stamped Sentiment color challenge of Fresh Fig, Pumpkin Pie and Lemon Twist.  I used the chandelier and other elements from the Season to Sparkle stamp set to create my card.

I sponged Fresh Fig, Pumpkin Pie and Lemon Twist on glossy white card stock.  The chandelier is die cut from basic black.  The jeweled swag, bird and spider were stamped with Momento Black and die cut from whisper white.  The jewels were colored with an Aqua painter then colored with Clear Wink of Stella .  To make it all sparkle I added basic rhinestones and topped with a Lemon Twist bow.

Stampin Up Season to Sparkle Chandelier Halloween card

Go to Hand Stamped Sentiments and see more inspiration from the design team.

All Stampin’ Up! supplies below may be ordered fr om my website or email me to place your order.

All products are Stampin’ Up! unless noted.

A Season to Sparkle Halloween Card

Card Size:  5.50″ H x 4.25 W

Stamp Sets:  Season to Sparkle

Paper:  Card stock:  Whisper White, White Glossy cardstock, Fresh Fig, Pumpkin Pie

Ink: Momento Black, Fresh Fig, Pumpkin Pie, Lemon Twist

Accessories:  Chandelier Thinlet dies, Basic Rhinestones, Aqua painter, In Color Bitty Bows


Save

Save

Save

Save

Open if you Dare the Graveyard Gate

OOOH! OOOH! SPOOKY is what I was going for with the card I created with the Graveyard Gate bundle.  Inspiration for my card came from the Inspiration Challenge at Hand Stamped Sentiments.  I sponged Daffodil Delight, Pumpkin Pie and Rich Razzleberry for the sky then sponged Smoky Slate on the bottom to create the graveyard.  I then stamped the headstones and bats in Momento Black.  I used an adhesive sheet to die cut the gate so I could easily adhere the gate to the front of the card.

For the sentiment I die cut a circle with the 1-3/8″ punch and sponged it with Daffodil Delight and Pumpkin Pie then stamped the sentiment with Momento Black.  For extra sparkle I colored around the sentiment with Clear Wink of Stella.  The lock and key I die cut from silver foil.  Now… try to open the graveyard gate if you dare.


Stampin Up Graveyard Gate Halloween Card

For more inspiration go to Hand Stamped Sentiments and see more projects from the design team.

All Stampin’ Up! supplies below may be ordered from my website or email me to place your order.

All products are Stampin’ Up! unless noted.

Open if you Dare the Graveyard Gate Card

Card Size:  5.50″ H x 4.25 W

Stamp Sets:  Graveyard Gage

Paper:  Card stock:  Basic Black, Basic Gray, Whisper White, Silver Foil

Ink: Daffodil Delight, Pumpkin Pie, Rich Razzleberry, Smoky Slate, Momento Black

Accessories:  Graveyard Gate Framelits, 1-3/8″ circle Punch, 1-1/2″ circle punch, Adhesive Window Sheet, Black rhinestones, Sponge, Basic Rhinestone, Clear Wink of Stella


Save

Save

Save

Save

Save

Thanks a Bunch with a Wood Crate of Flowers

The card I created this week was inspired by Hand Stamped Sentiments sketch challenge.  I used the Wood Crate Framelit  to create the wood crate. What’s really cool about this framelits is you can make a 3d wood crate project or you can use it to create card, like I did for my card. I also used the Jar of Love stamp set and Everyday Jars Framelits to create the flowers and foliage.  For the background I used the Work of Art to create the Pool Party  background and for sparkle I colored the flowers with Clear Wink of Stella and added Basic Rhinestones.

Stampin up wood words bundle cart

Head over to Hand Stamped Sentiments and see more inspiration from the design team and create your own project.

All Stampin’ Up! supplies below may be order ed from my website or email me to place your order.

All products are Stampin’ Up! unless noted.

Thanks a Bunch with a Wood Crate of Flowers

Card Size:  4.25″ H x 5.50 W

Stamp Sets:  Wood Words, Jar of Love, Work of Art

Paper:  Card stock:  Whisper White, Crumb Cake, Wood Textures DSP

Ink: Calyso Coral, So Saffron, Old Olive, Wisteria Wonder, Pool Party, Early Espresso

Accessories:  Wood Crate Framelits, Everyday Jars Framelits, Basic Rhinestones, Clear Wink of Stella, retired Corner Punch, Delicate White Doilies

Save

Save