• my photo

    Click photo for About Me

  • Enter your email address to subscribe to this blog and receive notifications of new posts by email.

    Join 1,198 other subscribers
  • Pinterest

    Follow Me on Pinterest
  • Amazing Deals

    Click image for Amazing Deals!

  • Share this blog

    Bookmark and Share
  • Archives

  • Categories

  • Recent Posts

  • Blog Stats

    • 418,075 hits
  • Meta

  • Disclaimer

    All content found at Stampin' by Genny is the sole responsibility of Genevieve Valdes, a Stampin’ Up! Independent Demonstrator. Stampin’ Up! does not endorse, edit, or otherwise contribute to this website.

Take it to Heart Forever & Always Valentine Card

This week at Hand Stamped Sentiments the challenge is Pleats and Ruffles.  I’ve used lots of items from the new mini catalog to create this card.

Stampin Up Valentine Take it to heart card

click image to enlarge

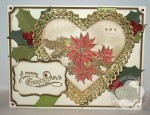
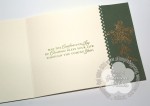
I love the bird image from the Take it to Heart stamp set.  I used ink pads and blender pens to color the image.  To give the image a bit more sparkle I used the tiniest bit of Cherry Cobbler Dazzling Details to the flowers.  I also heat embossed the textured background with touches of gold embossing powder.  Since the challenge calls for pleats or ruffles, I ruffled a piece of Victoria Crochet ribbon on a hat pin.  The top of the pin also features small punched flowers.  This is my first Valentine card of the season.  Let me know what you think and also what your favorite items are from the new mini.

Hand Stamped Sentiment ruffles and pleats challenge 100

All Stampin’ Up! supplies below may be ordered from my website or email me to place your order.

All products are Stampin’ Up! unless noted.

Take it to Heart Valentine Card

Size:  5.00″ h x 5.00″ w

Stamp sets: Take it to Heart, Loving Thoughts

Paper: Card Stock:  Riding Hood Red, Very Vanilla, Watercolor paper

Ink: StayzOn Brown, Riding Hood Red, Old Olive, Soft Suede, Baja Breeze, Versamark

Accessories: Big Shot, Finial Press, Paper Doily Sizzlit, Heart Collection Framelits Dies, Hat Pin, Itty Bitty Shapes Punch Pack, Gold Embossing Powder, Cherry Cobbler Dazzling Details, Blender Pen

Elementary Elegance Birthday Card

I have quite a few friends with birthdays this month and one of the cards I made was inspired by PPA’s color challenge of Baja Breeze, Not Quite Navy and Very Vanilla.  Beautiful colors!  For the Birthday stamped image here’s a sneak peak of the Elementary Elegance stamp set in the Sale-a-bration catalog.  Sale-a-bration begins later this month on January 24 through March 31.  During this event you earn free products from the catalog with every $50 purchase.  How cool is that!

The Birthday frame is heat embossed with pewter embossing powder.  The sentiment is stamped in Not Quite Navy and clear embossed.  I used the Elegant Lines embossing folder for the background and butterflies die cut with the Beautiful Wings Embosslits.

Stampin Up Elementary Elegance Birthday Card
click image to enlarge

Pals Paper Arts color challengeI’ll be posting the other birthday cards I created in the next few days.  So stay tuned.

All Stampin’ Up! supplies below may be ordered from my website or email me to place your order.

All products are Stampin’ Up! unless noted.

Elementary Elegance Birthday Card

Size:  5.00″ h x 5.00″ w

Stamp sets: Elementary Elegance

Paper: Card Stock:  Very Vanilla, Not Quite Navy, Baja Breeze textured

Ink: Not Quite Navy, Versamark

Accessories: Big Shot, Elegant Lines Embossing Folder, Beautiful Wings Embosslits, Curly Label punch, Eyelet Border punch, Basic Pearls, 1/4″ Very Vanilla grosgrain ribbon, Pewter Embossing Powder, Clear Embossing Powder, Baja Breeze Marker

A Mojo Monday Round Birthday Card

Sneak Peek Alert!  I created this card using the Mojo Monday sketch 221 and I got to use my new Sale-a-bration Everyday Enchantment DSP!  I’m so excited!  This paper is beautiful.  A pack of this gorgeous DSP is one of the items you’ll be able to get FREE with every $50 you purchase, starting on January 24, 2012.  I also used the  Lucky Limeade ruffle ribbon.  So pretty!

All Stampin’ Up! supplies below may be ordered from my website or email me to place your order.

All products are Stampin’ Up! unless noted.

Scallop Round Birthday Card

Approx. Size:  4.25”  h x 4.25” w

Stamp sets: Curly Cute

Paper: Card Stock:  Very Vanilla, Pool Party, Poppy Parade; DSP: Everyday Enchantment

Ink: Poppy Parade

Accessories: Big Shot, Scallop Circle die, Circle Scissor Plus, Eyelet Border punch, Bojo Punch, Doily Triple Layer Punch, 3/16″ metallic brads, Basic Pearls, Antique Brad, Bird Punch

HSS Inspiration Challenge

This week on HSS we have an Inspiration Challenge.  Cupcakes!  I’ve been wanting to make this cupcake box and this was the perfect time to do it.  I have a couple of gifts to make so these were perfect.  I got the tutorial for the box from Becky Roberts.

The actual cupcake box is made with the retired Table Setting die.  The instructions for making the box can be found on Patty Bennett’s blog.  So much fun to make!

Hop on over to HSS and be inspired by our talented design team and join us!

All Stampin’ Up! supplies below may be ordered from my website or email me to place your order.

All products are Stampin’ Up! unless noted.

Cupcake box

Box Size:  3.00”  h x 3.25” w x 3.00″ d

Cupcake:  approx. 2.25″ h x 3.00″ diameter

Stamp sets: Curly Cute

Paper: Card Stock:  Very Vanilla, Bashful Blue

Ink: Real Red

Accessories:Big Shot, non- Stampin’ Up! Sizzix Texturz Starter kit Polka Daisies for lid of box, retired Perfect Setting die, retired Early Espresso Grosgrain striped ribbon, Very Vanilla Ribbon, Bashful Blue satin ribbon, Bright Button collection, 8 mm pearl, non- Stampin’ Up! cupcake insert.

Pretty Christmas tag

I love the Perfect Pennant die!  It’s so versatile!  You can make pennants, decorative tags or cards.  I made this tag for PPA’s Tag your it Challenge.  I die cut some shimmer silver paper and embossed it with the Snowburst embossing folder.  I had some retired music DSP from the Love Letter DSP pack and made a fan fold flower.  I cut a 1-1/2 strip of DSP then used the Scallop Trim Border punch on one side.  I scored every 1/4″  and using the Simply Scored Scoring Tool really makes it fast and easy.

To add some sparkle I used Dazzling Details on the fan fold flower.  The silver glimmer snowflake is die cut using the Northern Frost Sizzix strip and decorated with an 8mm pearl.  The pearls are a sneak peek from the upcoming mini occasions catalog.  To hang the pennant or tie to a gift I used Very Vanilla satin ribbon.  Easy to make and so elegant.

Stampin' Up! christmas tag and ornament

click to enlarge

All Stampin’ Up! supplies below may be ordered from my website or email me to place your order.

All products are Stampin’ Up! unless noted.

Snowflake tag

Size:  4.50”  h x 3.50” w

Stamp sets: Four the Holidays

Paper: Card Stock:  Very Vanilla, retired Love Letter DSP, Silver Glimmer paper, Silver Shimmer paper

Ink: Versamark

Accessories: Big Shot, Snow Burst Embossing Folder, Northern Frost Strip, Scallop Trim Border Punch, Simply Scored, Pewter embossing powder, 8mm pearls, Dazzling Details, non-Stampin’ Up! vanilla organza ribbon

Rocking Christmas Card

This week at Hand Stamped Sentiments we have a fun challenge – Fancy Fold Cards.   With only few more days left till Christmas I decided to make another Christmas card but with a rocking twist.  I had seen this type of card out in internet land and decided to make a rocking Christmas card.  You can view a tutorial for making this card here.  They’re so easy to create!  I cut an Early Espresso 5″ circle and a 4-1/2″ Soft Suede circle with my Circle Scissor Plus then folded them in half and glued them together.

Stampin Up Rocking Christmas Card front

click image to enlarge - front

Stampin Up Rocking Christmas Card back

click to enlarge - back

The Scallop Circle Cherry Cobbler layer is embossed with the Snow Burst embossing folder and heat embossed with Iridescent Ice embossing powder.  I used the Scallop Circle and Scallop Circle #2 dies to cut the Cherry Cobbler Scallop Circle and the Lucky Limeade Scallop Circle.  The Gift image is stamped on watercolor paper with brown StayzOn and colored with ink pads and a blender pen.  I used the Circle Scissor Plus to cut out this layer at 2-3/4″ .  To add some more sparkle I framed it with Champagne Glass glitter.  I added an Old Olive button and stamped ‘Merry Christmas’ in Early Espresso on Very Vanilla.

For the back of the card I stamped the bird and ornament image on water color paper then punched with the ornament punch.  I also used ink pads and a blender pen to color.  I stamped snowflakes and heat embossed them in gold along with the sentiment.

Hop on over to HSS for more inspiration from out very talented Design Team.

All Stampin’ Up! supplies below may be ordered from my website or email me to place your order.

All products are Stampin’ Up! unless noted.

Rocking Christmas Card

Size:  5.00”  w x 5.00” H

Stamp sets: Forest Festivities, Short and Sweet

Paper: Card Stock:  Early Espresso, Soft Suede, Cherry Cobbler, Lucky Limeade, Very Vanilla, Watercolor paper

Ink: Versamark, Early Espresso, Soft Suede, Cherry Cobbler, Lucky Limeade, Brown StayzOn

Accessories: Big Shot, Snow Burst Embossing Folder, Scallop Circle die, Scallop Circles die #2, Ornament punch, Modern Label Punch, Word Punch, Bright Designer Button Old Olive, Twine, Retired silver tinsel, Dazzling Details, Champagne Glass Glitter

An Old Fashioned Vintage Christmas Card

This week at Hand Stamped Stamped Sentiments we have a theme challenge.  Create any paper craft project with an old fashion Christmas theme.  Looking through my stash I found some gold heart doilies and since recently I received the Hearts Collection Framelits Dies I was inspired!  Perfect combo!

I used one of my favorite Christmas vintage stamp sets, Bells and Boughs.  I stamped the poinsettia image on Very Vanilla with Versamark and heat embossed it in gold.  I then die cut it using the heart die.  It was so easy!  The image is colored with a blender pen and ink pads and sponged with Soft Suede.  I cut holly leaves in Always Artichoke and Old Olive using the Large Oval punch and 3/4″ circle punch to cut the sides.  I used a stylus to score the leaf veins.

The berries are cut from Red Glimmer paper with the 1/2″ circle punch.  So sparkly!  I love this paper.  I definitely need to get some more for Valentine’s.   The small circles at the corners and on the sentiments were cut with the Owl Builder punch.

I hope you’re inspired to join us this week at Hand Stamped Sentiments.

HSS Old Fashion Theme Challenge

All Stampin’ Up! supplies below may be ordered from my website or email me to place your order.

All products are Stampin’ Up! unless noted.

Vintage Christmas Card

Size:  5.50”  w x 4.25” H

Stamp sets: Bells and Boughs, Comfort and Joy

Paper: Card Base:  Very Vanilla; Card Stock:  Always Artichoke, Old Olive, Soft Suede, Red Glimmer paper

Ink: Versamark, Cherry Cobbler, Old Olive, Soft Suede

Accessories: Big Shot, Hearts Collection Framelits die, Decorative Label Punch, Large Oval Punch, 1/2″ circle punch, Owl Builder Punch, Ticket Corner Punch, Pinking Hearts Border punch, Olive Olive Satin Ribbon, Basic Pearls, non- Stampin’ Up! gold doily

Last minute 30 Christmas cards with Letters to Santa DSP

Oh my!  I need to send out my Christmas cards.  Here I’ve been helping everyone else complete theirs and I haven’t done mine.  I needed to make 30 Christmas cards fast!  I happened to have the Letters to Santa DSP and the Merry & Type stamp set so I set out to make 30 cards from half of the Letters to Santa DSP package.  We’ll here they are!  I primarily used the Merry & Type stamp set but I did also use the Tiny Tags and Tags Til Christmas sets.  I provide PDF instructions to show you how to cut the paper and card recipes for all 30 cards.  Below is a list of products used.

Merry & Bright Christmas Cards PDF Instructions - $5.95

All Stampin’ Up! supplies below may be ordered from my website or email me to place your order.

All products are Stampin’ Up! unless noted.

Merry and Type Christmas Cards

Size:  5.50”  H x 4.25” W

Stamp sets:  Merry and Type, Tags Til Christmas, Tiny Tags

Paper:  Card Stock:   Riding Hood Red, Whisper White, Early Espresso, Old Olive, Blushing Bride, Marina Mist; DSP:  Letter to Santa

Ink: Versamark, Riding Hood Red, Old Olive, Early Espresso, Marina Mist

Accessories:  Big Shot, Stocking Accents Die, Perfect Pennants Die, Stripes Embossing Folder, 1-1/4 square punch, Scallop Square punch, Ornament punch, Doily Triple Layer punch, Scallop Oval punch, Postage Stamp punch, Owl Builder punch, Ticket Corner punch, Corner Rounder punch, Jewelry Tag punch, Scallop Trim Corner punch, Scallop Trim Border punch, Scallop Edge Border punch, Eyelet border punch, Large Lace Ribbon Border punch, Dotted Scallop Ribbon Border punch, Antique brads, Champagne Glass Glitter, Dazzling Details, Iridescent Ice Stampin’ Emboss Powder, Gold Embossing Powder

Merry and Type Christmas Card

This week at Hand Stamped Sentiments we have a color challenge.  Create any project with the colors of  Blushing Bride, Pool Party, Pear Pizzazz and Real Red.  Since I’ve been  in the groove making Christmas cards with the Merry and Type stamp set and coordinating DSP I created a Christmas card with these non-traditional colors.

Merry and Type Christmas Card

click to enlarge

Do you recognize the Whisper White square shape?  It’s the Top Note Die.  I die cut the shape as you would normally then I turned the cut Top Note 90 degrees and centered it then ran it through the Big Shot again.  Very easy!

The ornament image is  stamped with Versamark and Real Red then heat embossed with Iridescent Embossing powder.  To color the ornaments I used a blender pen and ink pads.

To add some additional sparkle I embellished with light pink rhinestones.  I used a light colored pink  Sharpie to color them.

The sentiment is stamped with Pool Party and Versamark.  I then heat embossed it with Iridescent Embossing Powder to add some sparkle.  I used the the Decorative Label to punch it out then layered it over Real Red satin ribbon.

I hope you’re inspired to create a project with these colors.  Hop on over to HSS to be inspired by our talented design team.

Hand Stamped Sentiments Color challenge 96 - Blushing Bride, Pool Party, Pear Pizzazz, Real REd

All Stampin’ Up! supplies below may be ordered from my website or email me to place your order.

All products are Stampin’ Up! unless noted.

Merry and Type Christmas Card

Size:  5.50”  H x 4.25” W

Stamp sets: Merry and Type

Paper: Card Base:  Whisper White; Card Stock:  Pool Party, Blushing Bride; DSP retired Pear Pizzazz from Sale-a-bration 2010

Ink: Versamark, Pear Pizzazz, Pool Party, Real Red, Blushing Bride

Accessories: Big Shot, Top Note die, Decorative Label punch, Basic Rhinestones, Real Red Satin Ribbon, Iridescent Embossing Powder, Blender Pens

Winter Wonderland Snowflake Wreath

This week at Hand Stamped Sentiments we have a Winter Wonderland inspiration challenge.  When I saw the inspiration photo it made me think immediately of snowflakes so I created this snowflake wreath card.

I’ve been stuck on wreath cards because of the simplicity and elegance.  I used my Northern Frost Snowflake strip and Snow burst embossing folder along with silver glimmer paper for the snowflake theme. The sentiment is stamped with Island Indigo and heat embossed with Iridescent Embossing powder.

Snowflake wreath card

click to enlarge

Let’s see what inspires you in the photo below.  Go to HSS for more inspiration from our talented design team.

Wnter Wonderland Inspiration photo

All Stampin’ Up! supplies below may be ordered from my website or email me to place your order.

All products are Stampin’ Up! unless noted.

Snowflake Wreath Card

Size:  5.00”  H x 5.00” W

Stamp sets: Four the Holidays

Paper: Card Base:  Shimmer White; Card Stock:  Shimmer White; Silver Glimmer Paper

Ink: Island Indigo, Versamark

Accessories: Big Shot, Snow Burst Embossing Folder, Northern Frost strip, 1-1/4″ square punch, basic rhinestones, White Satin Ribbon, Rhinestone brad