• my photo

    Click photo for About Me

  • Enter your email address to subscribe to this blog and receive notifications of new posts by email.

    Join 1,203 other subscribers
  • Pinterest

    Follow Me on Pinterest
  • Amazing Deals

    Click image for Amazing Deals!

  • Share this blog

    Bookmark and Share
  • Archives

  • Categories

  • Recent Posts

  • Blog Stats

    • 411,357 hits
  • Meta

  • Disclaimer

    All content found at Stampin' by Genny is the sole responsibility of Genevieve Valdes, a Stampin’ Up! Independent Demonstrator. Stampin’ Up! does not endorse, edit, or otherwise contribute to this website.

Masculine Bookmark

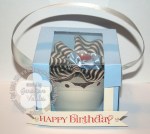
This week’s challenge at Hand Stamped Sentiments we have a masculine inspiration challenge.  Masculine projects are a challenge for me but my husband gave me a great idea!  He suggested I make bookmark for him.  I immediately thought My Digital Studio.  I haven’t played on it in awhile and this was the perfect opportunity.  I started with the First Edition digital DSP.  The edges look sponged because I used background #1 of the Vintage Overlays digital DSP.  There’s a great tutorial for this technique on www.mydigitalstudio.net.  The images are from digital stamp The Open Seas.  I used Cherry Cobbler and Not Quite Navy. I used two pieces of chipboard and covered each side with the  digital background.  Before I glued them together I put the Antique brads through.  EASY PROJECT!

Open Seas bookmark

click image to enlarge

I hope you join us this week for our masculine inspiration challenge.  For more inspiration visit HHS to see all the wonderful projects from our talented design team.

HHS masculine stampin up inspiration photo

All Stampin’ Up! supplies below may be ordered from my website or email me to place your order.

All products are Stampin’ Up! unless noted.

Masculine bookmark

Card Size:  1.50″ W x 5.50″ H

Digital Stamp sets:  The Open Seas, font:  French Script for initials

Paper: digital DSP First Edition, non Stampin’ Up! Matte photo paper

Inkjet:  Cherry Cobbler, Not Quite Navy

Accessories:  Antique Brads, retired Early Espresso 1-1/4 striped ribbon

Vintage Wedding Card

Something borrowed, something blue.  Springtime is the perfect time for a wedding.  For this week’s challenge at Hand Stamped Sentiments we have a wedding project challenge.  My card was inspired by the stamp set Established Elegance.  I selected for my blue shade – Pool Party.  Love, love, love this color!  I paired it with Certainly Celery for a fresh spring feel.  To add to the vintage style, after stamping the images I sprayed the scallop circle and Pool Party layers with water then crumpled them.  I also used my Color Spritzer to lightly spray the frame and sentiment layer with Early Espresso.

Established Elegance Vintage wedding card

click to enlarge

I have included a close up of the card below.  I used non-Stampin’ Up! white tulle around the bust form.  I added the pearls for an elegant touch.

Established Elegance Stampin' Up! vintage card

click image to enlarge

I hope you’re inspired to show us your wedding project.  Hop on over to Hand Stamped Sentiments to be inspired by our talented design team and to upload your creation.

hss wedding challenge #117

All Stampin’ Up! supplies below may be ordered from my website or email me to place your order.  If you have any questions about any card featured on my blog please email  me.

All products are Stampin’ Up! unless noted.

Established Elegance Vintage Wedding Card

Card Size:  5.00″ H x 5.00″ W

Stamp sets:  Established Elegance, Always

Paper: Whisper White, Pool Party

Ink: Pool Party, Certainly Celery, Soft Suede

Accessories: Big Shot, Scallop Circle die, Designer Frames Textured Impressions Embossing Folders, Vintage Wallpaper Textured Impressions Embossing Folder, Beautiful Wings Embosslits die, Large Oval Punch, Scallop Oval Punch, Bitty Shapes Punch Pack,  Certainly Celery marker, Pool Party marker, Basic Pearls, Antique Brad, Certainly Celery Satin ribbon, Dimensionals

Summer Smooches, Clearance NEWS and RETIRING STAMPS LIST

Summer Smooches Product Offer!  No need to wait until the new Stampin’ Up! catalog begins June 1.  Customers can preorder summer smooch products from the Stampin’ Up! Summer Smooches suite (below), Now through April 30, 2012.  Click here to view the Summer Smooches Catalog.

Here’s are projects I created with the Summer Smooches designer series paper, stamps and Petite Purse die.  See the end of the post for project recipe.

clip_image001

click image to enlarge

clip_image002

click image to enlarge

clip_image003

click image to enlarge

clip_image004

clip_image005

55 NEW PRODUCTS ON THE STAMPIN’ UP! CLEARANCE RACK.  Save up to 60%.  Check out the latest additions to the Stampin’ Up! Clearance Rack!  Punches, albums, Stampin’ Up! Designer Series Paper and so much more!  Clearance rack items can ONLY be placed through an on-line order and are available while supplies last!

RETIRED STAMPS LIST IS HERE!

Here’s the list we’ve all been waiting to see.  These are the Stampin’ Up! rubber stamp sets that will be retiring effective May 31, 2012!

  • Click here to see the  Stampin’ Up! Retired Stamp List (over 300 stamp sets will be retiring)
  • These stamp sets will be available for purchase THRU May 31, 2012!
  • If you plan to order your retiring favorites, be sure to check the Stampin’ Up! Clearance Rack for great deals on punches, albums, designer series paper and more.  Up to 60% off!   50+ new products added to clearance this past week!  Clearance rack items can ONLY be placed through an on-line order and are available while supplies last!
  • Don’t miss your chance to pre-order new products from the Stampin’ Up! Summer Smooches Collection.  Ends April 30.

MARK YOUR CALENDARS!  The Retired Accessories/Décor Elements Lists will be released on April 25, 2012.  Retiring accessories and Stampin’ Up! Décor Elements (this line is being discontinued) will only be available while supplies lastBE SURE TO ORDER EARLY!

PLEASE NOTE that the Stampin’ Up! 2012-2013 Annual Catalog will be released June 1, 2012, a month earlier than in the past.  The good news is that with so many stamp sets retiring, the new catalog will be loaded with new products!


Thanks so Much Gift Set

Card Size:  3.00 W x 3.00 H

Purse Size:  approx.  2.5 W x 2.00 H

Stamp sets:  Bright Blossoms

Paper: Card Stock:  Tempting Turquoise, Whisper White, Real Red; Summer Smooches DSP

Ink:  Stampin’ Up! markers – Tempting Turquoise, Rich Razzleberry, Lucky Limeade 

Accessories:  Big Shote, Petitie Purse Die, Dotted Scallop Ribbon Border, Itty Bitty Shapes Punch Pack, 1/4” Daffodil Delight Grosgrain ribbon, Bitty Buttons, white twine

Everybunny Easter Treat

I’m so excited that spring is almost here!  In anticipation  I created this adorable pillow box and card  for Hand Stamped Sentiments challenge.  A perfect treat to put in an Easter basket or to give just as is.  The challenge this week is a color challenge.  Create any paper crafting project with the colors of Real Red, Soft Suede, Crumb Cake and Daffodil Delight.

I used the new Easter stamp set, Everybunny, featured in the 2011-2012 Idea Book & Catalog.  This set has so many cute stamps perfect for Easter.  I made the box using the Pillow Box die.  I stamped the hot air balloon image on Crumb Cake with Soft Suede and Versamark then heat embossed it with clear embossing powder.  I used a blender pen to add color to the bunny and the balloon.  I then cut out the image and for a finishing touch I used Dazzling Details on the balloon.  I punched the flowers with the Itty Bitty Shapes Punch Pack then embellished with rhinestones.  I stamped the sentiment on Daffodil Delight and tied hemp twine around the box.  The 3″ x 3″ card was so easy to make.  I embossed the Daffodil Delight layer with the Perfect Polka Dots embossing folder.  The chick image I stamped then clear embossed and punched with the 1-3/8″ circle.  The flower layer is punched with the Fancy Flower punch.

Everybunny pillow box and card

click image to enlarge

I hope you’re inspired to join us over at Hand Stamped Sentiments.  We’d love to see your creation.

HSS color challenge - Real Red, Soft Suede, Crumb Cake, Daffodil Delight

click image to enlarge

All Stampin’ Up! supplies below may be ordered from my website or email me to place your order.

All products are Stampin’ Up! unless noted.

Everybunny Pillow Box and Card

Box Size:   3.75″ w x 2.25″ h

Card Size:  3″ x 3″

Stamp sets: Everybunny

Paper: Card Stock:  Crumb Cake, Soft Suede, Real Red, Daffodil Delight

Ink: Real Red, Soft Suede

Accessories: Pillow Box Die, Itty Bitty Shapes Punch Pack, 1-3/8 circle punch, Fancy Flower punch, Corner Rounder punch, Perfect Polka Dots embossing folder, Hemp Twine, Dazzling Details, Basic Rhinestones

A Valentine gift from the Heart

After weeks of anticipation, it’s finally here–Sale-A-Bration is now in full swing! During Sale-A-Bration 2012, you can earn free products in three different ways.

Stampin' Up! Sale-a-brationStampin' Up! Sale-a-brationStampin' Up! Sale-a-brationTo celebrate  Sale-a-bration I’ve been creating projects with some of the products in the Sale-a-bration catalog.  This week at Hand Stamped Sentiments the challenge is gift items.  With Valentine’s just around the corner I made this heart box using the Everyday Enchantment Designer Series Paper which you can earn with a $50 purchase.

Stampin' Up! heart box

click to enlarge

I used the Heart Framelits to create the box and I embellished it it with quill roses and butterflies die cut from the Beautiful Wi Sizzlit.  To make this box I adapted the tutorial from SCS.  I love the colors in the Everyday Enchantment DngsSP – Poppy Parade, Calypso Coral, Pool Party, Lucky Limeade, Very Vanilla and Soft Suede.  These colors are so pretty together.

Stampin' Up! heart box

click to enlarge

I added some extra sparkle to the roses with Dazzling Details and embellished with basic pearls.  The sentiment and the heart on the sentiment are embossed with Iridescent Ice embossing powder. To make this a sweet gift I filled the box with Hershey’s kisses.

Stampin' Up! Heart box

click to enlarge

I hope you’re inspired to join us at HHS for this week’s challenge of gift items.  Click here to see more inspiration from our very talented design team.

All Stampin’ Up! supplies below may be ordered from my website or email me to place your order.

All products are Stampin’ Up! unless noted.

Valentine Heart Box

Size:  approx. 5.00″ h x 5.50″ w

Stamp sets: Delightful Dozen, Four Frames

Paper: Card Stock:  Very Vanilla, Pool Party, Lucky Limeade, Calypso Coral, Poppy Parade, Everyday Enchantment DSP

Ink: Poppy Parade, Soft Suede,  Versamark

Accessories: Big Shot, Heart Framelits, Beautiful Wings Sizzlit, Bird Builder Punch, Scallop Circle punch, Decorative label punch, small Heart punch, Basic Pearls, Iridescent Ice embossing powder, Very Vanilla Satin ribbon, non- Stampin’ Up! lace trim

HSS Inspiration Challenge

This week on HSS we have an Inspiration Challenge.  Cupcakes!  I’ve been wanting to make this cupcake box and this was the perfect time to do it.  I have a couple of gifts to make so these were perfect.  I got the tutorial for the box from Becky Roberts.

The actual cupcake box is made with the retired Table Setting die.  The instructions for making the box can be found on Patty Bennett’s blog.  So much fun to make!

Hop on over to HSS and be inspired by our talented design team and join us!

All Stampin’ Up! supplies below may be ordered from my website or email me to place your order.

All products are Stampin’ Up! unless noted.

Cupcake box

Box Size:  3.00”  h x 3.25” w x 3.00″ d

Cupcake:  approx. 2.25″ h x 3.00″ diameter

Stamp sets: Curly Cute

Paper: Card Stock:  Very Vanilla, Bashful Blue

Ink: Real Red

Accessories:Big Shot, non- Stampin’ Up! Sizzix Texturz Starter kit Polka Daisies for lid of box, retired Perfect Setting die, retired Early Espresso Grosgrain striped ribbon, Very Vanilla Ribbon, Bashful Blue satin ribbon, Bright Button collection, 8 mm pearl, non- Stampin’ Up! cupcake insert.

Pretty Christmas tag

I love the Perfect Pennant die!  It’s so versatile!  You can make pennants, decorative tags or cards.  I made this tag for PPA’s Tag your it Challenge.  I die cut some shimmer silver paper and embossed it with the Snowburst embossing folder.  I had some retired music DSP from the Love Letter DSP pack and made a fan fold flower.  I cut a 1-1/2 strip of DSP then used the Scallop Trim Border punch on one side.  I scored every 1/4″  and using the Simply Scored Scoring Tool really makes it fast and easy.

To add some sparkle I used Dazzling Details on the fan fold flower.  The silver glimmer snowflake is die cut using the Northern Frost Sizzix strip and decorated with an 8mm pearl.  The pearls are a sneak peek from the upcoming mini occasions catalog.  To hang the pennant or tie to a gift I used Very Vanilla satin ribbon.  Easy to make and so elegant.

Stampin' Up! christmas tag and ornament

click to enlarge

All Stampin’ Up! supplies below may be ordered from my website or email me to place your order.

All products are Stampin’ Up! unless noted.

Snowflake tag

Size:  4.50”  h x 3.50” w

Stamp sets: Four the Holidays

Paper: Card Stock:  Very Vanilla, retired Love Letter DSP, Silver Glimmer paper, Silver Shimmer paper

Ink: Versamark

Accessories: Big Shot, Snow Burst Embossing Folder, Northern Frost Strip, Scallop Trim Border Punch, Simply Scored, Pewter embossing powder, 8mm pearls, Dazzling Details, non-Stampin’ Up! vanilla organza ribbon

Stampin’ Up! Vintage Skating Boot Gift Card Holder and Christmas ornament

This week at Hand Stamped Sentiments the challenge is Anything Goes Christmas Ornaments.  I love the Stampin’ Up! Holiday Stocking and Stocking Accents dies.  Inspired by the many stockings and boots I’ve seen created with these dies I made this vintage gift card holder.  I used the Snow burst textured folder for the top of the boot and heat embossed it with Iridescent embossing powder.  For the boot part I cut two Old Olive card stock stockings and two of the green print Paisley Petals DSP.  To show the green print on the back you need to flip the paper so the print you want to show both sides are showing when stacked.  I then adhered the DSP to the stockings then embossed with the Vintage Wallpaper embossing folder and Big Shot.

The blades are die cut from the Silver shimmery paper using the candy canes from the Stocking Accents die.   You need to cut four, two sets facing one side and the other facing opposite for the back side.  Therefore you need to cut two sets with the glimmer paper up and two sets with the glimmer paper down.  Before I adhered both sides of the boot I sandwiched the blades between the sides of the boot and used Tombow adhesive glue.

I then used some lace trim on the boot and adhered both cuffs to the top of the boot (it would look better if it was SU crochet trim but I ran out) .  For the lacing I made four 3/16″ holes with my Crop-a-dile then used Very Vanilla Satin Ribbon to lace up the boot.  The loop at the top is hemp twine through a  1/8″ hole.  I installed an eyelet for this hole.  I didn’t have any 3/16″ eyelets for the lace holes but it would look even better if I did.

An easy project with so many options for colors.

hand stamped sentiments christmas ornament challengeHop on over to HSS for more inspiration from our design team!

All Stampin’ Up! supplies below may be ordered from my website or email me to place your order.

All products are Stampin’ Up! unless noted.

Vintage Skater Boot Gift Card holder and Christmas ornament

Size:  7.25”  H x 5.50” W

Stamp sets: Curly Cute

Paper: Card Base:  Old Olive, Very Vanilla; DSP Paisley Petals, Silver glimmer paper

Ink: Old Olive, Versamark

Accessories: Big Shot, Snow Burst Embossing Folder, Vintage Wallpaper Embossing Folder, Holiday Stocking Die, Stocking Accents die, Very Vanilla Satin Ribbon, hemp twine, Basic Pearls, 1/8″ metal eyelet, Crop-a-dile, non-Stampin’ Up! lace trim

Gratitude Paper Pumpkin

This week at Hand Stamped Sentiments we have an inspiration challenge.  I’ve been wanting to make these 3D paper strip pumpkins and today I did!  It was so easy!  These would make beautiful decorations for your Thanksgiving table.  Another option would be instead of the stamped sentiment you could do place cards.

I cut 14 strips  1 inch by 6 inch, of DSP then sponged the edges with Soft Suede.  I used my Crop-a-dile to make 1/8″ holes on each end of the strips.  If you use the Crop-a-dile you can make a hole all at one time.  What a time saver!  I then used two brads to make the pumpkin.  I die cut the leaves using the Leaves #2 die then I embossed them with the Vintage Wallpaper embossing folder.  I also used Gold Lame Smooch Pearlized Accent ink on the leaves and on the tendrils.  To add more dimension to the leaves I also sponged them with with Soft Suede.  The sentiment is from Day of Gratitude and I used the Decorative Label punch to die cut and frame it.

click image to enlarge

I hope you’re inspired!  We’d love to see your project.

All Stampin’ Up! supplies below may be ordered from my website or email me to place your order.

All products are Stampin’ Up! unless noted.

3D Pumpkin

Size:  3.00”  H x 5.00” W

Stamp sets: Day of Gratitude

Paper: Card Stock:  Early Espresso, DSP:  Paisley Petals

Ink: Soft Suede, Early Espress, Gold Lame Smooch Pearlized Accent ink

Accessories: Big Shot, Vintage Wallpaper Embossing Folder, Leaves #2 die, Decorative Label Punch, Old Olive Brights Designer Buttons, Hemp Twine

Elegant Wedding Card

This week I was inspired to use a stamp set that I purchased but haven’t used. It’s the new Delicate Doilies stamp set featured in the Idea Book and Catalog. I love the versatility of this stamp set.  You can use this stamp set for almost any occasion.  This week at Hand Stamped Sentiments we have a Clean and Simple Challenge.  I created a card for a wedding.  I inked my doily stamp with Versamark and Basic Black ink then embossed it with Iridescent Embossing Powder then added Basic Rhinestones.  I also embossed the sentiment with Iridescent Embossing powder and added a small rhinestone to the ring.  So easy!  Click on the card image to see more details.

click image to enlarge

I hope you’re inspired to join us at Hand Stamped Sentiments and upload your clean and simple project.

All Stampin’ Up! supplies below may be ordered from my website or email me to place your order.

All products are Stampin’ Up! unless noted.

Happy I Do Day Card

Size:  5.50” H x 4.25” W

Stamp sets: Delicate Doilies, Word Play

Paper: Card base:  Whisper White

Ink: Basic Black, Versamark

Accessories: 5/8″ Black Satin Ribbon, 2-1/2 Circle punch, 3/16″ Corner Rounder punch, Basic Rhinestones, Iridescent Embossing powder, Heat Tool, Dimensionals