• my photo

    Click photo for About Me

  • Enter your email address to subscribe to this blog and receive notifications of new posts by email.

    Join 1,195 other subscribers
  • Pinterest

    Follow Me on Pinterest
  • Amazing Deals

    Click image for Amazing Deals!

  • Share this blog

    Bookmark and Share
  • Archives

  • Categories

  • Recent Posts

  • Blog Stats

    • 423,222 hits
  • Meta

  • Disclaimer

    All content found at Stampin' by Genny is the sole responsibility of Genevieve Valdes, a Stampin’ Up! Independent Demonstrator. Stampin’ Up! does not endorse, edit, or otherwise contribute to this website.

Mixed bunch party favor box

Due to some technical difficulties I was not able to post last week when I got home from convention.  But her I am.  It’s been a busy week trying to get caught up.  This week at Hand Stamped Sentiments we have a challenge for party favor boxes.  I had not used the Fancy Favor box in awhile so with summer in full swing here’s a favor for any summer party.

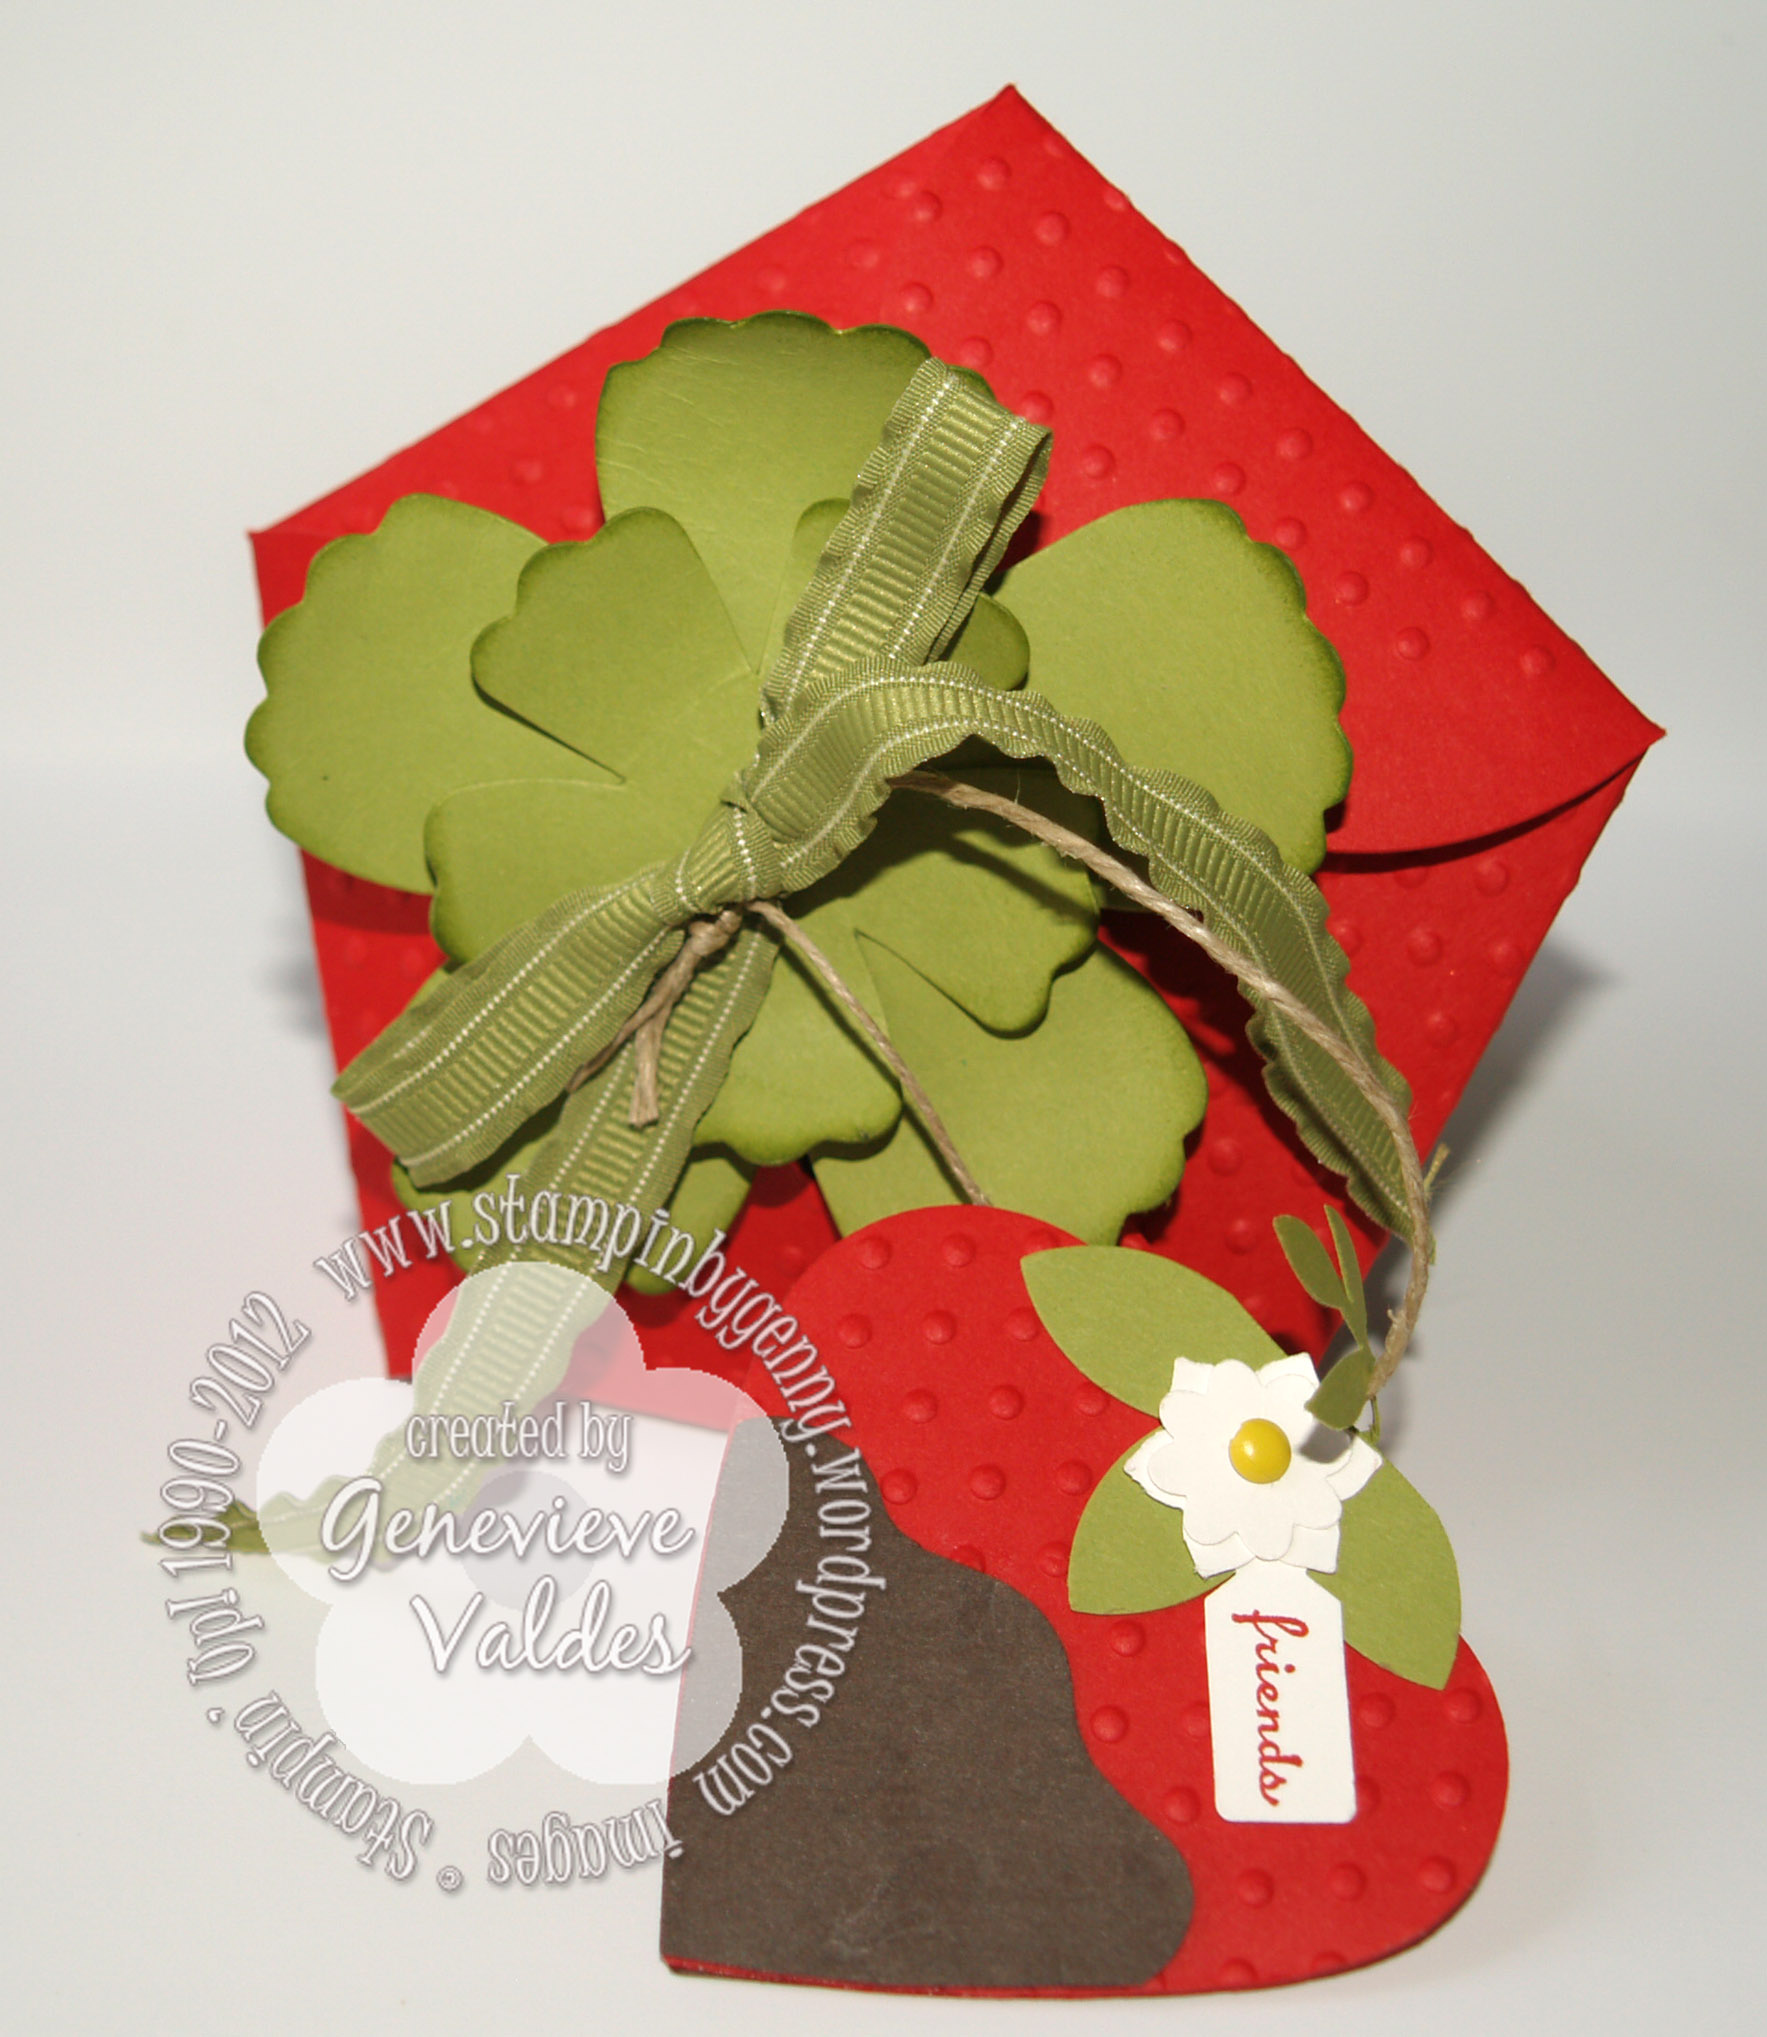
The box is die cut from Cherry Cobbler, the flower image is from the Mixed Bunch set and is stamped on Whisper White with Daffodil Yellow ink then die cut with the Blossom punch.  The center image is also from the Mixed Bunch set and is stamped in Cherry Cobbler ink.  For added sparkle I used Cherry Cobbler Dazzling Details for the center.  The handle was die cut with the Oval Punch then tied with Daffodil Seam binding ribbon.  So simple but this favor would look great on a white plate filled with chocolates.

party favor box

click image to enlarge

I hope you’re inspired to join us at HSS and wow us with your favorite party favor.  Also take a look at the other projects from our talented design team.

All Stampin’ Up! supplies below may be ordered from my website or email me to place your order.

All products are Stampin’ Up! unless noted.

Fancy Box Party Favor

Approx. Size:  3.00″ W x 3.50″ H

Stamp sets:  Mixed Bunch

Paper: Card Stock:  Cherry Cobbler, Whisper White

Ink:   Daffodil Yellow, Cherry Cobbler

Accessories:  Fancy Favor Box die, Big Shot, Blossom Punch, 1″ circle punch, Cobbler Dazzling Details, Daffodil Yellow Seam Binding ribbon, Dimensionals

Last day of Stampin’ Up! Convention 2012

Today was the last day of convention.  Although I was tired I still did not want it to end.  So many great classes and so much fun!  It was hard to say goodbye but that’s okay because there’s next year.  Stampin’ Up!’s next convention dates are July 18 – 20, 2013.  Make plans to attend.  It’s sure to be a fantastic one.  Stampin’ Up!  will be celebrating 25 years in business.

It was also announced by the Richtar where the next destination for the Incentive Great Vacation.  Who’s the Richtar you ask will here’s a picture of him.  Richtar knows all and sees all.  For him to answer your question you have to insert a stamp.   Next Incentive Vacation is a – Western Caribbean Cruise.  It looks awesome.  I’m sure going to make it a goal to win it!

the Great Richtar, aka Rich Jutkins, President of Stampin’ Up!

pay him in stamps and he’ll tell you what you want to know – Like where is the next great vacation

The last session before it was all-over was so fun because we viewed more stamping projects demonstrated by Sara Douglass and Carrie Cudney.

The projects presented by Sara were all about creating gifts with jars.  Such cute projects.

Carrie Cudney revealed she plays the bagpipes.  She came out with her brother playing.

Her presentation focused on flowers.  She demonstrated making all kinds of flowers featured in the new Idea and Catalog book.

The two step stamp set Stippled Blossoms was used to create this image.

She also demoed how to make these giant flowers with 12″ x 12″ paper.

Another fun activity  is PRIZE PATROL!  This is where they flash the color of your entry wrist-band on the screen and if it’s your color then you get a prize.  Today Erica and Shannon won!  However, we were all winners because of the great classes and because we all received 3 additional stamp sets.  We all received the Ronald McDonald stamp set Moving Forward, the I am stamp set commemorating convention and hostess set Mixed Medley.  So cool!  There were also other stamp sets and accessories given away.  Too many to mention.  That’s all I have for now but I will be posting more pictures of convention when I get home.  Here’s the link to the official convention video.  I can’t get the song out of my head.

So start making plans to attend next year – July 18 – 20, 2013.

Day 3 of Stampin’ Up! Convention 2012…I am so Wow’d

Hello!  I am so tired but I want to post some additional pictures from last night’s award.  Here I am with Erica Cerwin (Artisan Award Winner) and Erin Gonzales.

Erin Gonzales, Erica Cerwin, me

Below is a photo of fellow Hand Stamped Sentiment design team members.

Erin Gonzales, Shannon Eberhardt, Mindy Bingamon (Artisan Award finalist), Erica Cerwin (Artisan Winner)

Silly Erin!!!!

Erin is a CRAZY SILLY!  She’s constantly dancing, cracking jokes and making us all laugh until we have tears in our eyes and our cheeks hurt.  Everyday she’s like this.  We need to keep her away from sugar and Raisinettes.

Below is a picture of us at the morning general session.  Don’t we all look chipper!  I think it’s the caffeine kicking in.  We go to bed way too late every night.

Below are some pictures of amazing projects on display.  Way too many to post but here are some highlights.

Here are Erica’s winning projects.

Mindy’s finalist projects.

More fabulous projects.

Project featured in yesterday’s session with Dawn Griffith. So cute and you can make these in any color!

These are some of today’s very cool Halloween projects demonstrated by Shannon West.  Here’s how she presented her projects.  In costume!!

Here are some of the projects she showed us.

I hope you can see them. These were taken with my iPhone so they may be fuzzy.

The candle was rolled onto a background stamp! How cool is that? Don’t you just love the leaves?!

I  have got to get some sleep.  So off to dreamland I go.

Thanks for stopping by!

Day 2 of convention

My day 2 of convention started with a wonderful speaker, Jason Dorsey.  He talked about how to better market our business to Generation Y.  So interesting and informational.  He explained how to better understand and communicate with Gen Y.

After this session Erin, Erica, Shannon and me went to Momento Mall.  So many cool displays.  I spent more than what I wanted.  I hope my hubby doesn’t see this…LOL

After Momento Mall I attended another session for how to create some great projects in a very savvy way.  I was not able to photograph them today  but I promise to tomorrow.

After our session on MDS2  ( it will be released on August 1 and will have some many cool features) we went home to get ready for Award’s Night.  Here are a few pics of the stage area.  I’ll have some pics of Mindy and Erica in their finest tomorrow.  We were so happy for them.

It’s time for me to go to bed.  I’ll have more pics tomorrow.  Until then.

Salt Lake City…here I am ready to stamp

I just got in at 9 PM mountain time to Salt Lake City, home of Stampin’ Up!  I’m here to attend the I am 2012 Convention.  I’m so excited!  Erin, Shannon and Erica picked me up at the airport and we were off to the grocery store to pick up some breakfast foods.  We then drove to the house we rented.  Erin is so savvy.  She researched and rented the house for us.  She saved us a ton of money and I so appreciate it.  She’s a great upline.

Now that we’re all settled we’re sitting in the living room with our laptops clicking away posting to our blogs.  I’m really happy to announce that Erica Cerwin of Pink Buckaroo received an Artisan Award.  We’re so proud!

I don’t have much to post about since I just got here but I’ll post more about my day on Thursday.

Dare to Dream with Dazzling Diamond Dust

I’m so excited!  Convention is almost here!  I’ll be flying out on Wednesday and meeting up with my upline, downline and some of the HSS design team.  We’re going to have a blast!!  I’m hoping there’s WIFI so I can update you on all the great projects and activities.  This is my first convention and I’m so excited to finally be going.  I look forward to meeting you, my Stampin’ Friends.   So if you see me please say hi.

Now back to the project I want to share with you.  This week at Hand Stamped Sentiments we have a technique challenge.  I had never done the Dazzling Diamond Dust technique before and it was so fun and easy!  Here’s a link to a  tutorial on SCS.   Click to enlarge the photo so you can see how the flower image shimmers.

Stampin' Up! Dazzling Diamond Dust Bordering Romance stamp set

click image to enlarge

I used the flower image from Bordering on Romance stamp set.  I stamped it with black StayzOn on Very Vanilla card stock then used my blender pens and Primrose Petals and Gumball Green ink pads to color the image.  I then embossed it with the oval from the  Set Designer Frames Textured Impressions Embossing Folder Die.  I tore around the edges for a distressed look.    I then heat embossed the whole image layer with Iridescent Ice Stampin’ Emboss Powder.  The layers are cut from the Label Framelits.  I used the Vintage Wallpaper Embossing Folder for the background.  The butterflies are die cut using the Beautiful Wings Stampin’ Up! Embosslits Die.  I used the Loving Thoughts stamp set for my sentiment.  I embellished with 5/8 Inch Crochet Trim Victoria ribbon and Antique brad.  I also used Basic Pearls.

Join us this week at Hand Stamped Sentiments and see more projects from our very talented design team.

All Stampin’ Up! supplies below may be ordered from my website or email me to place your order.

All products are Stampin’ Up! unless noted.

Bordering on Romance Dazzling Diamond Dust Card

Size:  4.25″ W x 5.50″ H

Stamp sets:  Bordering on Romance, Loving Thoughts

Paper: Card Stock:  Very Vanilla, Primrose Petals

Ink:   Primrose Petals, Gumball Green, Black StayzOn

Accessories:  Iridescent Ice Stampin’ Emboss Powder, Label Framelits, Set Designer Frames Textured Impressions Embossing Folder Die, Vintage Wallpaper Textured Impressions Embossing Folder Die, Beautiful Wings Stampin’ Up! Embosslits Die, Blender Pens, 5/8 Inch Crochet Trim Victoria ribbon, Antique brad, Basic Pearls

Stampin’ Up! Petal Cone Strawberry box and tag

Juicy red strawberries were my inspiration for this week’s fruit challenge at Hand Stamped Sentiments.  I love shopping the produce section.  Vibrant colors and fruit displayed to show it’s freshness.  Strawberries are in abundance at my grocery store.  The clear boxes filled with juicy strawberries got me to thinking I could make a strawberry out of the Petal Cone die and to make it more decadent I thought chocolate dipped!  Here’s my creation complete with tag.  See below to download the tutorial for how to make this gift set.

This slideshow requires JavaScript.

Click here to download the tutorial complete with photos.

Please join us this week at Hand Stamped Sentiments.  Also take a look at the amazing projects from our talented design team.

All Stampin’ Up! supplies below may be ordered from my website or email me to place your order.

All products are Stampin’ Up! unless noted.

Strawberry box and tag gift set

Box Size:  2.50″ W x 5.00″ H

Tag Size:  2.50″ W x 2.50″ H

Stamp sets:  Tiny Tags

Paper: Real Red, Early Espresso, Lucky Limeade, Whisper White

Ink:  Real Red, Old Olive

Accessories:  Heart Framelits, Big Shot, Fun Flowers Bigz L Die, Petal Cone Bigz L Die, Perfect Polka Dots Embossing Folder, 27″ of Lucky Limeade 3/8″ Ruffled Ribbon, 1/8″ hole punch, Big Bite Crop-a-dile, Sticky Strip, sponge dauber, Hemp Twine, Heart Framelits, Retired 5-Petal Flower Punch (you can substitute with scallop circle punch), Boho Blossoms Punch, Jewelry Tag Punch, Bird Builder Punch (for leaves at top of strawberry), 1/8″ hole punch, 3/16” Daffodil Delight brad

Inspired again by Stampin’ Up’s Idea Book & Catalog – A Frames Framelit Pouch

This week’s challenge at Hand Stamped Sentiments is a color challenge of – Calypso Coral, Daffodil Delight and Baja Breeze.  Gorgeous summer colors!  As I was looking through Stampin’ Up’s new Idea Book & Catalog I saw a treat pouch created with the Label Framelits.

I first cut two framelits using the second to largest framelit.  I then stamped the flourish flower from Mixed Bunch with Versamark and heat embossed it in clear.  Score where shown.

Cut 2 framelits using the second to largest.  Click image to enlarge

Punch both sides of a 1-1/4″ x 3-3/4″ Calypso Coral strip of cardstock with the Scallop Trim Border punch.  Trim the strips and adhere them to the bottom of the pouch.

click image to enlarge

Punch 4 flowers using the Boho Blossom punch and adhere the layers with mini glue dots

click image to enlarge

Adhere the bottoms of the pouch with sticky tape.

Stamp the flower with Daffodil Delight and punch using the Blossoms punch.  Stamp the center on Baja Breeze card stock with Versamark then clear heat emboss.  Use dimensionals to adhere the Baja Breeze center to the flower.

Stamp the sentiment then die cut using the Bitty Banners Framelits.  Adhere the banner behind the center with a mini glue dot.

Embellish Scallop Border Trim edge with pearls.

Punch a hole through both sides of the pouch with a regular hole punch.  Use an 8″ piece of Daffodil Delight seam binding to tie together both sides.

click image to enlarge – Frames Framelit Pouch

I hope you’re inspired to join us this week at Hand Stamped Sentiments.  Also take a look at the amazing projects from our talented design team.

All Stampin’ Up! supplies below may be ordered from my website or email me to place your order.

All products are Stampin’ Up! unless noted.

Inspire Treat Pouch

Size:  3.00″ W x 4.00″ H

Stamp sets:  Bitty Banners, Mixed Bunch, Loving Thoughts

Paper: Calypso Coral, Baja Breeze, Whisper White

Ink:  Daffodil Delight, Calypso Coral, Versamark

Accessories:  Frames Framelits, Bitty Banners framelits, Blossoms punch, Scallop Trim border punch, 1″ circle punch, Daffodil Delight seam binding ribbon, Basic Pearls, Clear embossing powder, Heat Tool, non-Stampin’ Up hole punch